HTML5 Tutorial: Canvas - 2020

HTML 5 defines the <canvas> element as "a resolution-dependent bitmap canvas which can be used for rendering graphs, game graphics, or other visual images on the fly." A canvas is a rectangle in our page where we can use JavaScript to draw anything we want.
For Internet Explorer, we need to include Explorercanvas (excanvas.min.js). It is an open source, Apache-licensed JavaScript library that implements the canvas API in Internet Explorer. To use it, include the following <script> element at the top of our page.
<!DOCTYPE html>
<html>
<head>
  <meta charset="utf-8">
  <title>HTML5</title>
  <!--[if IE]>
    <script src="excanvas.min.js"></script>
<![endif]-->
</head>
<body>
  ...
</body>
</html>
</pre>
The <!--[if IE]> and <![endif]--> bits are conditional comments. Internet Explorer interprets them like an if statement: "if the current browser is any version of Internet Explorer, then execute this block." Every other browser will treat the entire block as an HTML comment. The net result is that Internet Explorer will download the excanvas.js script and execute it, but other browsers will ignore the script altogether (not download it, not execute it, not anything). This makes our page load faster in browsers that implement the canvas API natively.
Let's go back to our topic, "Canvas".
I've just put a canvas (300 x 225 ) right below this text.
Invisible canvas is up there. Can we see it?
Of course, not.
Nothing, really.
A <canvas> element has no content and no border of its own.
The markup used for the invisible canvas above looks like this:
<canvas width="300" height="225"></canvas>
Let's add a border to make it visible.
Here, we needed a Javascript file, excanvas.min.js, which is included in the <head> section of the html file.
We can have several <canvas> elements on the same page. Each canvas will show up in the DOM, and each canvas maintains its own state. If we give each canvas an id attribute, we can access them just like any other element. Let's modify that markup a little bit to include an id attribute:
<canvas id="myCanvasA" width="300" height="225"></canvas>Now we can easily find that <canvas> element in the DOM.
var canvas_element = document.getElementById("myCanvasA");
Let's draw something on the canvas.
The onclick handler called this function which is in <head> section of this html:
function draw_b() {
  var b_canvas = document.getElementById("myCanvasB");
  var b_context = b_canvas.getContext("2d");
  b_context.fillStyle = "#0f0";
  b_context.fillRect(50, 38, 200, 150);
}
The first line of the function finds the <canvas> element in the DOM.
The second line:
function draw_b() {
  var b_canvas = document.getElementById("myCanvasB");
  var b_context = b_canvas.getContext("2d");
  b_context.fillRect(50, 38, 200, 150);
}
Every canvas has a drawing context, which is where all things considered. Once we've found a <canvas> element in the DOM using document.getElementById(), we call its getContext() method. We must pass the string "2d" to the getContext() method.
We have a <canvas> element, and we have its drawing context. The drawing context is where all the drawing methods and properties are defined. There's a whole group of methods devoted to drawing rectangles:
The fillStyle property can be a CSS color, a pattern, or a gradient. The default fillStyle is solid black, but we can set it to whatever we like. Each drawing context remembers its own properties as long as the page is open, unless we do something to reset it. fillRect(x, y, width, height) draws a rectangle filled with the current fill style. The strokeStyle property is like fillStyle - it can be a CSS color, pattern, or gradient. strokeRect(x, y, width, height) draws an rectangle with the current stroke style. strokeRect doesn't fill in the middle; it just draws the edges. clearRect(x, y, width, height) clears the pixels in the specified rectangle.
function draw_b() {
  var b_canvas = document.getElementById("myCanvasB");
  var b_context = b_canvas.getContext("2d");
  b_context.fillRect(50, 38, 200, 150);
}
Calling the fillRect() method draws the rectangle and fills it with the current fill style, which is black until we change it. The rectangle is bounded by its upper-left corner (50, 38), its width (200), and its height (150).
Each canvas has a path. Defining the path is like sketching with a pencil before the real drawing. We can draw whatever we like, but it won't be part of the finished product until we pick up the quill and trace over our path in ink. To draw straight lines in pencil:
- moveTo(x, y) moves the pencil to the starting point.
- lineTo(x, y) draws a line to an ending point.
- Go to step 1.
The more we call moveTo() and lineTo(), the bigger the path gets. These are "pencil" methods - we can call them as often as we like, but we won't see anything on the canvas until we call one of the ink methods.
Nothing has actually been drawn on the canvas yet. We need an "ink" method to make it permanent.
context.strokeStyle = "#eee";
context.stroke();
stroke() is one of the "ink" methods. It takes the complex path we defined with all those moveTo() and lineTo() calls, and it actually draws it on the canvas. The strokeStyle controls the color of the lines.
We can also draw text on a canvas. Unlike text on the surrounding web page, there is no box model. That means none of the familiar CSS layout techniques are available: no floats, no margins, no padding, no word wrapping. We can set a few font attributes, then we pick a point on the canvas and draw our text there. The following font attributes are available on the drawing context:
- font can be anything we would put in a CSS font rule. That includes font style, font variant, font weight, font size, line height, and font family.
- textAlign controls text alignment. It is similar (but not identical) to a CSS text-align rule. Possible values are start, end, left, right, and center.
- textBaseline controls where the text is drawn relative to the starting point. Possible values are top, hanging, middle, alphabetic, ideographic, or bottom.
The markup looks the same as any other canvas.
<canvas id="d" width="300" height="225"></canvas>
First, we need to find the <canvas> element and its drawing context.
var c_canvas = document.getElementById("myCanvasC");
var c_context = c_canvas.getContext("2d");
Once we have the drawing context, we can start to define a gradient. A gradient is a smooth transition between two or more colors. The canvas drawing context supports two types of gradients:
- createLinearGradient(x0, y0, x1, y1) paints along a line from (x0, y0) to (x1, y1).
- createRadialGradient(x0, y0, r0, x1, y1, r1) paints along a cone between two circles. The first three parameters represent the start circle, with origin (x0, y0) and radius r0. The last three parameters represent the end circle, with origin (x1, y1) and radius r1.
Gradients can be any size, but for the picture above, we used 300 pixels wide linear gradient:
var myGradient = c_context.createLinearGradient(0, 0, 300, 0);
Because the y values, the 2nd and 4th parameters, are both 0, this gradient will shade evenly from left to right.
Once we have a gradient object, we can define the gradient's colors. A gradient has two or more color stops. Color stops can be anywhere along the gradient. To add a color stop, we need to specify its position along the gradient. Gradient positions can be anywhere between 0 to 1.
Let's define a gradient that shades from Navy to Aqua.
my_gradient.addColorStop(0, "#000080");
my_gradient.addColorStop(1, "#0ff");
Defining a gradient doesn't draw anything on the canvas. It's just an object tucked away in memory somewhere. To draw a gradient, we set our fillStyle to the gradient and draw a shape, like a rectangle or a line.
context.fillStyle = myGradient;
context.fillRect(0, 0, 300, 225);
If we use different gradient varies both in x and y from top-let to bottom-right direction:
var d_canvas = document.getElementById("myCanvasD");
var d_context = d_canvas.getContext("2d");
var myGradient = d_context.createLinearGradient(0, 0, 300, 255);
myGradient.addColorStop(0, "#0ff");
myGradient.addColorStop(1, "#000080");
d_context.fillStyle = myGradient;
d_context.fillRect(0, 0, 300, 225);
We have this result:
A tiger with an <img> element.

The same tiger on our <canvas> element.
The canvas drawing context defines several methods for drawing an image on a canvas.
- drawImage(image, dx, dy) takes an image and draws it on the canvas. The given coordinates (dx, dy) will be the upper-left corner of the image. Coordinates (0, 0) would draw the image at the upper-left corner of the canvas.
- drawImage(image, dx, dy, dw, dh) takes an image, scales it to a width of dw and a height of dh, and draws it on the canvas at coordinates (dx, dy).
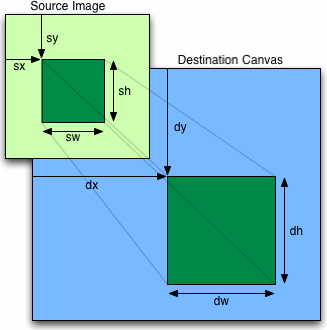
- drawImage(image, sx, sy, sw, sh, dx, dy, dw, dh) takes an image, clips it to the rectangle (sx, sy, sw, sh), scales it to dimensions (dw, dh), and draws it on the canvas at coordinates (dx, dy).
The HTML5 specification on the drawImage() pameters:
The source rectangle is the rectangle [within the source image] whose corners are the four points (sx, sy), (sx+sw, sy), (sx+sw, sy+sh), (sx, sy+sh).
The destination rectangle is the rectangle [within the canvas] whose corners are the four points (dx, dy), (dx+dw, dy), (dx+dw, dy+dh), (dx, dy+dh).
To draw an image on a canvas, we need an image. The image can be an existing <img> element, or we can create an Image() object with JavaScript. Either way, we need to ensure that the image is fully loaded before we can draw it on the canvas. If were using an existing <img> element, we can safely draw it on the canvas during the window.onload event.
- using an <img> element
<img id="tiger" src="http://www.bogotobogo.com/HTML5/images/tiger.jpg" alt="tiger.jpg" width="120" height="120"> <canvas id="tigerCanvas" width="120" height="120"></canvas> <script> window.onload = function() { var canvas = document.getElementById("tigerCanvas"); var context = canvas.getContext("2d"); var tg = document.getElementById("tiger"); context.drawImage(tg, 0, 0); }; </script> -
If we're creating the image object entirely in JavaScript, we can safely draw the image on the canvas during the Image.onload event.
using an Image() object
<canvas id="tigerCanvas" width="120" height="120"></canvas>
<script>
  var canvas = document.getElementById("tigerCanvas");
  var context = canvas.getContext("2d");
  var tg = new Image();
  tg.src = "http://www.bogotobogo.com/HTML5/images/tiger.jpg";
  tg.onload = function() {
    context.drawImage(tg, 0, 0);
  };
</script>
The optional 3rd and 4thparameters to the drawImage() method control image scaling. This is the same image, scaled to half its width and height and drawn repeatedly at different coordinates within a single canvas.
Here is the script that produces the "multitiger":
function draw_tigers() {
  var canvas = document.getElementById("tigersCanvas");
  var context = canvas.getContext("2d");
  var tg = document.getElementById("tiger");
  for(var x = 0, y = 0; x < 240 && y < 240; x += 60, y += 60 {
	context.drawImage(tg, x, y, 60, 60);   <-- scaling
  }
}

window.onload=function(){
  draw_tigers();
}
All this effort raises a legitimate question: why would we want to draw an image on a canvas in the first place? What does the extra complexity of image-on-a-canvas buy us over an <img> element and some CSS rules? Even the "multitiger" could be replicated with 10 overlapping <img> elements.
The simple answer is, for the same reason we might want to draw text on a canvas. The canvas coordinates diagram included text, lines, and shapes; the text-on-a-canvas was just one part of a larger work. A more complex diagram could easily use drawImage() to include icons, sprites, or other graphics.
Ph.D. / Golden Gate Ave, San Francisco / Seoul National Univ / Carnegie Mellon / UC Berkeley / DevOps / Deep Learning / Visualization