Flask with Embedded Machine Learning III : Embedding Classifier

Continued from Flask with Embedded Machine Learning II : Basic Flask App.
In the previous two articles, we have prepared the code to classify movie reviews and construct basic skeleton for Flask web application. In this article, we'll extend the app and embed our movie classifier.
In this section, we'll start implementing our movie classifier into the basic web application we created in the previous article.
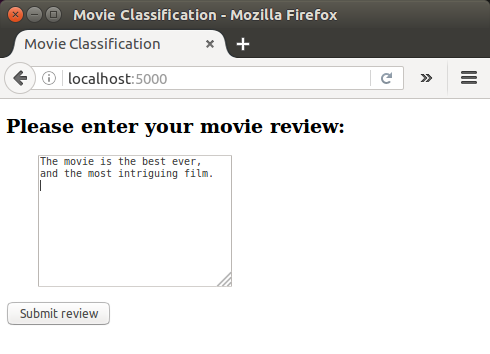
As the first step, we will develop a web application that prompts a user to enter a movie review:
After submitting the review, the user will be presented a new page that shows the predicted class label and the probability of the prediction. The user, then will have an option to provide feedback about this prediction by clicking either on the "Correct" or "Incorrect" button:
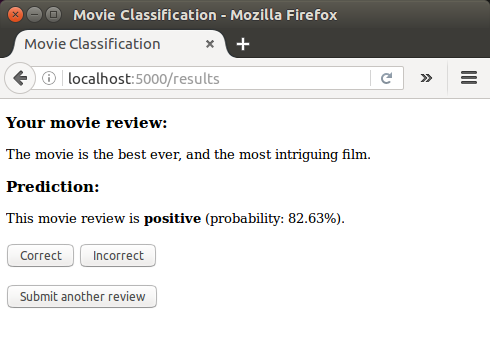
If a user clicked on either the "Correct" or "Incorrect" button, our classification model will be updated with respect to the user's feedback.
Note that we store the movie review text provided by the user into a SQLite database for future reference.
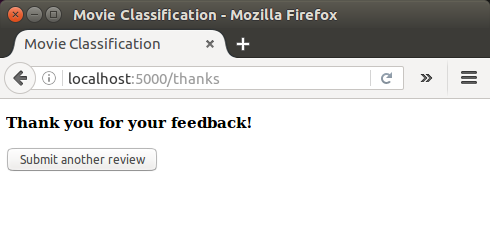
The third page that the user will see after clicking on one of the feedback buttons is a simple thank you screen with a "Submit another review" button that redirects the user back to the start page:
Before we start the code implementation of this web application, we may want to take a look at the live demo at ahaman.com to get a better understanding of what we are trying to accomplish.
Here is the directory tree that we are going to build for this movie classification app:
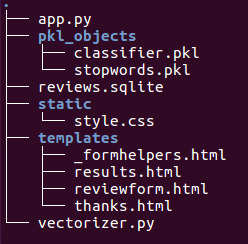
As we can see from the directory tree, we can see the vectorizer.py file, the SQLite database reviews.sqlite, and the pkl_objects subdirectory that we've already created in previous articles.
The app.py file in the main directory contains our Flask code, and we will use the review.sqlite database file to store the movie reviews that are being submitted to our web app.
The templates subdirectory contains the HTML templates that will be rendered by Flask and displayed in the browser, and the static subdirectory will contain a simple CSS file.
In app.py the code implementation to unpickle and set up our classification model:
from flask import Flask, render_template, request
from wtforms import Form, TextAreaField, validators
import pickle
import sqlite3
import os
import numpy as np

# import HashingVectorizer from local dir
from vectorizer import vect

# Preparing the Classifier
cur_dir = os.path.dirname(__file__)
clf = pickle.load(open(os.path.join(cur_dir,
			'pkl_objects/classifier.pkl'), 'rb'))
db = os.path.join(cur_dir, 'reviews.sqlite')

def classify(document):
	label = {0: 'negative', 1: 'positive'}
	X = vect.transform([document])
	y = clf.predict(X)[0]
	proba = np.max(clf.predict_proba(X))
	return label[y], proba

def train(document, y):
	X = vect.transform([document])
	clf.partial_fit(X, [y])

def sqlite_entry(path, document, y):
	conn = sqlite3.connect(path)
	c = conn.cursor()
	c.execute("INSERT INTO review_db (review, sentiment, date)"\
			" VALUES (?, ?, DATETIME('now'))", (document, y))
	conn.commit()
	conn.close()

app = Flask(__name__)

class ReviewForm(Form):
	moviereview = TextAreaField('',
			[validators.DataRequired(), validators.length(min=15)])

@app.route('/')
def index():
	form = ReviewForm(request.form)
	return render_template('reviewform.html', form=form)

@app.route('/results', methods=['POST'])
def results():
	form = ReviewForm(request.form)
	if request.method == 'POST' and form.validate():
		review = request.form['moviereview']
		y, proba = classify(review)
		return render_template('results.html',
	content=review,
	prediction=y,
	probability=round(proba*100, 2))
	return render_template('reviewform.html', form=form)

@app.route('/thanks', methods=['POST'])
def feedback():
	feedback = request.form['feedback_button']
	review = request.form['review']
	prediction = request.form['prediction']
	inv_label = {'negative': 0, 'positive': 1}
	y = inv_label[prediction]
	if feedback == 'Incorrect':
		y = int(not(y))
	train(review, y)
	sqlite_entry(db, review, y)
	return render_template('thanks.html')

if __name__ == '__main__':
	app.run(debug=True)
We imported the HashingVectorizer via vectorizer and unpickled the logistic regression classifier.
Then, we defined a classify() function to return the predicted class label as well as the corresponding probability prediction of a given text document.
The train() function can be used to update the classifier given that a document and a class label are provided.
Using the sqlite_entry() function, we can store a submitted movie review in our SQLite database along with its class label and timestamp for our personal records.
Note that the clf object will be reset to its original, pickled state if we restart the web application. So, we need to learn how to use the data that we collect in the SQLite database to update the classifier permanently.
We defined a ReviewForm class that instantiates a TextAreaField, which will be rendered in the reviewform.html template file. Note that reviewform.html is the landing page of our web app.
This, in turn, is rendered by the index() function. With the validators. length(min=15) parameter, we require the user to enter a review that contains at least 15 characters. Inside the results function, we fetch the contents of the submitted web form and pass it on to our classifier to predict the sentiment of the movie classifier, which will then be displayed in the rendered results.html template.
The feedback() function may look a little bit complicated at first glance. It essentially fetches the predicted class label from the results.html template if a user clicked on the Correct or Incorrect feedback button, and transforms the predicted sentiment back into an integer class label that will be used to update the classifier via the train() function, which we implemented in the first section of the app.py script.
Also, a new entry to the SQLite database will be made via the sqlite_entry() function if feedback was provided, and eventually the thanks.html template will be rendered to thank the user for the feedback.
Let's take a look at the starting page of our application (reviewform.html):
<!doctype html>

<html>
<head>
 <title>Movie Classification</title>
</head>

<body>
	<h2>Please enter your movie review:</h2>
	{% from "_formhelpers.html" import render_field %}
	<form method=post action="/results">
		<dl>
		{{ render_field(form.moviereview, cols='30', rows='10') }}
		</dl>
		<div>
			<input type=submit value='Submit review' name='submit_btn'>
		</div>
	</form>
</body>

</html>
Here, we imported the same _formhelpers.html template that we defined earlier in the Form validation and rendering section.
The render_field function of this macro is used to render a TextAreaField where a user can provide a movie review and submit it via the Submit review button displayed at the bottom of the page. This TextAreaField is 30 columns wide and 10 rows tall.
Here is the results.html:
<!doctype html>
<html>

<head>
	<title>Movie Classification</title>
	<link rel="stylesheet" href="{{ url_for('static',
		filename='style.css') }}">
</head>

<body>
	<h3>Your movie review:</h3>

	<div>{{ content }}</div>
	<h3>Prediction:</h3>
	<div>This movie review is <strong>{{ prediction }}</strong>
			(probability: {{ probability }}%).
	</div>

	<div id='button'>
		<form action="/thanks" method="post">
			<input type=submit value='Correct' name='feedback_button'>
			<input type=submit value='Incorrect' name='feedback_button'>
			<input type=hidden value='{{ prediction }}' name='prediction'>
			<input type=hidden value='{{ content }}' name='review'>
		</form>
	</div>

	<div id='button'>
		<form action="/">
			<input type=submit value='Submit another review'>
		</form>
	</div>
</body>

</html>
First, we inserted the submitted review as well as the results of the prediction in the corresponding fields {{ content }} , {{ prediction }} , and {{ probability }}.
Note that we used the {{ content }} and {{ prediction }} placeholder variables a second time in the form that contains the Correct and Incorrect buttons. This is a workaround to POST those values back to the server to update the classifier and store the review in case the user clicks on one of those two buttons.
Also, we imported a CSS file (style.css) at the beginning of the results.html file. The setup of this file is quite simple; it limits the width of the contents of this web app to 600 pixels and moves the Incorrect and Correct buttons labeled with the div id button down by 20 pixels:
body {
  width:600px;
}
#button {
  padding-top: 20px;
}
This CSS file is merely a placeholder, so please feel free to adjust it to adjust the look and feel of the web app to our liking.
The last HTML file we will implement for our web application is the thanks.html template. As the name suggests, it simply provides a nice thank you message to the user after providing feedback via the Correct or Incorrect button.
Furthermore, we put a Submit another review button at the bottom of this page, which will redirect the user to the starting page. Here is the thanks.html file are as follows:
<!doctype html>
<html>

<head>
	<title>Movie Classification</title>
</head>

<body>
	<h3>Thank you for your feedback!</h3>
	<div id='button'>
		<form action="/">
			<input type=submit value='Submit another review'>
		</form>
	</div>
</body>

</html>
Let's check if our implementation is working:
$ python app.py
 * Running on http://127.0.0.1:5000/ (Press CTRL+C to quit)
 * Restarting with stat
 * Debugger is active!
 * Debugger pin code: 135-351-354
As already been explained earlier, we get the following screen shots:
Source is available from ahaman-Flask-with-Machine-Learning-Sentiment-Analysis
Python Machine Learning, Sebastian Raschka
Flask with Embedded Machine Learning IV : Deploy
Ph.D. / Golden Gate Ave, San Francisco / Seoul National Univ / Carnegie Mellon / UC Berkeley / DevOps / Deep Learning / Visualization