AWS Identity and Access Management (IAM) Policies, sts AssumeRole, and delegate access across AWS accounts
Every AWS service uses IAM to authenticate and authorize API calls.
- I - Authentication (caller identity)
- AM - Authorization (permissions)
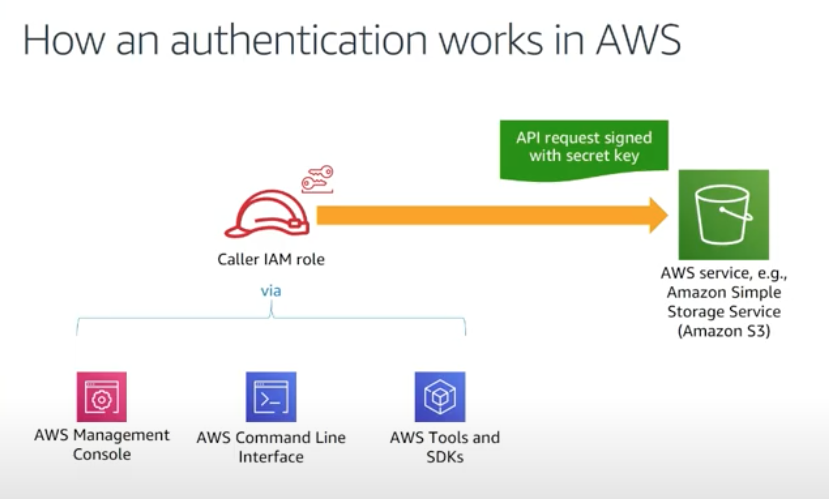
AWS re:Inforce 2019: The Fundamentals of AWS Cloud Security
Amazon API requires that we authenticate every request we send by signing the request. To sign a request, we calculate a digital signature using a hash function, which returns a hash value based on the input. The input includes the text of our request and our secret access key. The hash function returns a hash value that we include in the request as our signature. The signature is part of the Authorization header of our request.
After receiving our request, Amazon service recalculates the signature using the same hash function and input that we used to sign the request. If the resulting signature matches the signature in the request, Amazon API service processes the request. Otherwise, the request is rejected.
We have a user "Bob" just with basic default permissions, no policies and no groups attached.
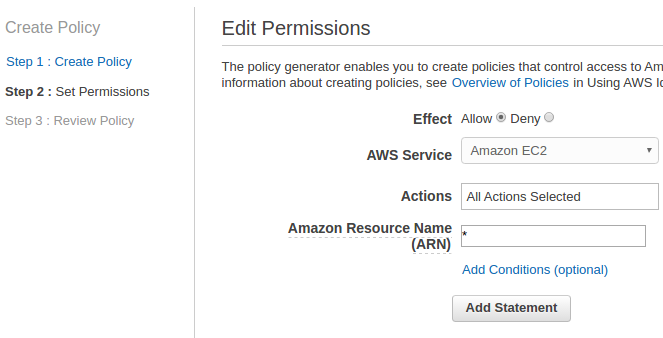
Let's create policies using Policy Generator. We'll give the user a permission to all resources of EC2:
Now, we want the user can only run small instances such as t1, t2, or m3, "Deny" for "Effect" and "RunInstances" selected for "Actions" for all resources for EC2:
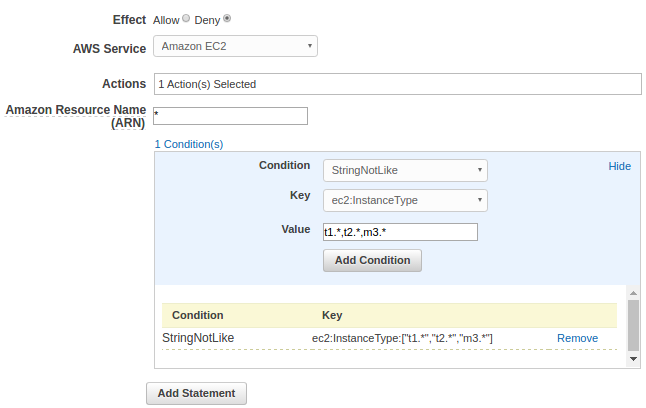
Click "Add statement" => "Next Step", then we get this after some cleanup:
{
    "Version": "2012-10-17",
    "Statement": [
        {
            "Effect": "Allow",
            "Action": "ec2:*",
            "Resource": "*"
        },
        {
            "Effect": "Deny",
            "Action": "ec2:RunInstances",
            "Condition": {
                "StringNotLike": {
                    "ec2:InstanceType": [
                        "t1.*",
                        "t2.*",
                        "m3.*"
                    ]
                }
            },
            "Resource": "*"
        }
    ]
}
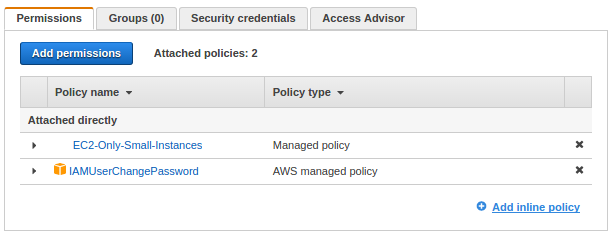
After validating it, we can create a new policy, "EC2-Only-Small-Instances".
Here is Bob's policy after attaching the newly created one:
Now, Bob can sign in as an IAM user via sign-in link: "https://{alias}.signin.aws.amazon.com/console", and check if the policy attached is working. It's very odds but Bob failed to create an instance not only big instances such as "r4" but also small ones like "t2.micro":
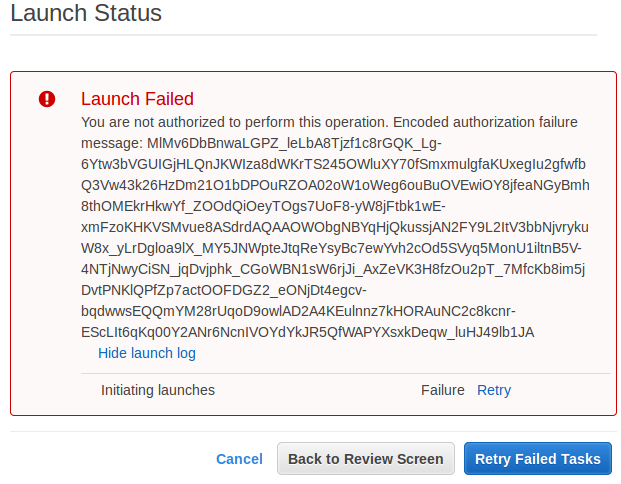
Out policy looks logical and should be working. What's happening to our policy? We'll see.
Here is the policy specification basics:
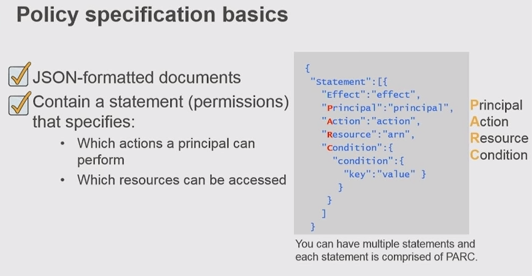
- Principal:
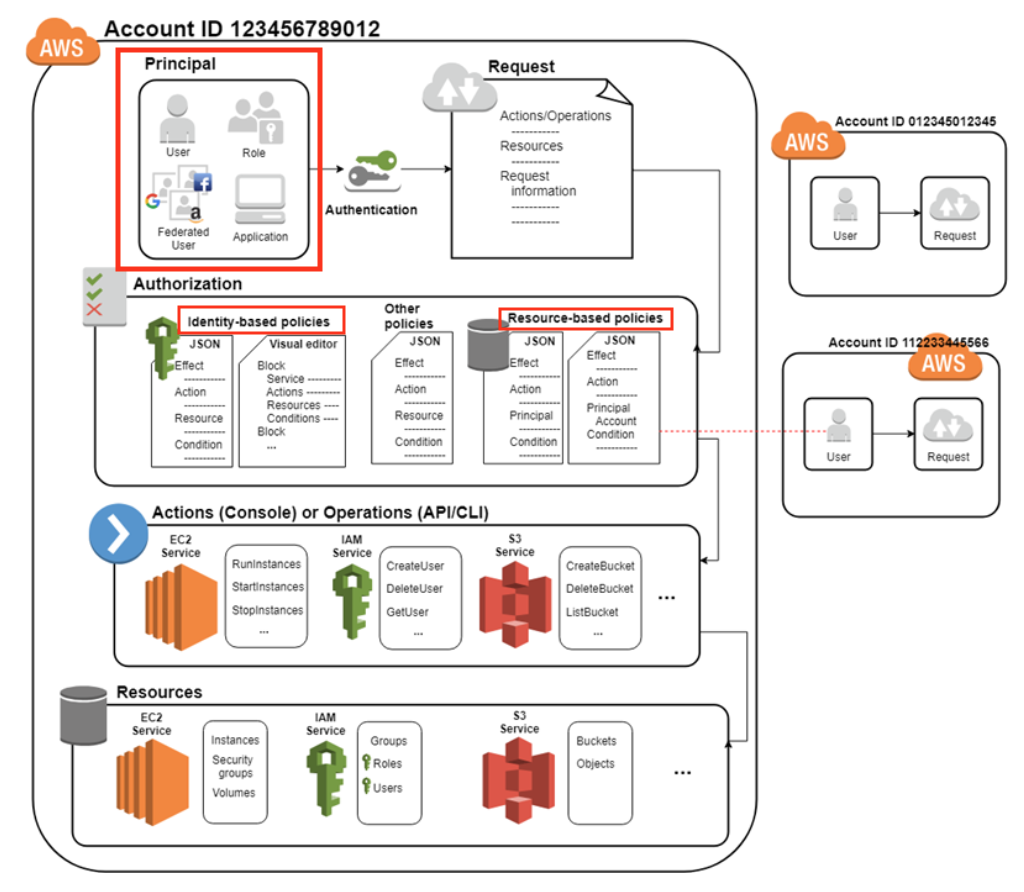
An entity that is allowed or denied access to a resource indicated by ARN (Amazon Resource Name).
A principal is a person or application that can make a request for an action or operation on an AWS resource. The principal is authenticated as the AWS account root user or an IAM entity to make requests to AWS.
With IAM policies, the principal element is implicit (i.e., the user, group, or role attached)
But we cannot specify IAM groups as principals.
When we specify an AWS account, we can use a shortened form that consists of the AWS: prefix followed by the account ID, instead of using the account's full ARN.
The following examples show various ways in which principals can be specified.
"Principal": "*"

"Principal" : { "AWS" : "*" }
We can specify more than one AWS account as a principal, as shown in the following example:
"Principal": {
  "AWS": [
    "arn:aws:iam::AWS-account-ID:root",
    "arn:aws:iam::AWS-account-ID:root"
  ]
}
We can specify an individual IAM user (or array of users) as the principal, as in the following examples:
"Principal": {
  "AWS": [
    "arn:aws:iam::AWS-account-ID:user/user-name-1",
    "arn:aws:iam::AWS-account-ID:user/UserName2"
  ]
}
IAM role:
"Principal": { "AWS": "arn:aws:iam::AWS-account-ID:role/role-name" } - Action:
The Action element describes the specific action or actions that will be allowed or denied. Statements must include either an Action or NotAction element.Amazon EC2 action:
"Action": "ec2:StartInstances"
IAM action:
"Action": "iam:ChangePassword"
Amazon S3 action:
"Action": "s3:GetObject"
We can specify multiple values for the Action element:
"Action": [ "sqs:SendMessage", "sqs:ReceiveMessage", "ec2:StartInstances", "iam:ChangePassword", "s3:GetObject" ]
We can use a wildcard (*) to give access to all the actions the specific AWS product offers. For example, the following Action element applies to all S3 actions:
"Action": "s3:*"
We can also use wildcards (*) as part of the action name. For example, the following Action element applies to all IAM actions that include the string AccessKey, including CreateAccessKey, DeleteAccessKey, ListAccessKeys, and UpdateAccessKey:
"Action": "iam:*AccessKey*"
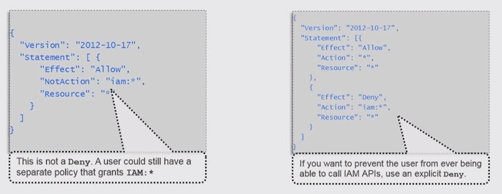
- NotAction:
NotAction is an advanced policy element that explicitly matches everything except the specified list of actions. Using NotAction can result in a shorter policy by listing only a few actions that should not match, rather than including a long list of actions that will match. When using NotAction, we should keep in mind that actions specified in this element are the only actions in that are limited. This, in turn, means that all of the actions or services that are not listed are allowed if we use the Allow effect, or are denied if we use the Deny effect.
- Condition:
The Condition element (or Condition block) lets us specify conditions for when a policy is in effect:
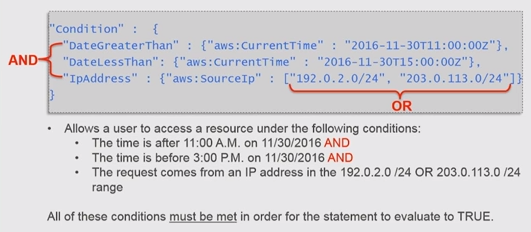
Check IAM Policy Elements Reference
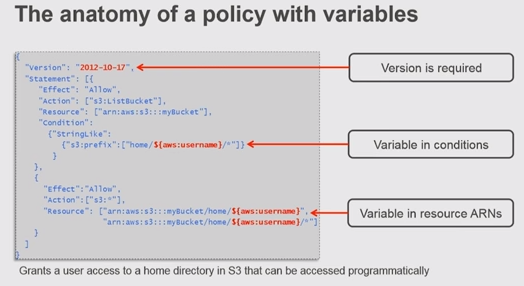
Sample of policy using variables:
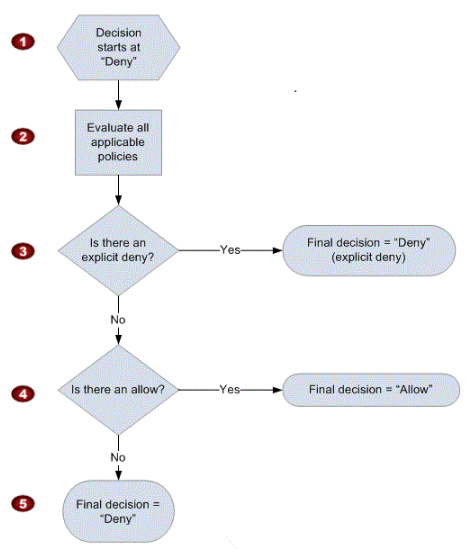
When a request is made, the AWS service decides whether a given request should be allowed or denied. The evaluation logic follows these rules:
- By default, all requests are denied. (In general, requests made using the account credentials for resources in the account are always allowed.)
- An explicit allow overrides this default.
- An explicit deny overrides any allows.
The order in which the policies are evaluated has no effect on the outcome of the evaluation. All policies are evaluated, and the result is always that the request is either allowed or denied.
The following flow chart provides details about how the decision is made:
Here is an example of Bob's complete policy that is associated with an IAM user named Bod by using the IAM console:
{
 "Version":"2012-10-17",
 "Statement": [
   {
     "Sid": "AllowUserToSeeBucketListInTheConsole",
     "Action": ["s3:ListAllMyBuckets", "s3:GetBucketLocation"],
     "Effect": "Allow",
     "Resource": ["arn:aws:s3:::*"]
   },
  {
     "Sid": "AllowRootAndHomeListingOfCompanyBucket",
     "Action": ["s3:ListBucket"],
     "Effect": "Allow",
     "Resource": ["arn:aws:s3:::my-company"],
     "Condition":{"StringEquals":{"s3:prefix":["","home/"],"s3:delimiter":["/"]}}
    },
   {
     "Sid": "AllowListingOfUserFolder",
     "Action": ["s3:ListBucket"],
     "Effect": "Allow",
     "Resource": ["arn:aws:s3:::my-company"],
     "Condition":{"StringLike":{"s3:prefix":["home/Bob/*"]}}
   },
   {
     "Sid": "AllowAllS3ActionsInUserFolder",
     "Effect": "Allow",
     "Action": ["s3:*"],
     "Resource": ["arn:aws:s3:::my-company/home/Bob/*"]
   }
 ]
}
Break down.
Allow required Amazon S3 console permissions:
Before we begin identifying the specific folders Bob can have access to, we have to give him two permissions that are required for Amazon S3 console access: ListAllMyBuckets and GetBucketLocation:
The ListAllMyBuckets action grants Bob permission to list all the buckets in the AWS account, which is required for navigating to buckets in the Amazon S3 console (and as an aside, we currently can't selectively filter out certain buckets, so users must have permission to list all buckets for console access).
   {
     "Sid": "AllowUserToSeeBucketListInTheConsole",
     "Action": ["s3:ListAllMyBuckets", "s3:GetBucketLocation"],
     "Effect": "Allow",
     "Resource": ["arn:aws:s3:::*"]
   },
The console also does a GetBucketLocation (Grants permission to return the Region that an Amazon S3 bucket resides in) call when users initially navigate to the Amazon S3 console, which is why Bob also requires permission for that action. Without these two actions, Bob will get an access denied error in the console.
Allow listing objects in root and home folders:
Although Bob should have access to only his home folder, he requires additional permissions so that he can navigate to his folder in the Amazon S3 console. Bob needs permission to list objects at the root level of the "my-company" bucket and in the "home/" folder. The following policy grants these permissions to Bob:{ "Sid": "AllowRootAndHomeListingOfCompanyBucket", "Action": ["s3:ListBucket"], "Effect": "Allow", "Resource": ["arn:aws:s3:::my-company"], "Condition":{"StringEquals":{"s3:prefix":["","home/"],"s3:delimiter":["/"]}} },
Without the ListBucket permission, Bob can't navigate to his folder because he won't have permissions to view the contents of the root and home folders. When Bod tries to use the console to view the contents of the "my-company" bucket, the console will return an access denied error. Although this policy grants Bob permission to list all objects in the root and home folders, he won't be able to view the contents of any files or folders except his own.
This block includes conditions, which let us limit when a request to AWS is valid. In this case, Bob can list objects in the "my-company" bucket only when he requests objects without a prefix (objects at the root level) and objects with the "home/" prefix (objects in the home folder). If Bob tried to navigate to other folders, such as "restricted/", Bob is denied access.
To set these root and home folder permissions, we used two conditions: s3:prefix and s3:delimiter. The s3:prefix condition specifies the folders that Bob has ListBucket permissions for. For example, Bob can list all of the following files and folders in the "my-company" bucket.
But, Bob cannot list files or subfolders in the "home/Bob" folders.
Although the s3:delimiter condition isn't required for console access, it's still a good practice to include it in case Bob makes requests by using the API or command line interface (CLI).
Allow listing objects in Bob's folder:
In addition to the root and home folders, Bob requires access to all objects in the "home/Bob/" folder and any subfolders that he might create. Here's a policy that allows this:
{ "Sid": "AllowListingOfUserFolder", "Action": ["s3:ListBucket"], "Effect": "Allow", "Resource": ["arn:aws:s3:::my-company"], "Condition":{"StringLike":{"s3:prefix":["home/Bob/*"]}} },
In the condition, we use a StringLike expression in combination with the asterisk (*) to represent any object in Bob's folder, where the asterisk acts like a wildcard. That way, Bob can list any files and folders in his folder (home/Bob/). We couldn't include this condition in the previous block (AllowRootAndHomeListingOfCompanyBucket) because the previous block used the StringEquals expression, which would literally interpret the asterisk (*) as an asterisk (not as a wildcard).
In the next section, the AllowAllS3ActionsInUserFolder block, we'll see that the Resource element specifies "my-company/home/Bob/*", which looks similar to the condition that we specified in this section. We might think that we can similarly use the Resource element to specify Bob's folder in this block. However, the ListBucket action is a bucket-level operation, meaning the Resource element for the ListBucket action applies only to bucket names and won't take into account any folder names. So, to limit actions at the object level (files and folders), we must use conditions.
Allow all Amazon S3 actions in Bob's folder:
Finally, we specify Bob's actions (such as read, write, and delete permissions) and limit them to just his home folder, as shown in the following policy:
{ "Sid": "AllowAllS3ActionsInUserFolder", "Effect": "Allow", "Action": ["s3:*"], "Resource": ["arn:aws:s3:::my-company/home/Bob/*"] }
For the "Action" element, we specified s3:*, which means Bob has permission to do all Amazon S3 actions. In the Resource element, we specified Bob's folder with an asterisk (*) (a wildcard) so that Bob can perform actions on the folder and inside the folder. For example, Bob has permission to change his folder's storage class, enable encryption, or make his folder public (perform actions against the folder itself). Bob also has permission to upload files, delete files, and create subfolders in his folder (perform actions in the folder).
In Bob's folder-level policy we specified Bob's home folder. If we wanted a similar policy for users like Bob and Alice, we'd have to create separate policies that specify their home folders. Instead of creating individual policies for each user, we can use policy variables and create a single policy that applies to multiple users (a group policy). Policy variables act as placeholders. When we make a request to AWS, the placeholder is replaced by a value from the request when the policy is evaluated.
For example, we can use the previous policy and replace Bob's user name with a variable that uses the requester's user name (aws:username), as shown in the following policy. Also note that we declared the version number for both policies; while the version is optional for the previous policy, it's required whenever we use policy variables:
{
"Version":"2012-10-17",
"Statement": [
{
"Sid": "AllowGroupToSeeBucketListInTheConsole",
"Action": ["s3:ListAllMyBuckets", "s3:GetBucketLocation"],
"Effect": "Allow",
"Resource": ["arn:aws:s3:::*"]
},
  {
     "Sid": "AllowRootAndHomeListingOfCompanyBucket",
     "Action": ["s3:ListBucket"],
     "Effect": "Allow",
     "Resource": ["arn:aws:s3:::my-company"],
     "Condition":{"StringEquals":{"s3:prefix":["","home/"],"s3:delimiter":["/"]}}
    },
{
"Sid": "AllowListingOfUserFolder",
"Action": ["s3:ListBucket"],
"Effect": "Allow",
"Resource": ["arn:aws:s3:::my-company"],
"Condition":{"StringLike":{"s3:prefix":["home/${aws:username}/*"]}}
},
{
"Sid": "AllowAllS3ActionsInUserFolder",
"Action":["s3:*"],
"Effect":"Allow",
"Resource": ["arn:aws:s3:::my-company/home/${aws:username}/*"]
}
]
}
Check Writing IAM Policies: Grant Access to User-Specific Folders in an Amazon S3 Bucket
AWS Identity and Access Management (IAM) recently launched managed policies, which enable us to attach a single access control policy to multiple entities (IAM users, groups, and roles).
Managed policies also give us precise, fine-grained control over how our users can manage policies and permissions for other entities. For example, we can control which managed policies a user can attach to or detach from specific entities. Using this capability, we now can now delegate management responsibilities by creating limited IAM administrators. These administrators have the ability to create users, groups, and roles; however, they can only grant access using a restricted set of managed policies.
Check How to Create a Limited IAM Administrator by Using Managed Policies
In this section, we will learn how to use a role to delegate access to resources that are in different AWS accounts that we own (Production and Development). We share resources in one account with users in a different account. Specifically, at the end of this tutorial, the users in the Development account (trusted account) that are allowed to assume a specific role in the Production account (trusting account).
Ref: IAM tutorial: Delegate access across AWS accounts using IAM roles
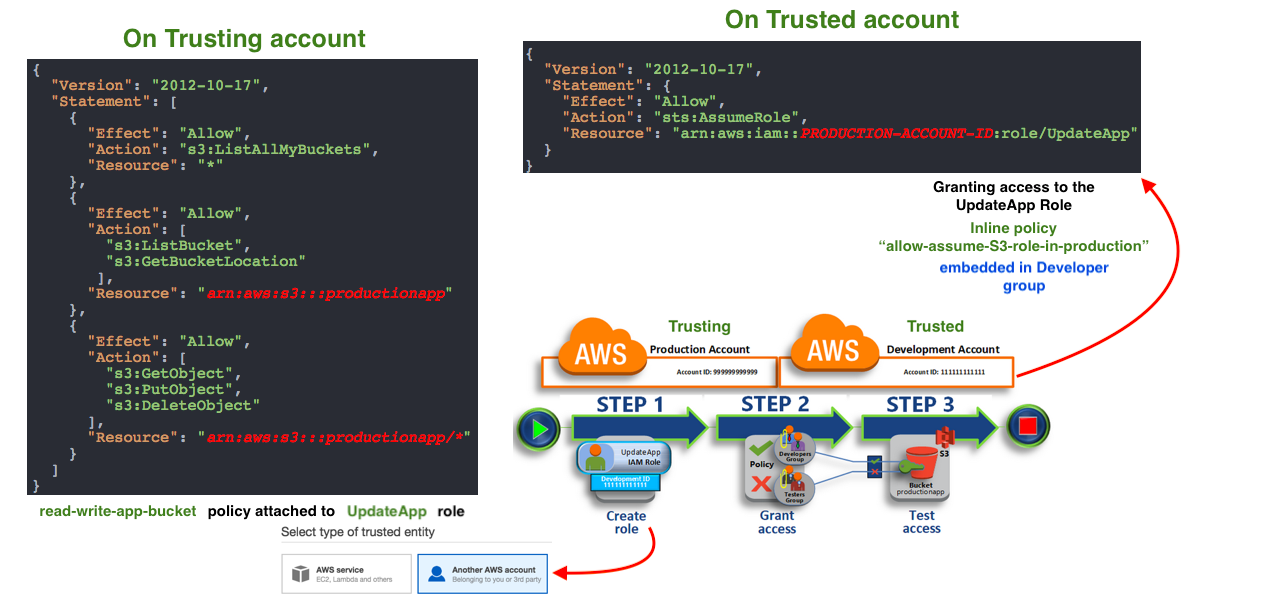
source: Tutorial: Delegate Access Across AWS Accounts Using IAM Roles
Developers can use the role in the AWS Management Console to access the productionapp bucket in the Production account. They can also access the bucket by using API calls that are authenticated by temporary credentials provided by the role.
This workflow has three basic steps.
- Create a role
First, we use the AWS Management Console to establish trust between the Production account (ID number 526262051452) and the Development account (ID number 047109936880).
We start by creating an IAM role named UpdateApp. When we create the role, we define the Development account as a trusted entity and specify a permissions policy that allows trusted users to update the productionapp bucket. - Grant access to the role
We modify the IAM user group policy so that Testers are denied access to the UpdateApp role. Because Testers have PowerUser access in this scenario, we must explicitly deny the ability to use the role. - Test access by switching roles
Finally, as a Developer, we use the UpdateApp role to update the productionapp bucket in the Production account.
By setting up cross-account access in this way, we don't need to create individual IAM users in each account. In the example, on the Trusting (Production) account does not create any IAM users. It just creates "UpdateApp" role with S3 bucket policy attached. On the Trusted (Development) account side, it grants the access to the "UpdateApp" role via inline group policy which is using "Action": "sts:AssumeRole" in the policy.
Note that setting up the cross-account access, on the Production side, we need the account information of Development account when we create a "UpdateApp" role:
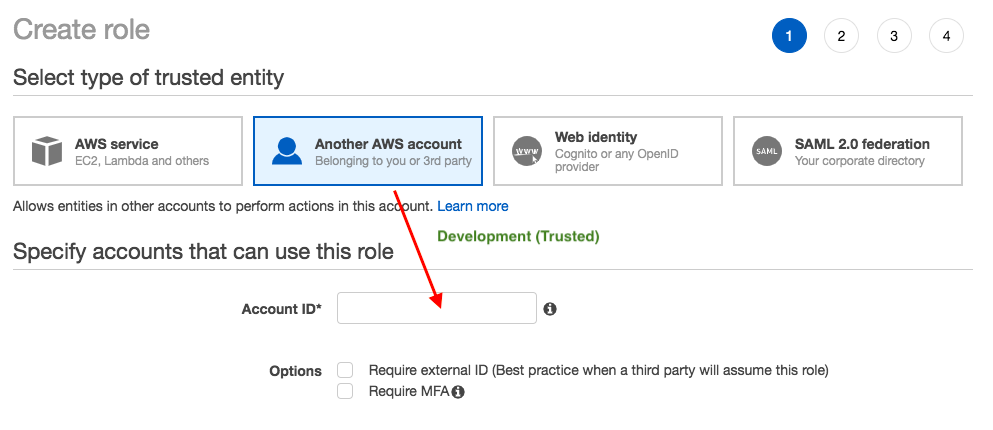
Also, as showed in the earlier picture, on the Development (Trusted) account side, it needs the "arn" for the "UpdateApp" role (created by Production account) when it assumes a role via embedded group policy.
In addition, users don't have to sign out of one account and sign into another in order to access resources that are in different AWS accounts.
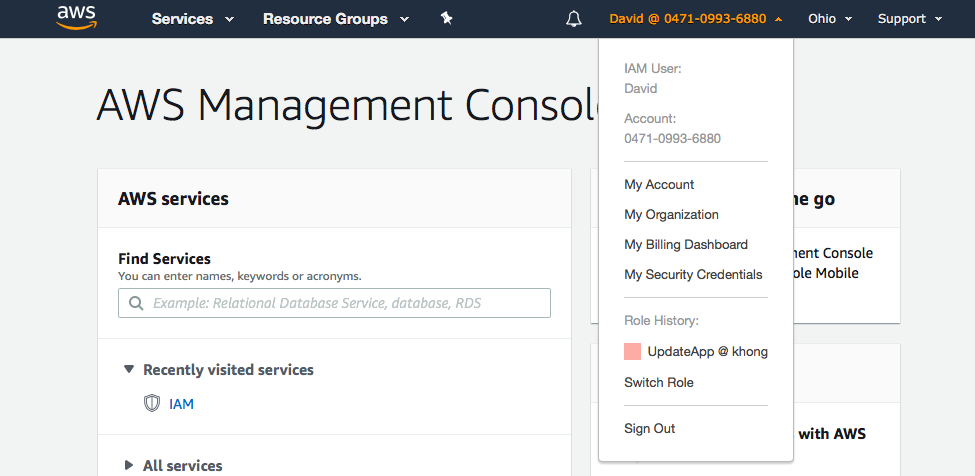
- Via "Switch Role" drop-down menu:
-
Switch Roles (Console):
David signs into the AWS Management Console using his normal user that is in the Development user group. If David needs to work with in the Production environment in the AWS Management Console, he can do so by using Switch Role from the Development account. He specifies the account ID (526262051452) or alias and the role name, and his permissions immediately switch to those permitted by the role. He can then use the console to work with the productionapp bucket
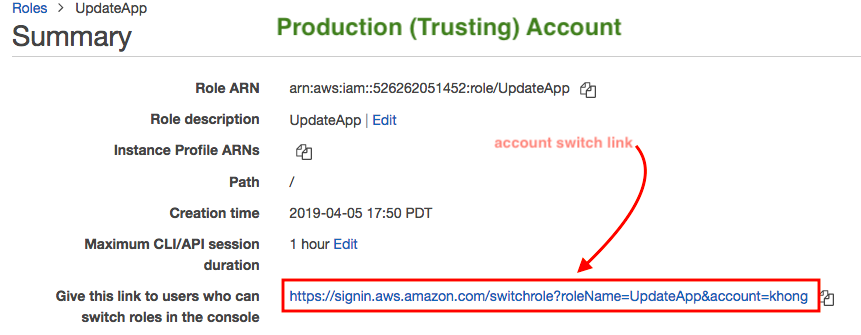
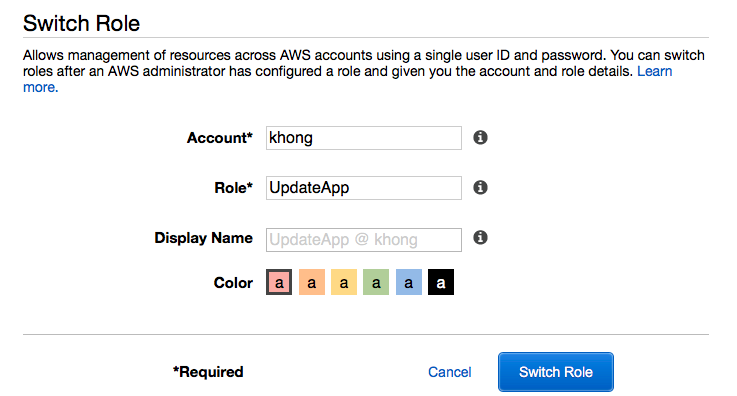
Now, David (Developer) logged in to Production console via "UpdateApp" role:

Switch Roles (AWS CLI):
If David needs to work in the Production environment at the command line, he can do so by running the
aws sts assume-rolecommand and passes the role ARN to get temporary security credentials for that role. He then configures those credentials in environment variables so subsequent AWS CLI commands work using the role's permissions.David's default environment uses the David user credentials from his default profile.
$ aws sts assume-role --role-arn "arn:aws:iam::526262051452:role/UpdateApp" --role-session-name "David-ProdUpdate"
{
    "Credentials": {
        "AccessKeyId": "ASIAXVB5JUJ6HDY325EG",
        "SecretAccessKey": "jrODSA5bBu9TpNj5bF+ULpMCtQwSwJUGK7UDqLV+",
        "SessionToken": "IQoJb3JpZ2luX2V...8FGHhgknrG",
        "Expiration": "2021-06-01T23:40:02+00:00"
    },
    "AssumedRoleUser": {
        "AssumedRoleId": "AROAXVB5JUJ6HDMYOXQBY:David-ProdUpdate",
        "Arn": "arn:aws:sts::526262051452:assumed-role/UpdateApp/David-ProdUpdate"
    }
}
The output has the three pieces of Credentials section:
- AccessKeyId
- SecretAccessKey
- SessionToken
David needs to configure the AWS CLI environment to use these parameters in subsequent calls:
$ export AWS_ACCESS_KEY_ID=ASIAXVB5JUJ6HDY325EG
$ export AWS_SECRET_ACCESS_KEY=jrODSA5bBu9TpNj5bF+ULpMCtQwSwJUGK7UDqLV+
$ export AWS_SESSION_TOKEN=IQoJb3JpZ2l...a8FGHhgknrG
At this point, any following commands run under the permissions of the role identified by those credentials, UpdateApp role.
Run the command to access the resources in the Production account. In this example, David simply lists the contents of his S3 bucket with the following command:
$ aws s3 ls s3://productioapp
- Using AssumeRole (AWS API):
To assume a role, an application calls the AWS STS AssumeRole API operation and passes the ARN of the role to use.
When David makes an AssumeRole call to assume the UpdateApp role as shown earlier. The call returns temporary credentials that he can use to access the productionapp bucket in the Production account. With those credentials, David can make API calls to update the productionapp bucket.
The response from the AssumeRole call includes the temporary credentials with an AccessKeyId and a SecretAccessKey. It also includes an Expiration time that indicates when the credentials expire and we must request new ones. With the temporary credentials, David makes an s3:PutObject call to update the productionapp bucket. He would pass the credentials to the API call as the AuthParams parameter.
The following example in Python using the Boto3 interface to AWS shows how to call AssumeRole. It also shows how to use the temporary security credentials returned by AssumeRole to list all Amazon S3 buckets in the account that owns the role.
Let's install dependencies of the bogo3:
$ pip install boto3 --user
$ pip install nose --user
$ pip install tornado --user
Here is the Python code (Switching to an IAM role (AWS API), assumerole.py:
import boto3

# The calls to AWS STS AssumeRole must be signed with the access key ID
# and secret access key of an existing IAM user or by using existing temporary
# credentials such as those from another role. (You cannot call AssumeRole
# with the access key for the root account.) The credentials can be in
# environment variables or in a configuration file and will be discovered
# automatically by the boto3.client() function. For more information, see the
# Python SDK documentation:
# http://boto3.readthedocs.io/en/latest/reference/services/sts.html#client

# create an STS client object that represents a live connection to the
# STS service
sts_client = boto3.client('sts')

# Call the assume_role method of the STSConnection object and pass the role
# ARN and a role session name.
assumed_role_object=sts_client.assume_role(
    RoleArn="arn:aws:iam::526262051452:role/UpdateApp",
    RoleSessionName="AssumeRoleSession1"
)

# From the response that contains the assumed role, get the temporary
# credentials that can be used to make subsequent API calls
credentials=assumed_role_object['Credentials']

# Use the temporary credentials that AssumeRole returns to make a
# connection to Amazon S3
s3_resource=boto3.resource(
    's3',
    aws_access_key_id=credentials['AccessKeyId'],
    aws_secret_access_key=credentials['SecretAccessKey'],
    aws_session_token=credentials['SessionToken'],
)

# Use the Amazon S3 resource object that is now configured with the
# credentials to access your S3 buckets.
for bucket in s3_resource.buckets.all():
    print(bucket.name)
$ python assumerole.py
bogo-alb
bogo-ddb-to-es
...
- AssumeRole
AssumeRole does require us to start with some basic AWS credentials, but those are allowed to be short-term ones as opposed to GetFederationToken. - AssumeRoleWithWebIdentity
AssumeRoleWithWebIdentity requires no AWS credentials to start with. Instead, it takes an external identity (Facebook etc.) and uses the trust policy built into the role to elevate AWS access for a short period of time. - AssumeRoleWithSAML
Same with AssumeRoleWithWebIdentity but it's used within AWS Organizations. - GetFederationToken
We must call the GetFederationToken action using the long-term security credentials of an IAM user. It scopes AWS credentials down in power (weaker) and time (shorter: up to 36h) so they can be handed out to someone else. - GetSessionToken
A user has all the permission for all actions against EC2:
{
  "Version": "2012-10-17",
  "Statement": [{
    "Effect": "Allow",
    "Action": [
      "ec2:*"
    ],
    "Resource": "*"
  }]
}
But still the user has this problem:
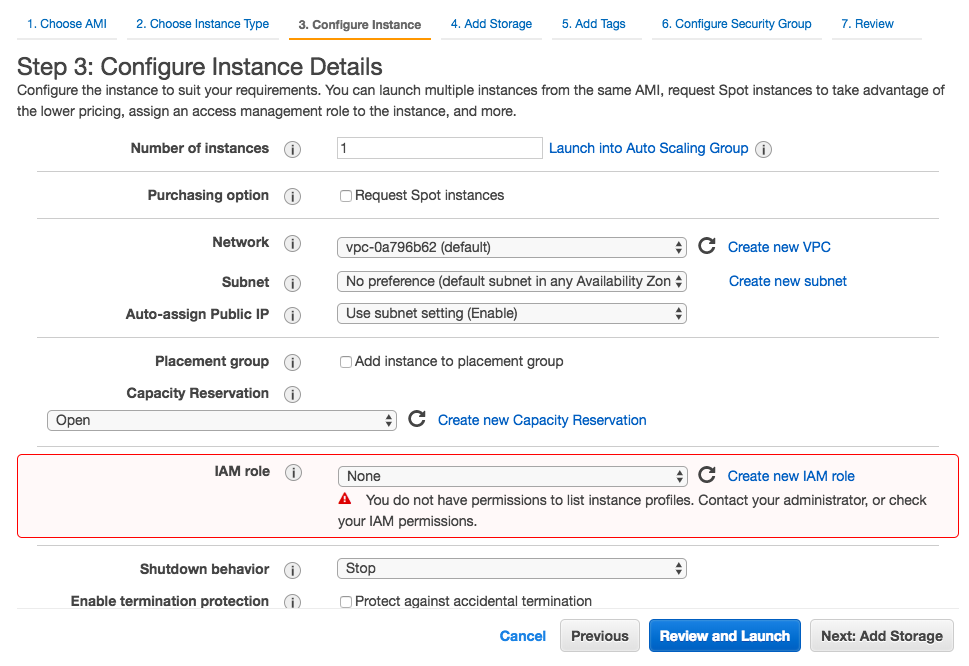
The user cannot launch an instance with a role. To do that, the user must have permission to launch EC2 instances and permission to pass IAM roles:
{
  "Version": "2012-10-17",
  "Statement": [{
    "Effect": "Allow",
    "Action": [
      "iam:PassRole",
      "iam:ListInstanceProfiles",
      "ec2:*"
    ],
    "Resource": "*"
  }]
}
The policy allows users to use the AWS Management Console to launch an instance with a role. The policy includes wildcards (*) to allow a user to pass any role and to perform all Amazon EC2 actions. The ListInstanceProfiles action allows users to view all of the roles that are available in the AWS account.
After attaching the policy to the user, the EC2 launch console looks like this:

Earlier in this tutorial, we tried to limit the user to specific instance types but we failed. In this section, we'll revisit the issue and make it work.
Again, the goal is to limit a user from starting an instance unless the instance is t1.*, t2.*,m3.*.
We'll do the following:
- Use a managed policy that limits starting EC2 instances to specific instance tpes.
- Attach that managed policy to an IAM user.
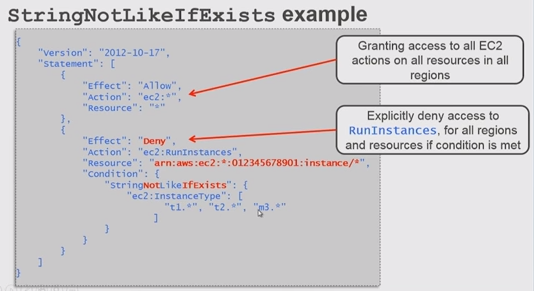
{
    "Version": "2012-10-17",
    "Statement": [
        {
            "Effect": "Allow",
            "Action": "ec2:*",
            "Resource": "*"
        },
        {
            "Effect": "Deny",
            "Action": "ec2:RunInstances",
            "Resource": "arn:aws:ec2:*:<ACCOUNT_NUMBER>:instance/*",
            "Condition": {
                "StringNotLikeIfExists": {
                    "ec2:InstanceType": [
                        "t1.*",
                        "t2.*",
                        "m3.*"
                    ]
                }
            }
        }
    ]
}
Github : IAM-Policy-to-run-only-specific-types-of-instnaces
AWS (Amazon Web Services)
- AWS : EKS (Elastic Container Service for Kubernetes)
- AWS : Creating a snapshot (cloning an image)
- AWS : Attaching Amazon EBS volume to an instance
- AWS : Adding swap space to an attached volume via mkswap and swapon
- AWS : Creating an EC2 instance and attaching Amazon EBS volume to the instance using Python boto module with User data
- AWS : Creating an instance to a new region by copying an AMI
- AWS : S3 (Simple Storage Service) 1
- AWS : S3 (Simple Storage Service) 2 - Creating and Deleting a Bucket
- AWS : S3 (Simple Storage Service) 3 - Bucket Versioning
- AWS : S3 (Simple Storage Service) 4 - Uploading a large file
- AWS : S3 (Simple Storage Service) 5 - Uploading folders/files recursively
- AWS : S3 (Simple Storage Service) 6 - Bucket Policy for File/Folder View/Download
- AWS : S3 (Simple Storage Service) 7 - How to Copy or Move Objects from one region to another
- AWS : S3 (Simple Storage Service) 8 - Archiving S3 Data to Glacier
- AWS : Creating a CloudFront distribution with an Amazon S3 origin
- AWS : Creating VPC with CloudFormation
- AWS : WAF (Web Application Firewall) with preconfigured CloudFormation template and Web ACL for CloudFront distribution
- AWS : CloudWatch & Logs with Lambda Function / S3
- AWS : Lambda Serverless Computing with EC2, CloudWatch Alarm, SNS
- AWS : Lambda and SNS - cross account
- AWS : CLI (Command Line Interface)
- AWS : CLI (ECS with ALB & autoscaling)
- AWS : ECS with cloudformation and json task definition
- AWS Application Load Balancer (ALB) and ECS with Flask app
- AWS : Load Balancing with HAProxy (High Availability Proxy)
- AWS : VirtualBox on EC2
- AWS : NTP setup on EC2
- AWS: jq with AWS
- AWS & OpenSSL : Creating / Installing a Server SSL Certificate
- AWS : OpenVPN Access Server 2 Install
- AWS : VPC (Virtual Private Cloud) 1 - netmask, subnets, default gateway, and CIDR
- AWS : VPC (Virtual Private Cloud) 2 - VPC Wizard
- AWS : VPC (Virtual Private Cloud) 3 - VPC Wizard with NAT
- DevOps / Sys Admin Q & A (VI) - AWS VPC setup (public/private subnets with NAT)
- AWS - OpenVPN Protocols : PPTP, L2TP/IPsec, and OpenVPN
- AWS : Autoscaling group (ASG)
- AWS : Setting up Autoscaling Alarms and Notifications via CLI and Cloudformation
- AWS : Adding a SSH User Account on Linux Instance
- AWS : Windows Servers - Remote Desktop Connections using RDP
- AWS : Scheduled stopping and starting an instance - python & cron
- AWS : Detecting stopped instance and sending an alert email using Mandrill smtp
- AWS : Elastic Beanstalk with NodeJS
- AWS : Elastic Beanstalk Inplace/Rolling Blue/Green Deploy
- AWS : Identity and Access Management (IAM) Roles for Amazon EC2
- AWS : Identity and Access Management (IAM) Policies, sts AssumeRole, and delegate access across AWS accounts
- AWS : Identity and Access Management (IAM) sts assume role via aws cli2
- AWS : Creating IAM Roles and associating them with EC2 Instances in CloudFormation
- AWS Identity and Access Management (IAM) Roles, SSO(Single Sign On), SAML(Security Assertion Markup Language), IdP(identity provider), STS(Security Token Service), and ADFS(Active Directory Federation Services)
- AWS : Amazon Route 53
- AWS : Amazon Route 53 - DNS (Domain Name Server) setup
- AWS : Amazon Route 53 - subdomain setup and virtual host on Nginx
- AWS Amazon Route 53 : Private Hosted Zone
- AWS : SNS (Simple Notification Service) example with ELB and CloudWatch
- AWS : Lambda with AWS CloudTrail
- AWS : SQS (Simple Queue Service) with NodeJS and AWS SDK
- AWS : Redshift data warehouse
- AWS : CloudFormation
- AWS : CloudFormation Bootstrap UserData/Metadata
- AWS : CloudFormation - Creating an ASG with rolling update
- AWS : Cloudformation Cross-stack reference
- AWS : OpsWorks
- AWS : Network Load Balancer (NLB) with Autoscaling group (ASG)
- AWS CodeDeploy : Deploy an Application from GitHub
- AWS EC2 Container Service (ECS)
- AWS EC2 Container Service (ECS) II
- AWS Hello World Lambda Function
- AWS Lambda Function Q & A
- AWS Node.js Lambda Function & API Gateway
- AWS API Gateway endpoint invoking Lambda function
- AWS API Gateway invoking Lambda function with Terraform
- AWS API Gateway invoking Lambda function with Terraform - Lambda Container
- Amazon Kinesis Streams
- AWS: Kinesis Data Firehose with Lambda and ElasticSearch
- Amazon DynamoDB
- Amazon DynamoDB with Lambda and CloudWatch
- Loading DynamoDB stream to AWS Elasticsearch service with Lambda
- Amazon ML (Machine Learning)
- Simple Systems Manager (SSM)
- AWS : RDS Connecting to a DB Instance Running the SQL Server Database Engine
- AWS : RDS Importing and Exporting SQL Server Data
- AWS : RDS PostgreSQL & pgAdmin III
- AWS : RDS PostgreSQL 2 - Creating/Deleting a Table
- AWS : MySQL Replication : Master-slave
- AWS : MySQL backup & restore
- AWS RDS : Cross-Region Read Replicas for MySQL and Snapshots for PostgreSQL
- AWS : Restoring Postgres on EC2 instance from S3 backup
- AWS : Q & A
- AWS : Security
- AWS : Security groups vs. network ACLs
- AWS : Scaling-Up
- AWS : Networking
- AWS : Single Sign-on (SSO) with Okta
- AWS : JIT (Just-in-Time) with Okta
Ph.D. / Golden Gate Ave, San Francisco / Seoul National Univ / Carnegie Mellon / UC Berkeley / DevOps / Deep Learning / Visualization