BogoToBogo
  • Home
  • About
  • Big Data
  • Machine Learning
  • AngularJS
  • Python
  • C++
  • go
  • DevOps
  • Kubernetes
  • Algorithms
  • More...
    • Qt 5
    • Linux
    • FFmpeg
    • Matlab
    • Django 1.8
    • Ruby On Rails
    • HTML5 & CSS

HashiCorp Vault

Vault_Icon.png


Bookmark and Share


bogotobogo.com site search:


Note

If you like to have Vault and Consul containerized, please check out these:

  1. Docker Compose - Hashicorp's Vault and Consul Part A (install vault, unsealing, static secrets, and policies)
  2. Docker Compose - Hashicorp's Vault and Consul Part B (EaaS, dynamic secrets, leases, and revocation)
  3. Docker Compose - Hashicorp's Vault and Consul Part C (Consul)
  4. Docker & Kubernetes : HashiCorp's Vault and Consul on minikube
  5. Docker & Kubernetes : HashiCorp's Vault and Consul - Auto-unseal using Transit Secrets Engine
  6. HashiCorp Vault and Consul on AWS with Terraform


Installing Vault

To install Vault, find the appropriate package for the system and download it. Vault is packaged as a zip archive.

After downloading Vault, unzip the package. Vault runs as a single binary named vault. Any other files in the package can be safely removed and Vault will still function.

The final step is to make sure that the vault binary is available on the PATH. See this page for instructions on setting the PATH on Linux and Mac.

After installing vault, verify the installation worked by opening a new terminal session and checking that the vault binary is available. By executing vault, we should see help output similar to the following:

$ vault
Usage: vault  [args]

Common commands:
    read        Read data and retrieves secrets
    write       Write data, configuration, and secrets
    delete      Delete secrets and configuration
    list        List data or secrets
    login       Authenticate locally
    agent       Start a Vault agent
    server      Start a Vault server
    status      Print seal and HA status
    unwrap      Unwrap a wrapped secret
...


Starting the Server

With Vault installed, the next step is to start a Vault server.

Vault operates as a client/server application. The Vault server is the only piece of the Vault architecture that interacts with the data storage and backends. All operations done via the Vault CLI interact with the server over a TLS connection.

First, we're going to start a Vault dev server. The dev server is a built-in, pre-configured server that is not very secure but useful for playing with Vault locally.

To start the Vault dev server, run:

$ vault server -dev
==> Vault server configuration:

             Api Address: http://127.0.0.1:8200
                     Cgo: disabled
         Cluster Address: https://127.0.0.1:8201
              Listener 1: tcp (addr: "127.0.0.1:8200", cluster address: "127.0.0.1:8201", max_request_duration: "1m30s", max_request_size: "33554432", tls: "disabled")
               Log Level: info
                   Mlock: supported: false, enabled: false
                 Storage: inmem
                 Version: Vault v1.0.3
...
You may need to set the following environment variable:

    $ export VAULT_ADDR='http://127.0.0.1:8200'
The unseal key and root token are displayed below in case you want to
seal/unseal the Vault or re-authenticate.

Unseal Key: Ivdz5V/7awjcDme14F3Oln6JRz07vZr65L9DZwkublI=
Root Token: s.lwp09Q4MKWuHLoFu2ohvTTa0

Development mode should NOT be used in production installations!

==> Vault server started! Log data will stream in below:
...

Vault does not fork, so it will continue to run in the foreground. Open another shell or terminal tab to run the remaining commands.

The dev server stores all its data in-memory (but still encrypted), listens on localhost without TLS, and automatically unseals and shows us the unseal key and root access key.

With the dev server running, do the following three things before anything else:

  1. Launch a new terminal session.
  2. Copy and run the export VAULT_ADDR ... command from the terminal output. This will configure the Vault client to talk to our dev server.
  3. $ export VAULT_ADDR='http://127.0.0.1:8200'
    
  4. Save the unseal key somewhere. Don't worry about how to save this securely. For now, just save it anywhere.
  5. Copy the generated Root Token value and set is as VAULT_DEV_ROOT_TOKEN_ID environment variable:
  6. $ export VAULT_DEV_ROOT_TOKEN_ID="s.lwp09Q4MKWuHLoFu2ohvTTa0"
    

Verify the server is running by running the vault status command. This should succeed and exit with exit code 0. If it ran successfully, the output should look like the following:

$ vault status
Key             Value
---             -----
Seal Type       shamir
Initialized     true
Sealed          false
Total Shares    1
Threshold       1
Version         1.0.3
Cluster Name    vault-cluster-0c053b11
Cluster ID      71e7c5d0-04eb-3caa-117e-701a4a2c61b5
HA Enabled      false


My first secret

Now that the dev server is up and running, let's get straight to it and read and write our first secret.

One of the core features of Vault is the ability to read and write arbitrary secrets securely. On this page, we'll do this using the CLI, but there is also a complete HTTP API that can be used to programmatically do anything with Vault.

Secrets written to Vault are encrypted and then written to backend storage. For our dev server, backend storage is in-memory, but in production this would more likely be on disk or in Consul. Vault encrypts the value before it is ever handed to the storage driver. The backend storage mechanism never sees the unencrypted value and doesn't have the means necessary to decrypt it without Vault.


Let's start by writing a secret. This is done very simply with the vault kv command, as shown below:

$ vault kv put secret/hello foo=world
Key              Value
---              -----
created_time     2019-03-18T18:32:38.887747Z
deletion_time    n/a
destroyed        false
version          1

This writes the pair foo=world to the path secret/hello. We'll cover paths in more detail later, but for now it is important that the path is prefixed with secret/, otherwise this example won't work. The secret/ prefix is where arbitrary secrets can be read and written.

We can even write multiple pieces of data, if we want:

$ vault kv put secret/hello foo=world excited=yes
Key              Value
---              -----
created_time     2019-03-18T18:34:59.445506Z
deletion_time    n/a
destroyed        false
version          2

vault kv put is a very powerful command. In addition to writing data directly from the command-line, it can read values and key pairs from STDIN as well as files.


Getting a Secret

The secrets can be gotten with vault get:

$ vault kv get secret/hello
====== Metadata ======
Key              Value
---              -----
created_time     2019-03-18T18:34:59.445506Z
deletion_time    n/a
destroyed        false
version          2

===== Data =====
Key        Value
---        -----
excited    yes
foo        world

As we can see, the values we wrote are given back to us. Vault gets the data from storage and decrypts it.

The output format is purposefully whitespace separated to make it easy to pipe into a tool like awk.

This contains some extra information. Many secrets engines create leases for secrets that allow time-limited access to other systems, and in those cases lease_id would contain a lease identifier and lease_duration would contain the length of time for which the lease is valid, in seconds.

To print only the value of a given field:

$ vault kv get -field=excited secret/hello
yes

Optional JSON output is very useful for scripts. For example below we use the jq tool to extract the value of the excited secret:

$ vault kv get -format=json secret/hello | jq -r .data.data.excited
yes


Deleting a Secret

Now that we've learned how to read and write a secret, let's go ahead and delete it. We can do this with vault delete:

$ vault kv delete secret/hello
Success! Data deleted (if it existed) at: secret/hello


Secrets Engines

Vault behaves similarly to a virtual filesystem. The read/write/delete/list operations are forwarded to the corresponding secrets engine, and the secrets engine decides how to react to those operations.

This abstraction is incredibly powerful. It enables Vault to interface directly with physical systems, databases, HSMs, etc. But in addition to these physical systems, Vault can interact with more unique environments like AWS IAM, dynamic SQL user creation, etc. all while using the same read/write interface.


In the previous section, while we're doing read and write arbitrary secrets to Vault, our requests started with secret/. Try the following command which will result an error:

$ vault write foo/bar a=b
Error writing data to foo/bar: Error making API request.

URL: PUT http://127.0.0.1:8200/v1/foo/bar
Code: 404. Errors:

* no handler for route 'foo/bar'

Similarly, vault kv put foo/bar a=b will return an error.

The path prefix tells Vault which secrets engine to which it should route traffic. When a request comes to Vault, it matches the initial path part using a longest prefix match and then passes the request to the corresponding secrets engine enabled at that path.

By default, Vault enables a secrets engine called kv at the path secret/. The kv secrets engine reads and writes raw data to the backend storage.

Vault supports many other secrets engines besides kv, and this feature makes Vault flexible and unique. For example, the aws secrets engine generates AWS IAM access keys on demand. The database secrets engine generates on-demand, time-limited database credentials. These are just a few examples of the many available secrets engines.

For simplicity and familiarity, Vault presents these secrets engines similar to a filesystem. A secrets engine is enabled at a path. Vault itself performs prefix routing on incoming requests and routes the request to the correct secrets engine based on the path at which they were enabled.

This section discusses secrets engines and the operations they support. This information is important to both operators who will configure Vault and users who will interact with Vault.


Enable Secret Engines

To get started, enable another instance of the kv secrets engine at a different path. Just like a filesystem, Vault can enable a secrets engine at many different paths. Each path is completely isolated and cannot talk to other paths. For example, a kv secrets engine enabled at foo has no ability to communicate with a kv secrets engine enabled at bar.

$ vault secrets enable -path=kv kv
Success! Enabled the kv secrets engine at: kv/

The path where the secrets engine is enabled defaults to the name of the secrets engine. Thus, the following commands are actually equivalent:

$ vault secrets enable -path=kv kv

$ vault secrets enable kv

To verify our success and get more information about the secrets engine, use the vault secrets list command:

$ vault secrets list
Path          Type         Accessor              Description
----          ----         --------              -----------
cubbyhole/    cubbyhole    cubbyhole_2a2329af    per-token private secret storage
identity/     identity     identity_56aabb04     identity store
kv/           kv           kv_e44ff061           n/a
secret/       kv           kv_ac4edc01           key/value secret storage
sys/          system       system_4f2059d2       system endpoints used for control, policy and debugging

This shows there are 5 enabled secrets engines on this Vault server. We can see the type of the secrets engine, the corresponding path, and an optional description (or "n/a" if none was given).

Take a few moments to read and write some data to the new kv secrets engine enabled at kv/. Here are a few ideas to get started:

$ vault write kv/my-secret value="s3c(eT"
Success! Data written to: kv/my-secret

$ vault write kv/hello target=world
Success! Data written to: kv/hello

$ vault write kv/airplane type=boeing class=787
Success! Data written to: kv/airplane

$ vault list kv
Keys
----
airplane
hello
my-secret


Disable Secret Engines

When a secrets engine is no longer needed, it can be disabled. When a secrets engine is disabled, all secrets are revoked and the corresponding Vault data and configuration is removed. Any requests to route data to the original path would result in an error, but another secrets engine could now be enabled at that path.

If, for some reason, Vault is unable to delete the data or revoke the leases, the disabling operation will fail. If this happens, the secrets engine will remain enabled and available, but the request will return an error.

$ vault secrets disable kv/
Success! Disabled the secrets engine (if it existed) at: kv/

Note that this command takes a PATH to the secrets engine as an argument, not the TYPE of the secrets engine.

In addition to disabling a secrets engine, it is also possible to "move" a secrets engine to a new path. This is still a disruptive command. All configuration data is retained, but any secrets are revoked, since secrets are closely tied to their engine's paths.


Dynamic Secrets

Now that we've experimented with the kv secrets engine, it is time to explore another feature of Vault: dynamic secrets.

Unlike the kv secrets where we had to put data into the store ourselves, dynamic secrets are generated when they are accessed. Dynamic secrets do not exist until they are read, so there is no risk of someone stealing them or another client using the same secrets. Because Vault has built-in revocation mechanisms, dynamic secrets can be revoked immediately after use, minimizing the amount of time the secret existed.


Enable the AWS Secrets Engine

Unlike the kv secrets engine which is enabled by default, the AWS secrets engine must be enabled before use. This step is usually done via a configuration management system.

$ vault secrets enable -path=aws aws
Success! Enabled the aws secrets engine at: aws/

The AWS secrets engine is now enabled at aws/. As we covered in the previous sections, different secrets engines allow for different behavior. In this case, the AWS secrets engine generates dynamic, on-demand AWS access credentials.


Configure the AWS Secrets Engine

After enabling the AWS secrets engine, we must configure it to authenticate and communicate with AWS. This requires privileged account credentials. If we are unfamiliar with AWS, use root account keys.

$ vault write aws/config/root \
    access_key=AK...5Q \
    secret_key=KLj...jb \
    region=us-east-1
Success! Data written to: aws/config/root


Create a role

The next step is to configure a role. A role in Vault is a human-friendly identifier to an action. Think of it as a symlink.

Vault knows how to create an IAM user via the AWS API, but it does not know what permissions, groups, and policies we want to attach to that user. This is where roles come in - roles map our configuration options to those API calls.

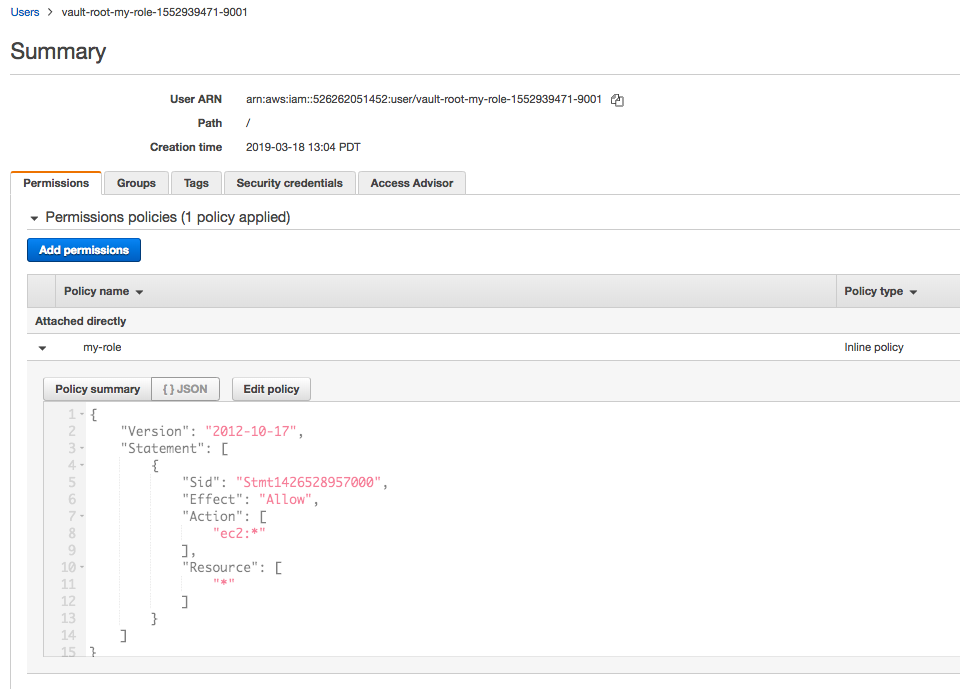
For example, here is an IAM policy that enables all actions on EC2. When Vault generates an access key, it will automatically attach this policy. The generated access key will have full access to EC2 (as dictated by this policy), but not IAM or other AWS services. If not familiar with AWS' IAM policies, that is okay - just use this one for now.

{
  "Version": "2012-10-17",
  "Statement": [
    {
      "Sid": "Stmt1426528957000",
      "Effect": "Allow",
      "Action": ["ec2:*"],
      "Resource": ["*"]
    }
  ]
}

As mentioned above, we need to map this policy document to a named role. To do that, write to aws/roles/:name where :name is a unique name that describes the role (such as aws/roles/my-role):

$ vault write aws/roles/my-role \
        credential_type=iam_user \
        policy_document=-<<EOF
{
  "Version": "2012-10-17",
  "Statement": [
    {
      "Sid": "Stmt1426528957000",
      "Effect": "Allow",
      "Action": [
        "ec2:*"
      ],
      "Resource": [
        "*"
      ]
    }
  ]
}
EOF
Success! Data written to: aws/roles/my-role

Note that we're using a special path here aws/roles/:name to write an IAM policy to Vault. We just told Vault:

    When I ask for a credential for "my-role", create it and attach the IAM policy { "Version": "2012..." }.

Let's go into AWS account and check:

vault-users-my-role.png

vault-inline-policy.png


Generating the secret

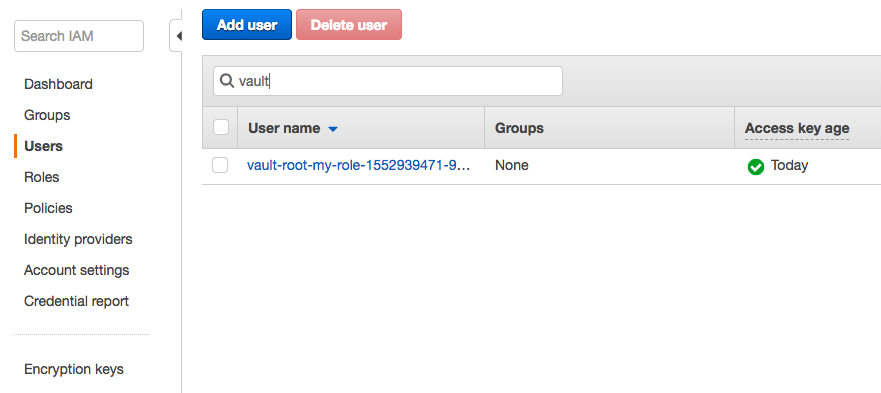
Now that the AWS secrets engine is enabled and configured with a role, we can ask Vault to generate an access key pair for that role by reading from aws/creds/:name where :name corresponds to the name of an existing role:

$ vault read aws/creds/my-role
Key                Value
---                -----
lease_id           aws/creds/my-role/bvgZQCEQckDslQbKoMVrOVLv
lease_duration     768h
lease_renewable    true
access_key         AKIAIY65XACZXRKQ2MLQ
secret_key         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
security_token     <nil>

Success! The access and secret key can now be used to perform any EC2 operations within AWS. Notice that these keys are new, they are not the keys we entered earlier. If we were to run the command a second time, we would get a new access key pair. Each time we read from aws/creds/:name, Vault will connect to AWS and generate a new IAM user and key pair.

Take careful note of the lease_id field in the output. This value is used for renewal, revocation, and inspection. Copy this lease_id to our clipboard. Note that the lease_id is the full path, not just the UUID at the end.


Revoking the secret

Vault will automatically revoke this credential after 768 hours (32 days) (see lease_duration in the output), but perhaps we want to revoke it early. Once the secret is revoked, the access keys are no longer valid.

To revoke the secret, use vault revoke with the lease ID that was outputted from vault read when we ran it:

$ vault lease revoke aws/creds/my-role/bvgZQCEQckDslQbKoMVrOVLv
All revocation operations queued successfully!

Done! If we login to our AWS account, we will see that no IAM users exist. If we try to use the access keys that were generated, we will find that they no longer work.

With such easy dynamic creation and revocation, we can hopefully begin to see how easy it is to work with dynamic secrets and ensure they only exist for the duration that they are needed.


We've now worked with vault write and vault read for multiple paths: the kv secrets engine with kv/ and dynamic AWS credentials with the AWS secrets engine provider at aws/.

In both cases, the structure and usage of each secrets engines differed, for example the AWS backend has special paths like aws/config.


Authentication

Now that we know how to use the basics of Vault, it is important to understand how to authenticate to Vault itself.

Up to this point, we have not logged in to Vault. When starting the Vault server in dev mode, it automatically logs us in as the root user with admin permissions. In a non-dev setup, we would have had to authenticate first.

On this page, we'll talk specifically about authentication. Then, later sections, we'll talk about authorization. Authentication is the mechanism of assigning an identity to a Vault user. The access control and permissions associated with an identity are authorization, and will not be covered in this section.

Vault has pluggable auth methods, making it easy to authenticate with Vault using whatever form works best for our organization. In this section we will use the token auth method and the GitHub auth method.


Authentication is the process by which user or machine-supplied information is verified and converted into a Vault token with matching policies attached. The easiest way to think about Vault's authentication is to compare it to a website.

When a user authenticates to a website, they enter their username, password, and maybe 2FA code. That information is verified against external sources (a database most likely), and the website responds with a success or failure. On success, the website also returns a signed cookie that contains a session id which uniquely identifies that user for this session. That cookie and session id are automatically carried by the browser to future requests so the user is authenticated.

Can we imagine how terrible it would be to require a user to enter their login credentials on each page?

Vault behaves very similarly, but it is much more flexible and pluggable than a standard website. Vault supports many different authentication mechanisms, but they all funnel into a single "session token", which we call the "Vault token".

Authentication is simply the process by which a user or machine gets a Vault token.


Tokens

Token authentication is enabled by default in Vault and cannot be disabled. When we start a dev server with vault server -dev, it prints our root token. The root token is the initial access token to configure Vault. It has root privileges, so it can perform any operation within Vault.

We can create more tokens:

$ vault token create
Key                  Value
---                  -----
token                s.yHEnGe7XnEzQTMCCiWBv02Mg
token_accessor       1MHZWUGBRfiKbbtJ7VQX1tVy
token_duration       ∞
token_renewable      false
token_policies       ["root"]
identity_policies    []
policies             ["root"]

By default, this will create a child token of our current token that inherits all the same policies. The "child" concept here is important: tokens always have a parent, and when that parent token is revoked, children can also be revoked all in one operation. This makes it easy when removing access for a user, to remove access for all sub-tokens that user created as well.

To authenticate with a token:

$ vault login s.yHEnGe7XnEzQTMCCiWBv02Mg
is already stored in the token helper. You do NOT need to run "vault login"
again. Future Vault requests will automatically use this token.

Key                  Value
---                  -----
token                s.yHEnGe7XnEzQTMCCiWBv02Mg
token_accessor       1MHZWUGBRfiKbbtJ7VQX1tVy
token_duration       ∞
token_renewable      false
token_policies       ["root"]
identity_policies    []
policies             ["root"]

This authenticates with Vault. It will verify our token and let us know what access policies the token is associated with.

After a token is created, we can revoke it:

$ vault token revoke s.yHEnGe7XnEzQTMCCiWBv02Mg
Success! Revoked token (if it existed)

In a previous section, we used the vault lease revoke command. This command is only used for revoking leases. For revoking tokens, use vault token revoke.

Log back in with root token:

$ vault login $VAULT_DEV_ROOT_TOKEN_ID
Success! You are now authenticated. The token information displayed below
is already stored in the token helper. You do NOT need to run "vault login"
again. Future Vault requests will automatically use this token.

Key                  Value
---                  -----
token                s.lwp09Q4MKWuHLoFu2ohvTTa0
token_accessor       SnvQEKl3wsXiSoFh3PuTeXMS
token_duration       ∞
token_renewable      false
token_policies       ["root"]
identity_policies    []
policies             ["root"]


Auth methods

Vault supports many auth methods, but they must be enabled before use. Auth methods give us flexibility. Enabling and configuring auth methods are typically performed by a Vault operator or security team. As an example of a human-focused auth method, let's authenticate via GitHub.

First, enable the GitHub auth method:

$ vault auth enable -path=github github
Success! Enabled github auth method at: github/

Just like secrets engines, auth methods default to their TYPE as the PATH, so the following commands are equivalent:

$ vault auth enable -path=github github

$ vault auth enable github

Unlike secrets engines which are enabled at the root router, auth methods are always prefixed with auth/ in their path. So the GitHub auth method we just enabled is accessible at auth/github. As another example:

$ vault auth enable -path=my-github github
Success! Enabled github auth method at: my-github/

This would make the GitHub auth method accessible at auth/my-github. We can use vault path-help to learn more about the paths.


Next, configure the GitHub auth method. Each auth method has different configuration options, in this case, the minimal set of configuration is to map teams to policies.

$ vault write auth/github/config organization=hashicorp
Success! Data written to: auth/github/config

With the GitHub auth method enabled, we first have to configure it. For GitHub, we tell it what organization users must be a part of, and map a team to a policy:

$ vault write auth/github/map/teams/my-team value=default,my-policy
Success! Data written to: auth/github/map/teams/my-team

The previous command configures Vault to pull authentication data from the "hashicorp" organization on GitHub. The next command tells Vault to map any users who are members of the team "my-team" (in the hashicorp organization) to map to the policies "default" and "my-policy". These policies do not have to exist in the system yet - Vault will just produce a warning when we login.


As a user, we may want to find which auth methods are enabled and available:

$ vault auth list
Path          Type      Accessor                Description
----          ----      --------                -----------
github/       github    auth_github_3cb0078a    n/a
my-github/    github    auth_github_f5475f28    n/a
token/        token     auth_token_2e0cad03     token based credentials

The vault auth list command will list all enabled auth methods. To learn more about how to authenticate to a particular auth method via the CLI, use the vault auth help command with the PATH or TYPE of an auth method:

$ vault auth help github
Usage: vault login -method=github [CONFIG K=V...]

  The GitHub auth method allows users to authenticate using a GitHub
  personal access token. Users can generate a personal access token from the
  settings page on their GitHub account.

  Authenticate using a GitHub token:

      $ vault login -method=github token=abcd1234

Configuration:

  mount=
      Path where the GitHub credential method is mounted. This is usually
      provided via the -path flag in the "vault login" command, but it can be
      specified here as well. If specified here, it takes precedence over the
      value for -path. The default value is "github".

  token=
      GitHub personal access token to use for authentication. If not provided,
      Vault will prompt for the value.

Similarly, we can ask for help information about any CLI auth method, even if it is not enabled:

$ vault auth help aws

$ vault auth help userpass

$ vault auth help token

As per the help output, authenticate to GitHub using the vault login command. Enter a GitHub personal access token and Vault will authenticate us.

$ vault login -method=github token=GITHUB_TOKEN
Error authenticating: Error making API request.

URL: PUT http://127.0.0.1:8200/v1/auth/github/login
Code: 400. Errors:

* user is not part of required org

For a while, I was stuck at the error "user is not part of required org".

Need to create an org in Github, in my case, "einsteinish-dev", and do the steps again:

$ vault write auth/github/config organization=einsteinish-dev
Success! Data written to: auth/github/config

$ vault write auth/github/map/teams/my-team value=default,my-policy
Success! Data written to: auth/github/map/teams/my-team

$ vault login -method=github token=$ vault login -method=github token=748c3b85c04edcc0518f9d9ef75c402ee72801dd
Success! You are now authenticated. The token information displayed below
is already stored in the token helper. You do NOT need to run "vault login"
again. Future Vault requests will automatically use this token.

Key                    Value
---                    -----
token                  s.HcGpr7TDmUsi4lyCWrVQuIiw
token_accessor         5tmpMDS93SIOR1bWCb23ebS8
token_duration         768h
token_renewable        true
token_policies         ["default"]
identity_policies      []
policies               ["default"]
token_meta_org         einsteinish-dev
token_meta_username    Einsteinish

Success! As the output indicates, Vault has already saved the resulting token in its token helper, so we do not need to run vault login again. However, this new user we just created does not have many permissions in Vault. To continue, re-authenticate as the root token:

$ vault login $VAULT_DEV_ROOT_TOKEN_ID
Success! You are now authenticated. The token information displayed below
is already stored in the token helper. You do NOT need to run "vault login"
again. Future Vault requests will automatically use this token.

Key                  Value
---                  -----
token                s.lwp09Q4MKWuHLoFu2ohvTTa0
token_accessor       SnvQEKl3wsXiSoFh3PuTeXMS
token_duration       ∞
token_renewable      false
token_policies       ["root"]
identity_policies    []
policies             ["root"]

$ vault login s.lwp09Q4MKWuHLoFu2ohvTTa0
Success! You are now authenticated. The token information displayed below
is already stored in the token helper. You do NOT need to run "vault login"
again. Future Vault requests will automatically use this token.

Key                  Value
---                  -----
token                s.lwp09Q4MKWuHLoFu2ohvTTa0
token_accessor       SnvQEKl3wsXiSoFh3PuTeXMS
token_duration       ∞
token_renewable      false
token_policies       ["root"]
identity_policies    []
policies             ["root"]

We can revoke any logins from an auth method using vault token revoke with the -mode argument. For example:

$ vault token revoke -mode path auth/github
Success! Revoked token (if it existed)

Alternatively, if we want to completely disable the GitHub auth method:

$ vault auth disable github
Success! Disabled the auth method (if it existed) at: github/

This will also revoke any logins for that auth method.


Terraform

  • Introduction to Terraform with AWS elb & nginx
  • Terraform Tutorial - terraform format(tf) and interpolation(variables)
  • Terraform Tutorial - user_data
  • Terraform Tutorial - variables
  • Terraform Tutorial - creating multiple instances (count, list type and element() function)
  • Terraform 12 Tutorial - Loops with count, for_each, and for
  • Terraform Tutorial - State (terraform.tfstate) & terraform import
  • Terraform Tutorial - Output variables
  • Terraform Tutorial - Destroy
  • Terraform Tutorial - Modules
  • Terraform Tutorial - Creating AWS S3 bucket / SQS queue resources and notifying bucket event to queue
  • Terraform Tutorial - AWS ASG and Modules
  • Terraform Tutorial - VPC, Subnets, RouteTable, ELB, Security Group, and Apache server I
  • Terraform Tutorial - VPC, Subnets, RouteTable, ELB, Security Group, and Apache server II
  • Terraform Tutorial - Docker nginx container with ALB and dynamic autoscaling
  • Terraform Tutorial - AWS ECS using Fargate : Part I
  • Hashicorp Vault
  • HashiCorp Vault Agent
  • HashiCorp Vault and Consul on AWS with Terraform
  • Ansible with Terraform
  • AWS IAM user, group, role, and policies - part 1
  • AWS IAM user, group, role, and policies - part 2
  • Delegate Access Across AWS Accounts Using IAM Roles
  • AWS KMS
  • terraform import & terraformer import
  • Terraform commands cheat sheet
  • Terraform Cloud
  • Terraform 14
  • Creating Private TLS Certs


  • Ph.D. / Golden Gate Ave, San Francisco / Seoul National Univ / Carnegie Mellon / UC Berkeley / DevOps / Deep Learning / Visualization

    YouTubeMy YouTube channel

    Sponsor Open Source development activities and free contents for everyone.

    Thank you.

    - K Hong


    Terraform


    Introduction to Terraform with AWS elb & nginx

    Terraform Tutorial - terraform format(tf) and interpolation(variables)

    Terraform Tutorial - user_data

    Terraform Tutorial - variables

    Terraform 12 Tutorial - Loops with count, for_each, and for

    Terraform Tutorial - creating multiple instances (count, list type and element() function)

    Terraform Tutorial - State (terraform.tfstate) & terraform import

    Terraform Tutorial - Output variables

    Terraform Tutorial - Destroy

    Terraform Tutorial - Modules

    Terraform Tutorial - Creating AWS S3 bucket / SQS queue resources and notifying bucket event to queue

    Terraform Tutorial - AWS ASG and Modules

    Terraform Tutorial - VPC, Subnets, RouteTable, ELB, Security Group, and Apache server I

    Terraform Tutorial - VPC, Subnets, RouteTable, ELB, Security Group, and Apache server II

    Terraform Tutorial - Docker nginx container with ALB and dynamic autoscaling

    Terraform Tutorial - AWS ECS using Fargate : Part I

    Hashicorp Vault

    HashiCorp Vault Agent

    HashiCorp Vault and Consul on AWS with Terraform

    Ansible with Terraform

    AWS IAM user, group, role, and policies - part 1

    AWS IAM user, group, role, and policies - part 2

    Delegate Access Across AWS Accounts Using IAM Roles

    AWS KMS

    terraform import & terraformer import

    Terraform commands cheat sheet

    Terraform Cloud

    Terraform 14

    Creating Private TLS Certs


    Sponsor Open Source development activities and free contents for everyone.

    Thank you.

    - K Hong


    DevOps


    Phases of Continuous Integration

    Software development methodology

    Introduction to DevOps

    Samples of Continuous Integration (CI) / Continuous Delivery (CD) - Use cases

    Artifact repository and repository management

    Linux - General, shell programming, processes & signals ...

    RabbitMQ...

    MariaDB

    New Relic APM with NodeJS : simple agent setup on AWS instance

    Nagios on CentOS 7 with Nagios Remote Plugin Executor (NRPE)

    Nagios - The industry standard in IT infrastructure monitoring on Ubuntu

    Zabbix 3 install on Ubuntu 14.04 & adding hosts / items / graphs

    Datadog - Monitoring with PagerDuty/HipChat and APM

    Install and Configure Mesos Cluster

    Cassandra on a Single-Node Cluster

    Container Orchestration : Docker Swarm vs Kubernetes vs Apache Mesos

    OpenStack install on Ubuntu 16.04 server - DevStack

    AWS EC2 Container Service (ECS) & EC2 Container Registry (ECR) | Docker Registry

    CI/CD with CircleCI - Heroku deploy

    Introduction to Terraform with AWS elb & nginx

    Docker & Kubernetes

    Kubernetes I - Running Kubernetes Locally via Minikube

    Kubernetes II - kops on AWS

    Kubernetes III - kubeadm on AWS

    AWS : EKS (Elastic Container Service for Kubernetes)

    CI/CD Github actions

    CI/CD Gitlab


    DevOps / Sys Admin Q & A


    (1A) - Linux Commands

    (1B) - Linux Commands

    (2) - Networks

    (2B) - Networks

    (3) - Linux Systems

    (4) - Scripting (Ruby/Shell)

    (5) - Configuration Management

    (6) - AWS VPC setup (public/private subnets with NAT)

    (6B) - AWS VPC Peering

    (7) - Web server

    (8) - Database

    (9) - Linux System / Application Monitoring, Performance Tuning, Profiling Methods & Tools

    (10) - Trouble Shooting: Load, Throughput, Response time and Leaks

    (11) - SSH key pairs, SSL Certificate, and SSL Handshake

    (12) - Why is the database slow?

    (13) - Is my web site down?

    (14) - Is my server down?

    (15) - Why is the server sluggish?

    (16A) - Serving multiple domains using Virtual Hosts - Apache

    (16B) - Serving multiple domains using server block - Nginx

    (16C) - Reverse proxy servers and load balancers - Nginx

    (17) - Linux startup process

    (18) - phpMyAdmin with Nginx virtual host as a subdomain

    (19) - How to SSH login without password?

    (20) - Log Rotation

    (21) - Monitoring Metrics

    (22) - lsof

    (23) - Wireshark introduction

    (24) - User account management

    (25) - Domain Name System (DNS)

    (26) - NGINX SSL/TLS, Caching, and Session

    (27) - Troubleshooting 5xx server errors

    (28) - Linux Systemd: journalctl

    (29) - Linux Systemd: FirewallD

    (30) - Linux: SELinux

    (31) - Linux: Samba

    (0) - Linux Sys Admin's Day to Day tasks


    Ansible 2.0


    What is Ansible?

    Quick Preview - Setting up web servers with Nginx, configure environments, and deploy an App

    SSH connection & running commands

    Ansible: Playbook for Tomcat 9 on Ubuntu 18.04 systemd with AWS

    Modules

    Playbooks

    Handlers

    Roles

    Playbook for LAMP HAProxy

    Installing Nginx on a Docker container

    AWS : Creating an ec2 instance & adding keys to authorized_keys

    AWS : Auto Scaling via AMI

    AWS : creating an ELB & registers an EC2 instance from the ELB

    Deploying Wordpress micro-services with Docker containers on Vagrant box via Ansible

    Setting up Apache web server

    Deploying a Go app to Minikube

    Ansible with Terraform


    Jenkins


    Install

    Configuration - Manage Jenkins - security setup

    Adding job and build

    Scheduling jobs

    Managing_plugins

    Git/GitHub plugins, SSH keys configuration, and Fork/Clone

    JDK & Maven setup

    Build configuration for GitHub Java application with Maven

    Build Action for GitHub Java application with Maven - Console Output, Updating Maven

    Commit to changes to GitHub & new test results - Build Failure

    Commit to changes to GitHub & new test results - Successful Build

    Adding code coverage and metrics

    Jenkins on EC2 - creating an EC2 account, ssh to EC2, and install Apache server

    Jenkins on EC2 - setting up Jenkins account, plugins, and Configure System (JAVA_HOME, MAVEN_HOME, notification email)

    Jenkins on EC2 - Creating a Maven project

    Jenkins on EC2 - Configuring GitHub Hook and Notification service to Jenkins server for any changes to the repository

    Jenkins on EC2 - Line Coverage with JaCoCo plugin

    Setting up Master and Slave nodes

    Jenkins Build Pipeline & Dependency Graph Plugins

    Jenkins Build Flow Plugin

    Pipeline Jenkinsfile with Classic / Blue Ocean

    Jenkins Setting up Slave nodes on AWS

    Jenkins Q & A


    Puppet


    Puppet with Amazon AWS I - Puppet accounts

    Puppet with Amazon AWS II (ssh & puppetmaster/puppet install)

    Puppet with Amazon AWS III - Puppet running Hello World

    Puppet Code Basics - Terminology

    Puppet with Amazon AWS on CentOS 7 (I) - Master setup on EC2

    Puppet with Amazon AWS on CentOS 7 (II) - Configuring a Puppet Master Server with Passenger and Apache

    Puppet master /agent ubuntu 14.04 install on EC2 nodes

    Puppet master post install tasks - master's names and certificates setup,

    Puppet agent post install tasks - configure agent, hostnames, and sign request

    EC2 Puppet master/agent basic tasks - main manifest with a file resource/module and immediate execution on an agent node

    Setting up puppet master and agent with simple scripts on EC2 / remote install from desktop

    EC2 Puppet - Install lamp with a manifest ('puppet apply')

    EC2 Puppet - Install lamp with a module

    Puppet variable scope

    Puppet packages, services, and files

    Puppet packages, services, and files II with nginx Puppet templates

    Puppet creating and managing user accounts with SSH access

    Puppet Locking user accounts & deploying sudoers file

    Puppet exec resource

    Puppet classes and modules

    Puppet Forge modules

    Puppet Express

    Puppet Express 2

    Puppet 4 : Changes

    Puppet --configprint

    Puppet with Docker

    Puppet 6.0.2 install on Ubuntu 18.04


    Chef


    What is Chef?

    Chef install on Ubuntu 14.04 - Local Workstation via omnibus installer

    Setting up Hosted Chef server

    VirtualBox via Vagrant with Chef client provision

    Creating and using cookbooks on a VirtualBox node

    Chef server install on Ubuntu 14.04

    Chef workstation setup on EC2 Ubuntu 14.04

    Chef Client Node - Knife Bootstrapping a node on EC2 ubuntu 14.04


    Docker & K8s


    Docker install on Amazon Linux AMI

    Docker install on EC2 Ubuntu 14.04

    Docker container vs Virtual Machine

    Docker install on Ubuntu 14.04

    Docker Hello World Application

    Nginx image - share/copy files, Dockerfile

    Working with Docker images : brief introduction

    Docker image and container via docker commands (search, pull, run, ps, restart, attach, and rm)

    More on docker run command (docker run -it, docker run --rm, etc.)

    Docker Networks - Bridge Driver Network

    Docker Persistent Storage

    File sharing between host and container (docker run -d -p -v)

    Linking containers and volume for datastore

    Dockerfile - Build Docker images automatically I - FROM, MAINTAINER, and build context

    Dockerfile - Build Docker images automatically II - revisiting FROM, MAINTAINER, build context, and caching

    Dockerfile - Build Docker images automatically III - RUN

    Dockerfile - Build Docker images automatically IV - CMD

    Dockerfile - Build Docker images automatically V - WORKDIR, ENV, ADD, and ENTRYPOINT

    Docker - Apache Tomcat

    Docker - NodeJS

    Docker - NodeJS with hostname

    Docker Compose - NodeJS with MongoDB

    Docker - Prometheus and Grafana with Docker-compose

    Docker - StatsD/Graphite/Grafana

    Docker - Deploying a Java EE JBoss/WildFly Application on AWS Elastic Beanstalk Using Docker Containers

    Docker : NodeJS with GCP Kubernetes Engine

    Docker : Jenkins Multibranch Pipeline with Jenkinsfile and Github

    Docker : Jenkins Master and Slave

    Docker - ELK : ElasticSearch, Logstash, and Kibana

    Docker - ELK 7.6 : Elasticsearch on Centos 7 Docker - ELK 7.6 : Filebeat on Centos 7

    Docker - ELK 7.6 : Logstash on Centos 7

    Docker - ELK 7.6 : Kibana on Centos 7 Part 1

    Docker - ELK 7.6 : Kibana on Centos 7 Part 2

    Docker - ELK 7.6 : Elastic Stack with Docker Compose

    Docker - Deploy Elastic Cloud on Kubernetes (ECK) via Elasticsearch operator on minikube

    Docker - Deploy Elastic Stack via Helm on minikube

    Docker Compose - A gentle introduction with WordPress

    Docker Compose - MySQL

    MEAN Stack app on Docker containers : micro services

    Docker Compose - Hashicorp's Vault and Consul Part A (install vault, unsealing, static secrets, and policies)

    Docker Compose - Hashicorp's Vault and Consul Part B (EaaS, dynamic secrets, leases, and revocation)

    Docker Compose - Hashicorp's Vault and Consul Part C (Consul)

    Docker Compose with two containers - Flask REST API service container and an Apache server container

    Docker compose : Nginx reverse proxy with multiple containers

    Docker compose : Nginx reverse proxy with multiple containers

    Docker & Kubernetes : Envoy - Getting started

    Docker & Kubernetes : Envoy - Front Proxy

    Docker & Kubernetes : Ambassador - Envoy API Gateway on Kubernetes

    Docker Packer

    Docker Cheat Sheet

    Docker Q & A

    Kubernetes Q & A - Part I

    Kubernetes Q & A - Part II

    Docker - Run a React app in a docker

    Docker - Run a React app in a docker II (snapshot app with nginx)

    Docker - NodeJS and MySQL app with React in a docker

    Docker - Step by Step NodeJS and MySQL app with React - I

    Installing LAMP via puppet on Docker

    Docker install via Puppet

    Nginx Docker install via Ansible

    Apache Hadoop CDH 5.8 Install with QuickStarts Docker

    Docker - Deploying Flask app to ECS

    Docker Compose - Deploying WordPress to AWS

    Docker - WordPress Deploy to ECS with Docker-Compose (ECS-CLI EC2 type)

    Docker - ECS Fargate

    Docker - AWS ECS service discovery with Flask and Redis

    Docker & Kubernetes: minikube version: v1.31.2, 2023

    Docker & Kubernetes 1 : minikube

    Docker & Kubernetes 2 : minikube Django with Postgres - persistent volume

    Docker & Kubernetes 3 : minikube Django with Redis and Celery

    Docker & Kubernetes 4 : Django with RDS via AWS Kops

    Docker & Kubernetes : Kops on AWS

    Docker & Kubernetes : Ingress controller on AWS with Kops

    Docker & Kubernetes : HashiCorp's Vault and Consul on minikube

    Docker & Kubernetes : HashiCorp's Vault and Consul - Auto-unseal using Transit Secrets Engine

    Docker & Kubernetes : Persistent Volumes & Persistent Volumes Claims - hostPath and annotations

    Docker & Kubernetes : Persistent Volumes - Dynamic volume provisioning

    Docker & Kubernetes : DaemonSet

    Docker & Kubernetes : Secrets

    Docker & Kubernetes : kubectl command

    Docker & Kubernetes : Assign a Kubernetes Pod to a particular node in a Kubernetes cluster

    Docker & Kubernetes : Configure a Pod to Use a ConfigMap

    AWS : EKS (Elastic Container Service for Kubernetes)

    Docker & Kubernetes : Run a React app in a minikube

    Docker & Kubernetes : Minikube install on AWS EC2

    Docker & Kubernetes : Cassandra with a StatefulSet

    Docker & Kubernetes : Terraform and AWS EKS

    Docker & Kubernetes : Pods and Service definitions

    Docker & Kubernetes : Headless service and discovering pods

    Docker & Kubernetes : Service IP and the Service Type

    Docker & Kubernetes : Kubernetes DNS with Pods and Services

    Docker & Kubernetes - Scaling and Updating application

    Docker & Kubernetes : Horizontal pod autoscaler on minikubes

    Docker & Kubernetes : NodePort vs LoadBalancer vs Ingress

    Docker & Kubernetes : Load Testing with Locust on GCP Kubernetes

    Docker & Kubernetes : From a monolithic app to micro services on GCP Kubernetes

    Docker & Kubernetes : Rolling updates

    Docker & Kubernetes : Deployments to GKE (Rolling update, Canary and Blue-green deployments)

    Docker & Kubernetes : Slack Chat Bot with NodeJS on GCP Kubernetes

    Docker & Kubernetes : Continuous Delivery with Jenkins Multibranch Pipeline for Dev, Canary, and Production Environments on GCP Kubernetes

    Docker & Kubernetes - MongoDB with StatefulSets on GCP Kubernetes Engine

    Docker & Kubernetes : Nginx Ingress Controller on minikube

    Docker & Kubernetes : Setting up Ingress with NGINX Controller on Minikube (Mac)

    Docker & Kubernetes : Nginx Ingress Controller for Dashboard service on Minikube

    Docker & Kubernetes : Nginx Ingress Controller on GCP Kubernetes

    Docker & Kubernetes : Kubernetes Ingress with AWS ALB Ingress Controller in EKS

    Docker & Kubernetes : MongoDB / MongoExpress on Minikube

    Docker & Kubernetes : Setting up a private cluster on GCP Kubernetes

    Docker & Kubernetes : Kubernetes Namespaces (default, kube-public, kube-system) and switching namespaces (kubens)

    Docker & Kubernetes : StatefulSets on minikube

    Docker & Kubernetes : StatefulSets on minikube

    Docker & Kubernetes : RBAC

    Docker & Kubernetes Service Account, RBAC, and IAM

    Docker & Kubernetes - Kubernetes Service Account, RBAC, IAM with EKS ALB, Part 1

    Docker & Kubernetes : Helm Chart

    Docker & Kubernetes : My first Helm deploy

    Docker & Kubernetes : Readiness and Liveness Probes

    Docker & Kubernetes : Helm chart repository with Github pages

    Docker & Kubernetes : Deploying WordPress and MariaDB with Ingress to Minikube using Helm Chart

    Docker & Kubernetes : Deploying WordPress and MariaDB to AWS using Helm 2 Chart

    Docker & Kubernetes : Deploying WordPress and MariaDB to AWS using Helm 3 Chart

    Docker & Kubernetes : Helm Chart for Node/Express and MySQL with Ingress

    Docker & Kubernetes : Docker_Helm_Chart_Node_Expess_MySQL_Ingress.php

    Docker & Kubernetes: Deploy Prometheus and Grafana using Helm and Prometheus Operator - Monitoring Kubernetes node resources out of the box

    Docker & Kubernetes : Deploy Prometheus and Grafana using kube-prometheus-stack Helm Chart

    Docker & Kubernetes : Istio (service mesh) sidecar proxy on GCP Kubernetes

    Docker & Kubernetes : Istio on EKS

    Docker & Kubernetes : Istio on Minikube with AWS EC2 for Bookinfo Application

    Docker & Kubernetes : Deploying .NET Core app to Kubernetes Engine and configuring its traffic managed by Istio (Part I)

    Docker & Kubernetes : Deploying .NET Core app to Kubernetes Engine and configuring its traffic managed by Istio (Part II - Prometheus, Grafana, pin a service, split traffic, and inject faults)

    Docker & Kubernetes : Helm Package Manager with MySQL on GCP Kubernetes Engine

    Docker & Kubernetes : Deploying Memcached on Kubernetes Engine

    Docker & Kubernetes : EKS Control Plane (API server) Metrics with Prometheus

    Docker & Kubernetes : Spinnaker on EKS with Halyard

    Docker & Kubernetes : Continuous Delivery Pipelines with Spinnaker and Kubernetes Engine

    Docker & Kubernetes: Multi-node Local Kubernetes cluster - Kubeadm-dind(docker-in-docker)

    Docker & Kubernetes: Multi-node Local Kubernetes cluster - Kubeadm-kind(k8s-in-docker)

    Docker & Kubernetes : nodeSelector, nodeAffinity, taints/tolerations, pod affinity and anti-affinity - Assigning Pods to Nodes

    Docker & Kubernetes : Jenkins-X on EKS

    Docker & Kubernetes : ArgoCD App of Apps with Heml on Kubernetes

    Docker & Kubernetes : ArgoCD on Kubernetes cluster

    Docker & Kubernetes : GitOps with ArgoCD for Continuous Delivery to Kubernetes clusters (minikube) - guestbook


    Elasticsearch search engine, Logstash, and Kibana


    Elasticsearch, search engine

    Logstash with Elasticsearch

    Logstash, Elasticsearch, and Kibana 4

    Elasticsearch with Redis broker and Logstash Shipper and Indexer

    Samples of ELK architecture

    Elasticsearch indexing performance


    Vagrant


    VirtualBox & Vagrant install on Ubuntu 14.04

    Creating a VirtualBox using Vagrant

    Provisioning

    Networking - Port Forwarding

    Vagrant Share

    Vagrant Rebuild & Teardown

    Vagrant & Ansible


    Big Data & Hadoop Tutorials


    Hadoop 2.6 - Installing on Ubuntu 14.04 (Single-Node Cluster)

    Hadoop 2.6.5 - Installing on Ubuntu 16.04 (Single-Node Cluster)

    Hadoop - Running MapReduce Job

    Hadoop - Ecosystem

    CDH5.3 Install on four EC2 instances (1 Name node and 3 Datanodes) using Cloudera Manager 5

    CDH5 APIs

    QuickStart VMs for CDH 5.3

    QuickStart VMs for CDH 5.3 II - Testing with wordcount

    QuickStart VMs for CDH 5.3 II - Hive DB query

    Scheduled start and stop CDH services

    CDH 5.8 Install with QuickStarts Docker

    Zookeeper & Kafka Install

    Zookeeper & Kafka - single node single broker

    Zookeeper & Kafka - Single node and multiple brokers

    OLTP vs OLAP

    Apache Hadoop Tutorial I with CDH - Overview

    Apache Hadoop Tutorial II with CDH - MapReduce Word Count

    Apache Hadoop Tutorial III with CDH - MapReduce Word Count 2

    Apache Hadoop (CDH 5) Hive Introduction

    CDH5 - Hive Upgrade to 1.3 to from 1.2

    Apache Hive 2.1.0 install on Ubuntu 16.04

    Apache HBase in Pseudo-Distributed mode

    Creating HBase table with HBase shell and HUE

    Apache Hadoop : Hue 3.11 install on Ubuntu 16.04

    Creating HBase table with Java API

    HBase - Map, Persistent, Sparse, Sorted, Distributed and Multidimensional

    Flume with CDH5: a single-node Flume deployment (telnet example)

    Apache Hadoop (CDH 5) Flume with VirtualBox : syslog example via NettyAvroRpcClient

    List of Apache Hadoop hdfs commands

    Apache Hadoop : Creating Wordcount Java Project with Eclipse Part 1

    Apache Hadoop : Creating Wordcount Java Project with Eclipse Part 2

    Apache Hadoop : Creating Card Java Project with Eclipse using Cloudera VM UnoExample for CDH5 - local run

    Apache Hadoop : Creating Wordcount Maven Project with Eclipse

    Wordcount MapReduce with Oozie workflow with Hue browser - CDH 5.3 Hadoop cluster using VirtualBox and QuickStart VM

    Spark 1.2 using VirtualBox and QuickStart VM - wordcount

    Spark Programming Model : Resilient Distributed Dataset (RDD) with CDH

    Apache Spark 2.0.2 with PySpark (Spark Python API) Shell

    Apache Spark 2.0.2 tutorial with PySpark : RDD

    Apache Spark 2.0.0 tutorial with PySpark : Analyzing Neuroimaging Data with Thunder

    Apache Spark Streaming with Kafka and Cassandra

    Apache Spark 1.2 with PySpark (Spark Python API) Wordcount using CDH5

    Apache Spark 1.2 Streaming

    Apache Drill with ZooKeeper install on Ubuntu 16.04 - Embedded & Distributed

    Apache Drill - Query File System, JSON, and Parquet

    Apache Drill - HBase query

    Apache Drill - Hive query

    Apache Drill - MongoDB query


    Redis In-Memory Database


    Redis vs Memcached

    Redis 3.0.1 Install

    Setting up multiple server instances on a Linux host

    Redis with Python

    ELK : Elasticsearch with Redis broker and Logstash Shipper and Indexer


    GCP (Google Cloud Platform)


    GCP: Creating an Instance

    GCP: gcloud compute command-line tool

    GCP: Deploying Containers

    GCP: Kubernetes Quickstart

    GCP: Deploying a containerized web application via Kubernetes

    GCP: Django Deploy via Kubernetes I (local)

    GCP: Django Deploy via Kubernetes II (GKE)


    AWS (Amazon Web Services)


    AWS : EKS (Elastic Container Service for Kubernetes)

    AWS : Creating a snapshot (cloning an image)

    AWS : Attaching Amazon EBS volume to an instance

    AWS : Adding swap space to an attached volume via mkswap and swapon

    AWS : Creating an EC2 instance and attaching Amazon EBS volume to the instance using Python boto module with User data

    AWS : Creating an instance to a new region by copying an AMI

    AWS : S3 (Simple Storage Service) 1

    AWS : S3 (Simple Storage Service) 2 - Creating and Deleting a Bucket

    AWS : S3 (Simple Storage Service) 3 - Bucket Versioning

    AWS : S3 (Simple Storage Service) 4 - Uploading a large file

    AWS : S3 (Simple Storage Service) 5 - Uploading folders/files recursively

    AWS : S3 (Simple Storage Service) 6 - Bucket Policy for File/Folder View/Download

    AWS : S3 (Simple Storage Service) 7 - How to Copy or Move Objects from one region to another

    AWS : S3 (Simple Storage Service) 8 - Archiving S3 Data to Glacier

    AWS : Creating a CloudFront distribution with an Amazon S3 origin

    AWS : Creating VPC with CloudFormation

    WAF (Web Application Firewall) with preconfigured CloudFormation template and Web ACL for CloudFront distribution

    AWS : CloudWatch & Logs with Lambda Function / S3

    AWS : Lambda Serverless Computing with EC2, CloudWatch Alarm, SNS

    AWS : Lambda and SNS - cross account

    AWS : CLI (Command Line Interface)

    AWS : CLI (ECS with ALB & autoscaling)

    AWS : ECS with cloudformation and json task definition

    AWS : AWS Application Load Balancer (ALB) and ECS with Flask app

    AWS : Load Balancing with HAProxy (High Availability Proxy)

    AWS : VirtualBox on EC2

    AWS : NTP setup on EC2

    AWS: jq with AWS

    AWS : AWS & OpenSSL : Creating / Installing a Server SSL Certificate

    AWS : OpenVPN Access Server 2 Install

    AWS : VPC (Virtual Private Cloud) 1 - netmask, subnets, default gateway, and CIDR

    AWS : VPC (Virtual Private Cloud) 2 - VPC Wizard

    AWS : VPC (Virtual Private Cloud) 3 - VPC Wizard with NAT

    AWS : DevOps / Sys Admin Q & A (VI) - AWS VPC setup (public/private subnets with NAT)

    AWS : OpenVPN Protocols : PPTP, L2TP/IPsec, and OpenVPN

    AWS : Autoscaling group (ASG)

    AWS : Setting up Autoscaling Alarms and Notifications via CLI and Cloudformation

    AWS : Adding a SSH User Account on Linux Instance

    AWS : Windows Servers - Remote Desktop Connections using RDP

    AWS : Scheduled stopping and starting an instance - python & cron

    AWS : Detecting stopped instance and sending an alert email using Mandrill smtp

    AWS : Elastic Beanstalk with NodeJS

    AWS : Elastic Beanstalk Inplace/Rolling Blue/Green Deploy

    AWS : Identity and Access Management (IAM) Roles for Amazon EC2

    AWS : Identity and Access Management (IAM) Policies, sts AssumeRole, and delegate access across AWS accounts

    AWS : Identity and Access Management (IAM) sts assume role via aws cli2

    AWS : Creating IAM Roles and associating them with EC2 Instances in CloudFormation

    AWS Identity and Access Management (IAM) Roles, SSO(Single Sign On), SAML(Security Assertion Markup Language), IdP(identity provider), STS(Security Token Service), and ADFS(Active Directory Federation Services)

    AWS : Amazon Route 53

    AWS : Amazon Route 53 - DNS (Domain Name Server) setup

    AWS : Amazon Route 53 - subdomain setup and virtual host on Nginx

    AWS Amazon Route 53 : Private Hosted Zone

    AWS : SNS (Simple Notification Service) example with ELB and CloudWatch

    AWS : Lambda with AWS CloudTrail

    AWS : SQS (Simple Queue Service) with NodeJS and AWS SDK

    AWS : Redshift data warehouse

    AWS : CloudFormation - templates, change sets, and CLI

    AWS : CloudFormation Bootstrap UserData/Metadata

    AWS : CloudFormation - Creating an ASG with rolling update

    AWS : Cloudformation Cross-stack reference

    AWS : OpsWorks

    AWS : Network Load Balancer (NLB) with Autoscaling group (ASG)

    AWS CodeDeploy : Deploy an Application from GitHub

    AWS EC2 Container Service (ECS)

    AWS EC2 Container Service (ECS) II

    AWS Hello World Lambda Function

    AWS Lambda Function Q & A

    AWS Node.js Lambda Function & API Gateway

    AWS API Gateway endpoint invoking Lambda function

    AWS API Gateway invoking Lambda function with Terraform

    AWS API Gateway invoking Lambda function with Terraform - Lambda Container

    Amazon Kinesis Streams

    Kinesis Data Firehose with Lambda and ElasticSearch

    Amazon DynamoDB

    Amazon DynamoDB with Lambda and CloudWatch

    Loading DynamoDB stream to AWS Elasticsearch service with Lambda

    Amazon ML (Machine Learning)

    Simple Systems Manager (SSM)

    AWS : RDS Connecting to a DB Instance Running the SQL Server Database Engine

    AWS : RDS Importing and Exporting SQL Server Data

    AWS : RDS PostgreSQL & pgAdmin III

    AWS : RDS PostgreSQL 2 - Creating/Deleting a Table

    AWS : MySQL Replication : Master-slave

    AWS : MySQL backup & restore

    AWS RDS : Cross-Region Read Replicas for MySQL and Snapshots for PostgreSQL

    AWS : Restoring Postgres on EC2 instance from S3 backup

    AWS : Q & A

    AWS : Security

    AWS : Security groups vs. network ACLs

    AWS : Scaling-Up

    AWS : Networking

    AWS : Single Sign-on (SSO) with Okta

    AWS : JIT (Just-in-Time) with Okta


    Powershell 4 Tutorial


    Powersehll : Introduction

    Powersehll : Help System

    Powersehll : Running commands

    Powersehll : Providers

    Powersehll : Pipeline

    Powersehll : Objects

    Powershell : Remote Control

    Windows Management Instrumentation (WMI)

    How to Enable Multiple RDP Sessions in Windows 2012 Server

    How to install and configure FTP server on IIS 8 in Windows 2012 Server

    How to Run Exe as a Service on Windows 2012 Server

    SQL Inner, Left, Right, and Outer Joins


    Git/GitHub Tutorial


    One page express tutorial for GIT and GitHub

    Installation

    add/status/log

    commit and diff

    git commit --amend

    Deleting and Renaming files

    Undoing Things : File Checkout & Unstaging

    Reverting commit

    Soft Reset - (git reset --soft <SHA key>)

    Mixed Reset - Default

    Hard Reset - (git reset --hard <SHA key>)

    Creating & switching Branches

    Fast-forward merge

    Rebase & Three-way merge

    Merge conflicts with a simple example

    GitHub Account and SSH

    Uploading to GitHub

    GUI

    Branching & Merging

    Merging conflicts

    GIT on Ubuntu and OS X - Focused on Branching

    Setting up a remote repository / pushing local project and cloning the remote repo

    Fork vs Clone, Origin vs Upstream

    Git/GitHub Terminologies

    Git/GitHub via SourceTree II : Branching & Merging

    Git/GitHub via SourceTree III : Git Work Flow

    Git/GitHub via SourceTree IV : Git Reset

    Git wiki - quick command reference


    Subversion

    Subversion Install On Ubuntu 14.04

    Subversion creating and accessing I

    Subversion creating and accessing II


    Contact

    BogoToBogo
    contactus@bogotobogo.com

    Follow Bogotobogo

    About Us

    contactus@bogotobogo.com

    YouTubeMy YouTube channel
    Pacific Ave, San Francisco, CA 94115

    Pacific Ave, San Francisco, CA 94115

    Copyright © 2024, bogotobogo
    Design: Web Master