Introduction to Terraform with AWS elb & nginx
In this article, we'll do a quick tour how Terraform can be used to setup load balancer and nginx server in AWS. For more basic things about Terraform, please check tutorials:
Terraform
As an open source tool, Terraform provides a flexible abstraction of resources and providers.
While configuration management tools such as Chef, Puppet, and Ansible install and manage software on a machine that already exists, Terraform is not a configuration management tool, and it allows existing tooling to focus on their strengths: bootstrapping and initializing resources.
Terraform separates the planning phase from the execution phase, by using the concept of an execution plan.
Terraform is not intended to give low-level programmatic access (e.g. boto) to providers, but instead provides a high level syntax for describing how cloud resources and services should be created, provisioned, and combined. Terraform is very flexible, using a plugin-based model to support providers and provisioners, giving it the ability to support almost any service that exposes APIs.
"Terraform generates an execution plan describing what it will do to reach the desired state, and then executes it to build the described infrastructure. As the configuration changes, Terraform is able to determine what changed and create incremental execution plans which can be applied" - What is Terraform?
Ref: Getting Started with Kubernetes provider.
While we could use kubectl or similar CLI-based tools mapped to API calls
to manage all Kubernetes resources described in YAML files,
orchestration with Terraform presents a few benefits.
- Use the same configuration language to provision the Kubernetes infrastructure and to deploy applications into it.
- drift detection -
terraform planwill always present us the difference between reality at a given time and config we intend to apply. - full lifecycle management - Terraform doesn't just initially create resources, but offers a single command for creation, update, and deletion of tracked resources without needing to inspect the API to identify those resources.
- synchronous feedback - While asynchronous behavior is often useful, sometimes it's counter-productive as the job of identifying operation result (failures or details of created resource) is left to the user. e.g. we don't have IP/hostname of load balancer until it has finished provisioning, hence we can't create any DNS record pointing to it.
- graph of relationships - Terraform understands relationships between resources which may help in scheduling - e.g. if a Persistent Volume Claim claims space from a particular Persistent Volume Terraform won't even attempt to create the PVC if creation of the PV has failed.
Here are lists of Use cases for Terraform:
- Multi-Tier Applications: The most common 2-tier architecture is a pool of web servers that use a database tier. Additional tiers get added for API servers, caching servers, routing meshes, etc. This pattern is used because the tiers can be scaled independently and provide a separation of concerns.
Terraform is an ideal tool for building and managing these infrastructures. Each tier can be described as a collection of resources, and the dependencies between each tier are handled automatically; Terraform will ensure the database tier is available before the web servers are started and that the load balancers are aware of the web nodes. Each tier can then be scaled easily using Terraform by modifying a single count configuration value. Because the creation and provisioning of a resource is codified and automated, elastically scaling with load becomes trivial. - Self-Service Clusters: Terraform configurations can be shared within an organization enabling customer teams to use the configuration as a black box and use Terraform as a tool to manage their services.
- Software Demos: Software writers can provide a Terraform configuration to create, provision and bootstrap a demo on cloud providers like AWS.
- Disposable Environments: Using Terraform, the production environment can be codified and then shared with staging and dev. These configurations can be used to rapidly spin up new environments to test in, and then be easily disposed of.
- Resource Schedulers: There are a number of schedulers like Borg, Mesos, YARN, and Kubernetes.
- Multi-Cloud Deployment: Terraform is cloud-agnostic and allows a single configuration to be used to manage multiple providers, and to even handle cross-cloud dependencies. Terraform can be used to orchestrate an AWS and OpenStack cluster simultaneously, while enabling 3rd-party providers like Cloudflare and DNSimple to be integrated to provide CDN and DNS services.
- Software Defined Networking (SDN): Most SDN implementations have a control layer and infrastructure layer. Terraform can be used to codify the configuration for software defined networks. This configuration can then be used by Terraform to automatically setup and modify settings by interfacing with the control layer. This allows configuration to be versioned and changes to be automated. AWS VPC is one of the most commonly used SDN implementations, and can be configured by Terraform.
To install Terraform, find the appropriate package and download it. Terraform is packaged as a zip archive.
After downloading Terraform, unzip the package:
$ unzip terraform_0.11.8_linux_amd64.zip
Archive:  terraform_0.11.8_linux_amd64.zip
  inflating: terraform
Terraform runs as a single binary named terraform:
$ ls -la terr*
-rwxrwxr-x 1 k k 76422048 Aug 15 22:02 terraform
-rw-rw-r-- 1 k k 17871447 Sep  2 09:05 terraform_0.11.8_linux_amd64.zip
Make sure that the terraform binary is available on the PATH:
$ sudo cp terraform /usr/local/bin
We can verify the installation:
$ terraform -version
Terraform v0.11.8
With Terraform installed, it's time to build infrastructure using a minimal Terraform configuration file. We will be able to examine Terraform's execution plan before we deploy it to AWS.
The set of files used to describe infrastructure in Terraform is simply known as a Terraform configuration.
The recommended format of the configuration files JSON.
We're going to write our first configuration to launch a single AWS EC2 instance.
Configuration files describe to Terraform the components needed to run a single application or a entire datacenter. The Terraform configuration consists of a set of files used to describe infrastructure.
Terraform will automatically search for saved API credentials in ~/.aws/credentials or IAM instance profile credentials:
[default]
aws_access_key_id = B...T
aws_secret_access_key = 8...Z
Terraform uses text files to describe infrastructure and to set variables. These text files are called Terraform configurations. The format of the configuration files are able to be in two formats: Terraform format (.tf) and JSON (.tf.json). The Terraform format is more human-readable, supports comments, and is the generally recommended format for most Terraform files.
The configuration file should look like this in its simplest form, and it is designed to work with access to a default VPC in "us-east-1". The provider block is used to configure the named provider, in our case "aws".
provider "aws" {
  region     = "us-east-1"
  access_key = "A...Q"
  secret_key = "m...x"
}

resource "aws_instance" "terra-sample0" {
  	ami 		= "ami-04169656fea786776"
  	instance_type	= "t2.nano"
}
The resource block creates a resource of the given TYPE (first parameter) and NAME (second parameter). The combination of the type and name must be unique. Within the block (the { }) is configuration for the resource, and the configuration is dependent on the type.
Save the contents to a file named terra-sample0.tf. We need to make sure that there are no other *.tf files in our directory, since Terraform loads all of them.
This is a complete, and probably the simplest configuration that Terraform is ready to apply.
The resource block defines a resource that exists within the infrastructure. A resource might be a physical component such as an EC2 instance, or it can be a logical resource such as a Heroku application.
The resource block has three strings before opening the block: the resource type, the resource name, and the key_name.
In our example, the resource type is "aws_instance" and the resource name is "terra-sample0." The prefix of the type maps to the provider. In our case "aws_instance" automatically tells Terraform that it is managed by the "aws" provider. In order to access an EC2 instance once it is created, we need to assign an AWS EC2 Key Pair at the time of instantiating the instance.
Within the resource block itself is a configuration for that resource. For our EC2 instance, we specify an AMI for Ubuntu 16.04, and request a "t2.nano" instance.
The terraform init command is used to initialize a working directory containing Terraform configuration files. This is the first command that should be run after writing a new Terraform configuration. terraform init will initialize various local settings and data that will be used by subsequent commands.
Terraform uses a plugin-based architecture to support the numerous infrastructure and service providers available. Each "Provider" is its own encapsulated binary distributed separately from Terraform itself. The terraform init command will automatically download and install any Provider binary for the providers to use within the configuration, whether the provider is AWS or Google.
So, if we run the terraform init in an empty working directory (without configuration), it will give us the following message:
$ terraform init
Terraform initialized in an empty directory!

The directory has no Terraform configuration files. You may begin working
with Terraform immediately by creating Terraform configuration files.
The command initializes various local settings and data that will be used by subsequent commands.
$ terraform init

Initializing provider plugins...
- Checking for available provider plugins on https://releases.hashicorp.com...
- Downloading plugin for provider "aws" (1.39.0)...

The following providers do not have any version constraints in configuration,
so the latest version was installed.

To prevent automatic upgrades to new major versions that may contain breaking
changes, it is recommended to add version = "..." constraints to the
corresponding provider blocks in configuration, with the constraint strings
suggested below.

* provider.aws: version = "~> 1.39"

Terraform has been successfully initialized!

You may now begin working with Terraform. Try running terraform plan to see
any changes that are required for your infrastructure. All Terraform commands
should now work.

If you ever set or change modules or backend configuration for Terraform,
rerun this command to reinitialize your working directory. If you forget, other
commands will detect it and remind you to do so if necessary.
If the provider is Google, we get the similar output:
$ terraform init
Initializing provider plugins...
- Checking for available provider plugins on https://releases.hashicorp.com...
- Downloading plugin for provider "google" (2.1.0)...

The following providers do not have any version constraints in configuration,
so the latest version was installed.

To prevent automatic upgrades to new major versions that may contain breaking
changes, it is recommended to add version = "..." constraints to the
corresponding provider blocks in configuration, with the constraint strings
suggested below.

* provider.google: version = "~> 2.1"

Terraform has been successfully initialized!

...
The output from Google, used the following configuration file (instance.tf):
resource "google_compute_instance" "default" {
  project      = "my_project_id"
  name         = "terraform"
  machine_type = "n1-standard-1"
  zone         = "us-central1-a"

  boot_disk {
    initialize_params {
      image = "debian-cloud/debian-9"
    }
  }

  network_interface {
    network = "default"
    access_config {
    }
  }
}
Let's see what Terraform would do if we asked it to apply the configuration. In the same directory as the terra-sample0.tf file we created, run terraform plan. We should see output similar to the following:
$ terraform plan
Refreshing Terraform state in-memory prior to plan...
The refreshed state will be used to calculate this plan, but will not be
persisted to local or remote state storage.

------------------------------------------------------------------------

An execution plan has been generated and is shown below.
Resource actions are indicated with the following symbols:
  + create

Terraform will perform the following actions:

  + aws_instance.terra-sample0
      id:                           <computed>
      ami:                          "ami-04169656fea786776"
      ...

Plan: 1 to add, 0 to change, 0 to destroy.

------------------------------------------------------------------------

Note: You didn't specify an "-out" parameter to save this plan, so Terraform
can't guarantee that exactly these actions will be performed if
"terraform apply" is subsequently run.
terraform plan shows what changes Terraform will apply to our infrastructure given the current state of our infrastructure as well as the current contents of our configuration.
The terraform plan command won't take any action or make any changes. Terraform uses a declarative approach in which our configuration file specifies the desired end-state of the infrastructure. When we run terraform plan, an analysis is done to determine which actions are required to achieve this state.
If terraform plan failed with an error, read the error message and fix the error that occurred. At this stage, it is probably a syntax error in the configuration.
The output format is similar to the diff format generated by tools such as Git. The output has a "+" next to "aws_instance.terra-sample0", meaning that Terraform will create this resource. Beneath that, it shows the attributes that will be set. When the value displayed is <computed>, it means that the value won't be known until the resource is created.
The plan looks good, our configuration appears valid, so it's time to create real resources. Run terraform apply in the same directory as our terra-sample0.tf, and watch it go! It will take a few minutes since Terraform waits for the EC2 instance to become available.
$ terraform apply
An execution plan has been generated and is shown below.
Resource actions are indicated with the following symbols:
  + create

Terraform will perform the following actions:

  + aws_instance.terra-sample0

      id:                           <computed>
      ami:                          "ami-04169656fea786776"
      ...
Plan: 1 to add, 0 to change, 0 to destroy.

Do you want to perform these actions?
  Terraform will perform the actions described above.
  Only 'yes' will be accepted to approve.

  Enter a value: yes

aws_instance.terra-sample0: Creating...
  ami:                          "" => "ami-04169656fea786776"
...
aws_instance.terra-sample0: Still creating... (20s elapsed)
aws_instance.terra-sample0: Creation complete after 21s (ID: i-0d5fea86e227bfcce)

Apply complete! Resources: 1 added, 0 changed, 0 destroyed.
Done! We can go to the AWS console and check the EC2 instance has been created:

Terraform also puts some state into the terraform.tfstate file by default.
This state file is extremely important; it maps various resource metadata to actual resource IDs so that Terraform knows what it is managing. This file must be saved and distributed to anyone who might run Terraform. It is generally recommended to setup remote state when working with Terraform. This will mean that any potential secrets stored in the state file, will not be checked into version control.
We can inspect the state using terraform show:
$ terraform show
aws_instance.terra-sample0:
  id = i-0d5fea86e227bfcce
  ami = ami-04169656fea786776
  arn = arn:aws:ec2:us-east-1:526262051452:instance/i-0d5fea86e227bfcce
  associate_public_ip_address = true
  availability_zone = us-east-1c
  cpu_core_count = 1
  cpu_threads_per_core = 1
  credit_specification.# = 1
  credit_specification.0.cpu_credits = standard
  disable_api_termination = false
  ebs_block_device.# = 0
  ebs_optimized = false
  ephemeral_block_device.# = 0
  get_password_data = false
  iam_instance_profile =
  instance_state = running
  instance_type = t2.nano
  ipv6_addresses.# = 0
  key_name =
  monitoring = false
  network_interface.# = 0
  network_interface_id = eni-0923b90f3578b8da1
  password_data =
  placement_group =
  primary_network_interface_id = eni-0923b90f3578b8da1
  private_dns = ip-172-31-42-130.ec2.internal
  private_ip = 172.31.42.130
  public_dns = ec2-34-227-207-129.compute-1.amazonaws.com
  public_ip = 34.227.207.129
  root_block_device.# = 1
  root_block_device.0.delete_on_termination = true
  root_block_device.0.iops = 100
  root_block_device.0.volume_id = vol-00ff841ea651a92d3
  root_block_device.0.volume_size = 8
  root_block_device.0.volume_type = gp2
  security_groups.# = 1
  security_groups.3814588639 = default
  source_dest_check = true
  subnet_id = subnet-66d25311
  tags.% = 0
  tenancy = default
  volume_tags.% = 0
  vpc_security_group_ids.# = 1
  vpc_security_group_ids.3461207847 = sg-22897246
We've created our first infrastructure with Terraform: a single EC2 instance.
For best practices, we should not hard code the credentials. There are three ways to secure our IDs:
Using ~/.aws/credentials:
[terraform]
aws_access_key_id = A...Q
aws_secret_access_key = Q...i
Here is terra-sample0.tf file:
provider "aws"  {
	shared_credentials_file = "/home/k/.aws/credentials"
  	profile                 = "terraform"
}
resource "aws_instance" "terra-sample0"  {
  	ami 			= "ami-04169656fea786776"
  	instance_type	= "t2.nano"
}
Still using the same ~/.aws/credentials, we can specify the "key_name":
provider "aws"  {
        region     = "us-east-1"
}
resource "aws_instance" "terra-sample0"  {
        ami                     = "ami-00395b56cb6891346"
        instance_type   = "t2.nano"
        key_name = "terraform"
}
Using environment variables. Here is terra-sample0.tf file:
provider "aws" { region = "us-east-1" } resource "aws_instance" "terra-sample0" { ami = "ami-04169656fea786776" instance_type = "t2.nano" }-
We can also use variables.
It's not required but in this case out of convenience, we created an AWS user, "terraform_user":

Next, we're going to modify that resource, and see how Terraform handles change.
Infrastructure is continuously evolving, and Terraform was built to help manage and enact that change. As we change Terraform configurations, Terraform builds an execution plan that only modifies what is necessary to reach our desired state.
By using Terraform to change infrastructure, we can version control not only our configurations but also our state so we can see how the infrastructure evolved over time.
Let's modify the ami of our instance:
provider "aws" {
  region     = "us-east-1"
}

resource "aws_instance" "terra-sample0" {
  ami           = "ami-00395b56cb6891346"
  instance_type = "t2.nano"
}
We can see what Terraform will do with the change we made:
$ terraform plan
...

The prefix "-/+" means that Terraform will destroy and recreate the resource, versus purely updating it in-place. While some attributes can do in-place updates (which are shown with a "~" prefix), AMI changing on EC2 instance requires a new resource. Terraform handles these details for us, and the execution plan makes it clear what Terraform will do.
Let's apply the change:
$ terraform apply
...
Apply complete! Resources: 1 added, 0 changed, 1 destroyed.
As the plan predicted, Terraform started by destroying our old instance, then creating the new one. We can use terraform show again to see the new properties associated with this instance.
In the next section we're going to destroy our infrastructure.
In this section, we're going to see how to completely destroy the Terraform-managed infrastructure.
Before destroying our infrastructure, we can use the plan command to see what resources Terraform will destroy:
$ terraform plan -destroy
...
- aws_instance.terra-sample0

Plan: 0 to add, 0 to change, 1 to destroy.
With the -destroy flag, we're asking Terraform to plan a destroy, where all resources under Terraform management are destroyed. We can use this output to verify exactly what resources Terraform is managing and will destroy.
Let's destroy the infrastructure:
$ terraform destroy
...
- aws_instance.terra-sample0
...
Destroy complete! Resources: 1 destroyed.
The terraform destroy command should ask us to verify that we really want to destroy the infrastructure. Terraform only accepts the literal "yes" as an answer as a safety mechanism. Once entered, Terraform will go through and destroy the infrastructure.
Just like with apply, Terraform is smart enough to determine what order things should be destroyed. In our case, we only had one resource, so there wasn't any ordering necessary. But in more complicated cases with multiple resources, Terraform will destroy in the proper order.
Up to this point, our example has only contained a single resource, however, real infrastructure has a diverse set of resources and resource types.
We're going to introduce resource dependencies, where we'll not only see a configuration with multiple resources for the first time, but also scenarios where resource parameters use information from other resources.
We'll improve our configuration by assigning an elastic IP to the EC2 instance we're managing. Modify our terra-sample.tf and add the following:
provider "aws" {
  region     = "us-east-1"
  profile    = "terraform"
}

resource "aws_instance" "terra-sample0" {
  ami           = "ami-00395b56cb6891346"
  instance_type = "t2.nano"
}

resource "aws_eip" "ip" {
  instance = "${aws_instance.terra-sample0.id}"
}
Note that we're building an "aws_eip" resource type. This resource type allocates and associates an elastic IP to an EC2 instance.
The only parameter for aws_eip is "instance" which is the EC2 instance to assign the IP to. For this value, we use an interpolation to use an attribute from the EC2 instance we managed earlier.
The syntax for this interpolation should be straightforward: it requests the "id" attribute from the "aws_instance.terra-sample" resource.
Run terraform plan to view the execution plan:
$ terraform plan
...
+ aws_eip.ip
    ...
    instance:          "${aws_instance.terra-sample0.id}"
    ...

+ aws_instance.terra-sample0
    ami:                         "ami-00395b56cb6891346"
    ...

Plan: 2 to add, 0 to change, 0 to destroy.
Terraform will create two resources: the instance and the elastic IP. In the "instance" value for the "aws_eip", we can see the raw interpolation is still present. This is because this variable won't be known until the "aws_instance" is created. It will be replaced at apply-time.
Next, run terraform apply:
$ terraform apply
...
aws_instance.terra-sample0: Creating...
  ami:                         "" => "ami-00395b56cb6891346"
  ...
aws_instance.terra-sample0: Creation complete (ID: i-095d5fbf168bed4a0)
aws_eip.ip: Creating...
  ...
  instance:          "" => "i-095d5fbf168bed4a0"
  ...
aws_eip.ip: Creation complete after 2s (ID: eipalloc-0b5c284aab1fac880)


Apply complete! Resources: 2 added, 0 changed, 0 destroyed.
...
Terraform creates the EC2 instance before the elastic IP address. Due to the interpolation earlier where the elastic IP requires the ID of the EC2 instance, Terraform is able to infer a dependency, and knows to create the instance first.
Most dependencies in Terraform are implicit: Terraform is able to infer dependencies based on usage of attributes of other resources.
Using this information, Terraform builds a graph of resources. This tells Terraform not only in what order to create resources, but also what resources can be created in parallel. In our example, since the IP address depended on the EC2 instance, they could not be created in parallel.
Implicit dependencies work well and are usually all we ever need. However, we can also specify explicit dependencies with the depends_on parameter which is available on any resource. For example, we could modify the "aws_eip" resource to the following, which effectively does the same thing and is redundant:
resource "aws_eip" "ip" {
  instance   = "${aws_instance.terra-sample0.id}"
  depends_on = ["aws_instance.terra-sample0"]
}
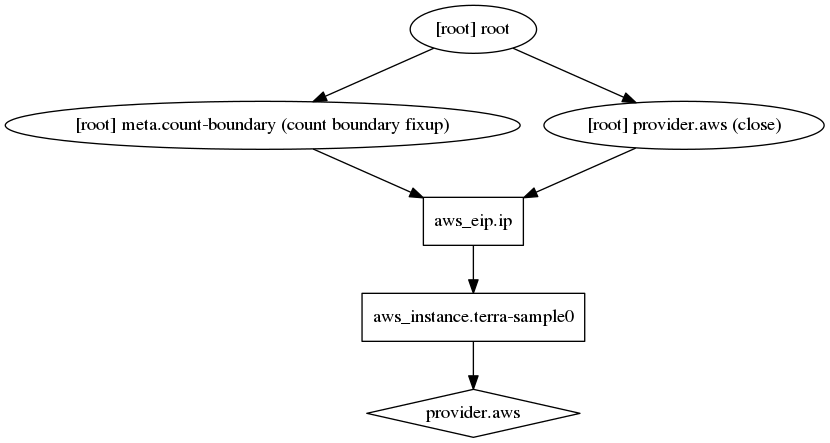
If not sure for the dependency chain that Terraform is creating, we can use the terraform graph command to view the graph. This command outputs a dot-formatted graph which can be viewed with Graphviz.
$ terraform graph
digraph {
	compound = "true"
	newrank = "true"
	subgraph "root" {
		"[root] aws_eip.ip" [label = "aws_eip.ip", shape = "box"]
		"[root] aws_instance.terra-sample0" [label = "aws_instance.terra-sample0", shape = "box"]
		"[root] provider.aws" [label = "provider.aws", shape = "diamond"]
		"[root] aws_eip.ip" -> "[root] aws_instance.terra-sample0"
		"[root] aws_instance.terra-sample0" -> "[root] provider.aws"
		"[root] meta.count-boundary (count boundary fixup)" -> "[root] aws_eip.ip"
		"[root] provider.aws (close)" -> "[root] aws_eip.ip"
		"[root] root" -> "[root] meta.count-boundary (count boundary fixup)"
		"[root] root" -> "[root] provider.aws (close)"
	}
}
$ terraform graph | dot -Tpng > graph.png
We can now augment the configuration with another EC2 instance. Because this doesn't rely on any other resource, it can be created in parallel to everything else.
Here is our modified tf file with two independent instances:
provider "aws" {
  region     = "us-east-1"
  profile    = "terraform"
}

resource "aws_instance" "terra-sample0" {
  ami           = "ami-00395b56cb6891346"
  instance_type = "t2.nano"
}

resource "aws_eip" "ip" {
  instance = "${aws_instance.terra-sample0.id}"
}

resource "aws_instance" "another" {
  ami           = "ami-04169656fea786776"
  instance_type = "t2.nano"
}
$ terraform graph | dot -Tpng > graph2.png
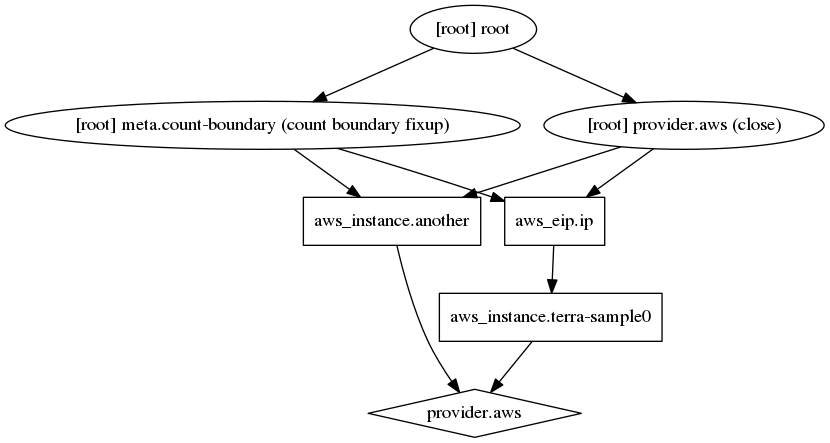
We see that nothing depends on this and that it will likely be created in parallel.
Ref: Provision
Provisioning is important for being able to bootstrap instances. As another reminder, it is not a replacement for configuration management. It is meant to simply bootstrap machines. If we use configuration management, we should use the provisioning as a way to bootstrap the configuration management tool.
Now let's see how to use provisioners to initialize instances when they're created.
If we need to do some initial setup on our instances, then provisioners let us upload files, run shell scripts, or install and trigger other software like configuration management tools, etc.
To define a provisioner, modify the resource block defining the "terra-sample0" EC2 instance to look like the following:
provider "aws" {
  region     = "us-east-1"
  profile    = "terraform"
}

resource "aws_instance" "terra-sample1" {
  ami           = "ami-00395b56cb6891346"
  instance_type = "t2.nano"

  provisioner "local-exec" {
    command = "echo ${aws_instance.terra-sample1.public_ip} > ip_address.txt"
  }
}
This adds a provisioner block within the resource block. Multiple provisioner blocks can be added to define multiple provisioning steps. Terraform supports multiple provisioners, but for this example we are using the local-exec provisioner.
The local-exec provisioner executes a command locally on the machine running Terraform. We're using this provisioner versus the others so we don't have to worry about specifying any connection info right now.
Provisioners are only run when a resource is created. They are not a replacement for configuration management and changing the software of an already-running server, and are instead just meant as a way to bootstrap a server. For configuration management, we should use Terraform provisioning to invoke a real configuration management solution.
Make sure that our infrastructure is destroyed if it isn't already, then run apply:
$ terraform apply
...

  + aws_instance.terra-sample1
      ...
      ami:                          "ami-00395b56cb6891346"
      ...

aws_instance.terra-sample1: Provisioning with 'local-exec'...
aws_instance.terra-sample1 (local-exec): Executing: ["/bin/sh" "-c" "echo 34.207.181.150 > ip_address.txt"]
aws_instance.terra-sample1: Creation complete after 27s (ID: i-0555f1fe9ff76602e)

Apply complete! Resources: 1 added, 0 changed, 0 destroyed.
Let's first extract our access key, secret key, and region into a few variables. Create another file variables.tf:
variable "access_key" {}
variable "secret_key" {}
variable "region" {
  default = "us-east-1"
}
This defines three variables within our Terraform configuration. The first two have empty blocks {}. The third sets a default. If a default value is set, the variable is optional. Otherwise, the variable is required. If we run terraform plan now, Terraform will prompt us for the values for unset string variables:
$ terraform plan
var.access_key
  Enter a value: A...Q

var.secret_key
  Enter a value: Q...i

Refreshing Terraform state in-memory prior to plan...
...
Next, replace the AWS provider configuration with the following:
provider "aws" {
  access_key = "${var.access_key}"
  secret_key = "${var.secret_key}"
  region     = "${var.region}"
}
This uses more interpolations, this time prefixed with var. which tells Terraform that we're accessing variables. This configures the AWS provider with the given variables.
There are multiple ways to assign variables. Below is also the order in which variable values are chosen. The following is the descending order of precedence in which variables are considered.
We can set variables directly on the command-line with the -var flag. Any command in Terraform that inspects the configuration accepts this flag, such as apply, plan, and refresh:
$ terraform plan \
  -var 'access_key=foo' \
  -var 'secret_key=bar'
Once again, setting variables this way will not save them, and they'll have to be input repeatedly as commands are executed.
To persist variable values, create a file and assign variables within this file. Create a file named terraform.tfvars with the following contents:
access_key = "foo"
secret_key = "bar"
If a terraform.tfvars file is present in the current directory, Terraform automatically loads it to populate variables. If the file is named something else, we can use the -var-file flag directly to specify a file. These files are the same syntax as Terraform configuration files. And like Terraform configuration files, these files can also be JSON.
We don't recommend saving usernames and password to version control, But you can create a local secret variables file and use -var-file to load it.
We can use multiple -var-file arguments in a single command, with some checked in to version control and others not checked in. For example:
$ terraform plan \
  -var-file="secret.tfvars" \
  -var-file="production.tfvars"
We can provide our credentials via the AWS_ACCESS_KEY_ID and AWS_SECRET_ACCESS_KEY, environment variables, representing our AWS Access Key and AWS Secret Key, respectively. The AWS_DEFAULT_REGION and AWS_SESSION_TOKEN environment variables are also used, if applicable:
provider "aws" {}
Usage:
$ export AWS_ACCESS_KEY_ID="anaccesskey"
$ export AWS_SECRET_ACCESS_KEY="asecretkey"
$ export AWS_DEFAULT_REGION="us-west-2"
We can use an AWS credentials file to specify our credentials. The default location is $HOME/.aws/credentials on Linux. If we fail to detect credentials inline, or in the environment, Terraform will check this location. We can optionally specify a different location in the configuration by providing the shared_credentials_file attribute, or in the environment with the AWS_SHARED_CREDENTIALS_FILE variable:
provider "aws" {
  region                  = "us-east-1"
  shared_credentials_file = "/home/k/.aws/credentials"
}
We can use output variables as a way to organize data to be easily queried and shown back to the Terraform user.
When building potentially complex infrastructure, Terraform stores hundreds or thousands of attribute values for all our resources. But as a user of Terraform, we may only be interested in a few values of importance, such as a load balancer IP, VPN address, etc.
Outputs are a way to tell Terraform what data is important. This data is outputted when apply is called, and can be queried using the terraform output command.
Let's define an output to show us the public IP address of the elastic IP address that we create. Add this to any of our *.tf files:
output "ip" {
  value = "${aws_eip.ip.public_ip}"
}
This defines an output variable named "ip". The value field specifies what the value will be, and almost always contains one or more interpolations, since the output data is typically dynamic. In this case, we're outputting the public_ip attribute of the elastic IP address.
We run terraform apply to populate the output. This only needs to be done once after the output is defined. The apply output should change slightly. At the end we should see this:
$ terraform apply
...
Apply complete! Resources: 0 added, 0 changed, 0 destroyed.

Outputs:

  ip = 50.17.232.209
apply highlights the outputs. We can also query the outputs after apply-time using terraform output:
$ terraform output ip
50.17.232.209
AMIs are specific to the region that is in use. One option is to just ask the user to input the proper AMI for the region, but Terraform can do better than that with maps.
Maps are a way to create variables that are lookup tables. An example will show this best. Let's extract our AMIs into a map and add support for the us-west-2 region as well:
variable "amis" {
  type = "map"
  default = {
    "us-east-1" = "ami-b374d5a5"
    "us-west-2" = "ami-4b32be2b"
  }
}
A variable can have a map type assigned explicitly, or it can be implicitly declared as a map by specifying a default value that is a map. The above demonstrates both.
Then, replace the aws_instance with the following:
resource "aws_instance" "example" {
  ami           = "${lookup(var.amis, var.region)}"
  instance_type = "t2.micro"
}
This introduces a new type of interpolation: a function call. The lookup function does a dynamic lookup in a map for a key. The key is "var.region", which specifies that the value of the region variables is the key.
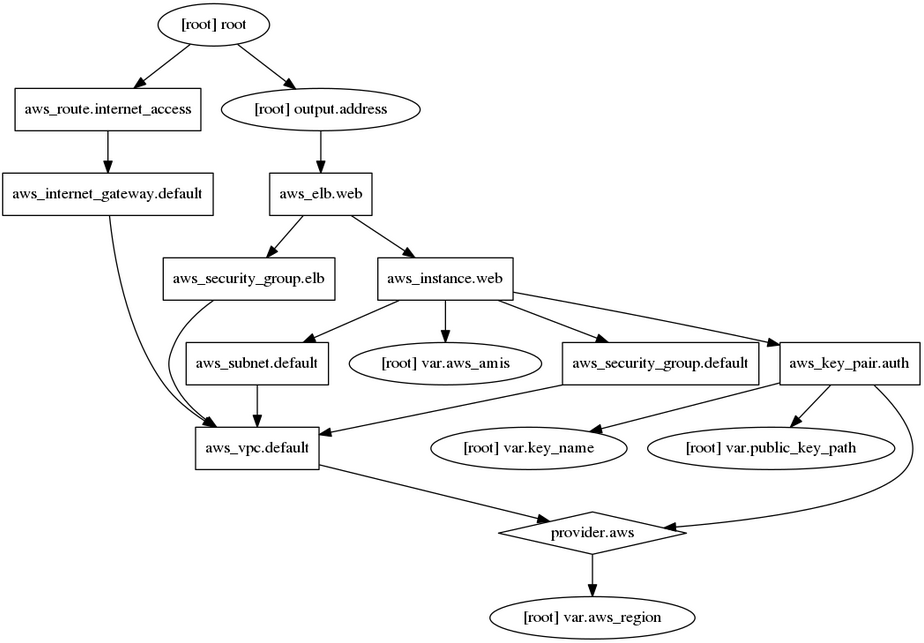
This provides a template for running a simple two-tier architecture on Amazon Web Services. The premise is that we have stateless app servers running behind an ELB serving traffic.
To simplify the example, it intentionally ignores deploying and getting our application onto the servers. However, we could do so either via provisioners and a configuration management tool, or by pre-baking configured AMIs with Packer.
After we run terraform apply on this configuration, it will automatically output the DNS address of the ELB. After our instance registers, this should respond with the default Nginx web page.
As with all the examples, just copy and paste the example and run terraform apply to see it work.
We can get the example from aws-two-tier.
$ terraform apply
var.key_name
  Desired name of AWS key pair

  Enter a value: ~/.ssh/einsteinish.pem

var.public_key_path
  Path to the SSH public key to be used for authentication.
  Ensure this keypair is added to your local SSH agent so provisioners can
  connect.
  Example: ~/.ssh/terraform.pub

  Enter a value: ~/.ssh/id_rsa.pub

aws_vpc.default: Refreshing state... (ID: vpc-adc2e1ca)
aws_key_pair.auth: Refreshing state... (ID: ~/.ssh/einsteinish.pem)
aws_security_group.default: Refreshing state... (ID: sg-39df7c42)
aws_internet_gateway.default: Refreshing state... (ID: igw-552bcb32)
aws_security_group.elb: Refreshing state... (ID: sg-a1d87bda)
aws_subnet.default: Refreshing state... (ID: subnet-b5750bd2)
aws_route.internet_access: Refreshing state... (ID: r-rtb-74a071121080289494)
aws_vpc.default: Creating...
  assign_generated_ipv6_cidr_block: "" => "false"
  cidr_block:                       "" => "10.0.0.0/16"
  default_network_acl_id:           "" => "<computed>"
  default_route_table_id:           "" => "<computed>"
  default_security_group_id:        "" => "<computed>"
  dhcp_options_id:                  "" => "<computed>"
  enable_classiclink:               "" => "<computed>"
  enable_dns_hostnames:             "" => "<computed>"
  enable_dns_support:               "" => "true"
  instance_tenancy:                 "" => "<computed>"
  ipv6_association_id:              "" => "<computed>"
  ipv6_cidr_block:                  "" => "<computed>"
  main_route_table_id:              "" => "<computed>"
aws_key_pair.auth: Creating...
  fingerprint: "" => "<computed>"
  key_name:    "" => "~/.ssh/einsteinish.pem"
  public_key:  "" => "ssh-rsa AA...F9PR k@laptop"
aws_key_pair.auth: Creation complete (ID: ~/.ssh/einsteinish.pem)
aws_vpc.default: Creation complete (ID: vpc-d01a16b6)
aws_internet_gateway.default: Creating...
  vpc_id: "" => "vpc-d01a16b6"
aws_subnet.default: Creating...
  assign_ipv6_address_on_creation: "" => "false"
  availability_zone:               "" => "<computed>"
  cidr_block:                      "" => "10.0.1.0/24"
  ipv6_cidr_block_association_id:  "" => "<computed>"
  map_public_ip_on_launch:         "" => "true"
  vpc_id:                          "" => "vpc-d01a16b6"
aws_security_group.default: Creating...
  description:                           "" => "Used in the terraform"
  egress.#:                              "" => "1"
  egress.482069346.cidr_blocks.#:        "" => "1"
  egress.482069346.cidr_blocks.0:        "" => "0.0.0.0/0"
  egress.482069346.from_port:            "" => "0"
  egress.482069346.ipv6_cidr_blocks.#:   "" => "0"
  egress.482069346.prefix_list_ids.#:    "" => "0"
  egress.482069346.protocol:             "" => "-1"
  egress.482069346.security_groups.#:    "" => "0"
  egress.482069346.self:                 "" => "false"
  egress.482069346.to_port:              "" => "0"
  ingress.#:                             "" => "2"
  ingress.2165049311.cidr_blocks.#:      "" => "1"
  ingress.2165049311.cidr_blocks.0:      "" => "10.0.0.0/16"
  ingress.2165049311.from_port:          "" => "80"
  ingress.2165049311.ipv6_cidr_blocks.#: "" => "0"
  ingress.2165049311.protocol:           "" => "tcp"
  ingress.2165049311.security_groups.#:  "" => "0"
  ingress.2165049311.self:               "" => "false"
  ingress.2165049311.to_port:            "" => "80"
  ingress.2541437006.cidr_blocks.#:      "" => "1"
  ingress.2541437006.cidr_blocks.0:      "" => "0.0.0.0/0"
  ingress.2541437006.from_port:          "" => "22"
  ingress.2541437006.ipv6_cidr_blocks.#: "" => "0"
  ingress.2541437006.protocol:           "" => "tcp"
  ingress.2541437006.security_groups.#:  "" => "0"
  ingress.2541437006.self:               "" => "false"
  ingress.2541437006.to_port:            "" => "22"
  name:                                  "" => "terraform_example"
  owner_id:                              "" => "<computed>"
  vpc_id:                                "" => "vpc-d01a16b6"
aws_security_group.elb: Creating...
  description:                           "" => "Used in the terraform"
  egress.#:                              "" => "1"
  egress.482069346.cidr_blocks.#:        "" => "1"
  egress.482069346.cidr_blocks.0:        "" => "0.0.0.0/0"
  egress.482069346.from_port:            "" => "0"
  egress.482069346.ipv6_cidr_blocks.#:   "" => "0"
  egress.482069346.prefix_list_ids.#:    "" => "0"
  egress.482069346.protocol:             "" => "-1"
  egress.482069346.security_groups.#:    "" => "0"
  egress.482069346.self:                 "" => "false"
  egress.482069346.to_port:              "" => "0"
  ingress.#:                             "" => "1"
  ingress.2214680975.cidr_blocks.#:      "" => "1"
  ingress.2214680975.cidr_blocks.0:      "" => "0.0.0.0/0"
  ingress.2214680975.from_port:          "" => "80"
  ingress.2214680975.ipv6_cidr_blocks.#: "" => "0"
  ingress.2214680975.protocol:           "" => "tcp"
  ingress.2214680975.security_groups.#:  "" => "0"
  ingress.2214680975.self:               "" => "false"
  ingress.2214680975.to_port:            "" => "80"
  name:                                  "" => "terraform_example_elb"
  owner_id:                              "" => "<computed>"
  vpc_id:                                "" => "vpc-d01a16b6"
aws_internet_gateway.default: Creation complete (ID: igw-4c24e02a)
aws_route.internet_access: Creating...
  destination_cidr_block:     "" => "0.0.0.0/0"
  destination_prefix_list_id: "" => "<computed>"
  egress_only_gateway_id:     "" => "<computed>"
  gateway_id:                 "" => "igw-4c24e02a"
  instance_id:                "" => "<computed>"
  instance_owner_id:          "" => "<computed>"
  nat_gateway_id:             "" => "<computed>"
  network_interface_id:       "" => "<computed>"
  origin:                     "" => "<computed>"
  route_table_id:             "" => "rtb-5d0b2f24"
  state:                      "" => "<computed>"
aws_subnet.default: Creation complete (ID: subnet-b826f5f0)
aws_route.internet_access: Creation complete (ID: r-rtb-5d0b2f241080289494)
aws_security_group.elb: Creation complete (ID: sg-7bfcd904)
aws_security_group.default: Creation complete (ID: sg-b7fcd9c8)
aws_instance.web: Creating...
  ami:                               "" => "ami-f4cc1de2"
  associate_public_ip_address:       "" => "<computed>"
  availability_zone:                 "" => "<computed>"
  ebs_block_device.#:                "" => "<computed>"
  ephemeral_block_device.#:          "" => "<computed>"
  instance_state:                    "" => "<computed>"
  instance_type:                     "" => "t2.nano"
  ipv6_addresses.#:                  "" => "<computed>"
  key_name:                          "" => "~/.ssh/einsteinish.pem"
  network_interface_id:              "" => "<computed>"
  placement_group:                   "" => "<computed>"
  private_dns:                       "" => "<computed>"
  private_ip:                        "" => "<computed>"
  public_dns:                        "" => "<computed>"
  public_ip:                         "" => "<computed>"
  root_block_device.#:               "" => "<computed>"
  security_groups.#:                 "" => "<computed>"
  source_dest_check:                 "" => "true"
  subnet_id:                         "" => "subnet-b826f5f0"
  tenancy:                           "" => "<computed>"
  vpc_security_group_ids.#:          "" => "1"
  vpc_security_group_ids.1255873682: "" => "sg-b7fcd9c8"
aws_instance.web: Still creating... (10s elapsed)
aws_instance.web: Still creating... (20s elapsed)
aws_instance.web: Provisioning with 'remote-exec'...
aws_instance.web (remote-exec): Connecting to remote host via SSH...
aws_instance.web (remote-exec):   Host: 52.201.230.107
aws_instance.web (remote-exec):   User: ubuntu
aws_instance.web (remote-exec):   Password: false
aws_instance.web (remote-exec):   Private key: false
aws_instance.web (remote-exec):   SSH Agent: true
aws_instance.web: Still creating... (30s elapsed)
aws_instance.web: Still creating... (40s elapsed)
...
aws_instance.web (remote-exec): Processing triggers for ufw (0.35-0ubuntu2) ...
aws_instance.web (remote-exec): sudo: unable to resolve host ip-10-0-1-102
aws_instance.web: Creation complete (ID: i-096c9cb80c3cc55a5)
aws_elb.web: Creating...
  availability_zones.#:                   "" => "<computed>"
  connection_draining:                    "" => "false"
  connection_draining_timeout:            "" => "300"
  cross_zone_load_balancing:              "" => "true"
  dns_name:                               "" => "<computed>"
  health_check.#:                         "" => "<computed>"
  idle_timeout:                           "" => "60"
  instances.#:                            "" => "1"
  instances.281684789:                    "" => "i-096c9cb80c3cc55a5"
  internal:                               "" => "<computed>"
  listener.#:                             "" => "1"
  listener.3057123346.instance_port:      "" => "80"
  listener.3057123346.instance_protocol:  "" => "http"
  listener.3057123346.lb_port:            "" => "80"
  listener.3057123346.lb_protocol:        "" => "http"
  listener.3057123346.ssl_certificate_id: "" => ""
  name:                                   "" => "terraform-example-elb"
  security_groups.#:                      "" => "1"
  security_groups.3201328540:             "" => "sg-7bfcd904"
  source_security_group:                  "" => "<computed>"
  source_security_group_id:               "" => "<computed>"
  subnets.#:                              "" => "1"
  subnets.3949924399:                     "" => "subnet-b826f5f0"
  zone_id:                                "" => "<computed>"
aws_elb.web: Still creating... (10s elapsed)
aws_elb.web: Creation complete (ID: terraform-example-elb)

Apply complete! Resources: 9 added, 0 changed, 0 destroyed.

The state of your infrastructure has been saved to the path
below. This state is required to modify and destroy your
infrastructure, so keep it safe. To inspect the complete state
use the `terraform show` command.

State path:

Outputs:

address = terraform-example-elb-1938749564.us-east-1.elb.amazonaws.com
We can check our nginx web server is running:

Here are the files used.
variables.tf:
variable "key_name" {
  description = "Desired name of AWS key pair"
}

variable "aws_region" {
  description = "AWS region to launch servers."
  default     = "us-east-1"
}

# Ubuntu Precise 16.04 LTS (x64)
variable "aws_amis" {
  default = {
    us-east-1 = "ami-f4cc1de2"
    us-east-2 = "ami-fcc19b99"
    us-west-1 = "ami-16efb076"
    us-west-2 = "ami-a58d0dc5"
  }
}
variables.tf:
output "address" {
  value = "${aws_elb.web.dns_name}"
}
main.tf:
# Specify the provider and access details
provider "aws" {
  region = "${var.aws_region}"
}

# Create a VPC to launch our instances into
resource "aws_vpc" "default" {
  cidr_block = "10.0.0.0/16"
}

# Create an internet gateway to give our subnet access to the outside world
resource "aws_internet_gateway" "default" {
  vpc_id = "${aws_vpc.default.id}"
}

# Grant the VPC internet access on its main route table
resource "aws_route" "internet_access" {
  route_table_id         = "${aws_vpc.default.main_route_table_id}"
  destination_cidr_block = "0.0.0.0/0"
  gateway_id             = "${aws_internet_gateway.default.id}"
}

# Create a subnet to launch our instances into
resource "aws_subnet" "default" {
  vpc_id                  = "${aws_vpc.default.id}"
  cidr_block              = "10.0.1.0/24"
  map_public_ip_on_launch = true
}

# A security group for the ELB so it is accessible via the web
resource "aws_security_group" "elb" {
  name        = "terraform_example_elb"
  description = "Used in the terraform"
  vpc_id      = "${aws_vpc.default.id}"

  # HTTP access from anywhere
  ingress {
    from_port   = 80
    to_port     = 80
    protocol    = "tcp"
    cidr_blocks = ["0.0.0.0/0"]
  }

  # outbound internet access
  egress {
    from_port   = 0
    to_port     = 0
    protocol    = "-1"
    cidr_blocks = ["0.0.0.0/0"]
  }
}

# Our default security group to access
# the instances over SSH and HTTP
resource "aws_security_group" "default" {
  name        = "terraform_example"
  description = "Used in the terraform"
  vpc_id      = "${aws_vpc.default.id}"

  # SSH access from anywhere
  ingress {
    from_port   = 22
    to_port     = 22
    protocol    = "tcp"
    cidr_blocks = ["0.0.0.0/0"]
  }

  # HTTP access from the VPC
  ingress {
    from_port   = 80
    to_port     = 80
    protocol    = "tcp"
    cidr_blocks = ["10.0.0.0/16"]
  }

  # outbound internet access
  egress {
    from_port   = 0
    to_port     = 0
    protocol    = "-1"
    cidr_blocks = ["0.0.0.0/0"]
  }
}

resource "aws_elb" "web" {
  name = "terraform-example-elb"

  subnets         = ["${aws_subnet.default.id}"]
  security_groups = ["${aws_security_group.elb.id}"]
  instances       = ["${aws_instance.web.id}"]

  listener {
    instance_port     = 80
    instance_protocol = "http"
    lb_port           = 80
    lb_protocol       = "http"
  }
}

resource "aws_key_pair" "auth" {
  key_name   = "${var.key_name}"
  public_key = "${file(var.public_key_path)}"
}

resource "aws_instance" "web" {
  # The connection block tells our provisioner how to
  # communicate with the resource (instance)
  connection {
    # The default username for our AMI
    user = "ubuntu"

    # The connection will use the local SSH agent for authentication.
  }

  instance_type = "t2.nano"

  # Lookup the correct AMI based on the region
  # we specified
  ami = "${lookup(var.aws_amis, var.aws_region)}"

  # The name of our SSH keypair we created above.
  key_name = "${aws_key_pair.auth.id}"

  # Our Security group to allow HTTP and SSH access
  vpc_security_group_ids = ["${aws_security_group.default.id}"]

  # We're going to launch into the same subnet as our ELB. In a production
  # environment it's more common to have a separate private subnet for
  # backend instances.
  subnet_id = "${aws_subnet.default.id}"

  # We run a remote provisioner on the instance after creating it.
  # In this case, we just install nginx and start it. By default,
  # this should be on port 80
  provisioner "remote-exec" {
    inline = [
      "sudo apt-get -y update",
      "sudo apt-get -y install nginx",
      "sudo service nginx start",
    ]
  }
}
Why we use Terraform and not Chef, Puppet, Ansible, SaltStack, or CloudFormation.
Terraform
Ph.D. / Golden Gate Ave, San Francisco / Seoul National Univ / Carnegie Mellon / UC Berkeley / DevOps / Deep Learning / Visualization