BogoToBogo
  • Home
  • About
  • Big Data
  • Machine Learning
  • AngularJS
  • Python
  • C++
  • go
  • DevOps
  • Kubernetes
  • Algorithms
  • More...
    • Qt 5
    • Linux
    • FFmpeg
    • Matlab
    • Django 1.8
    • Ruby On Rails
    • HTML5 & CSS

DevOps / Sys Admin Q & A #1A : Linux Commands


Bookmark and Share


bogotobogo.com site search:


tee

Why the following command,

sudo echo "deb http://pkg.jenkins-ci.org/debian binary/" >>  /etc/apt/sources.list.d/jenkins.list 

does not work?

The issue is that it's the shell that handles redirection; it's trying to open the file with user's permissions not those of the process we're running under sudo.

So, we should do the following:

$ echo "deb http://pkg.jenkins-ci.org/debian binary/" | sudo  tee -a /etc/apt/sources.list.d/jenkins.list

There is another way of doing the same thing not using "tee":

$ sudo sh -c "echo deb http://pkg.jenkins-ci.org/debian binary/ > /etc/apt/sources.list.d/jenkins.list"

Note the command after sh -c, the command is enclosed by ".


Similarly, we can do this when we want to update package list on Debian:

$ echo "deb http://repo.mongodb.org/apt/ubuntu "$(lsb_release -sc)"/mongodb-org/3.0 multiverse" | sudo tee /etc/apt/sources.list.d/mongodb-org-3.0.list

Another example: /etc/fstab file. We need to append a line to the config file so that a volume to be mounted whenever a linux instance stated:

$ echo "/dev/sdf   /mnt/data-store ext3 defaults,noatime 1 2" | sudo  tee -a /etc/fstab

The resulting file looks like this:

#
LABEL=/     /           ext4    defaults,noatime  1   1
tmpfs       /dev/shm    tmpfs   defaults        0   0
devpts      /dev/pts    devpts  gid=5,mode=620  0   0
sysfs       /sys        sysfs   defaults        0   0
proc        /proc       proc    defaults        0   0
/dev/sdf   /mnt/data-store ext3 defaults,noatime 1 2

We frequently face the situation where a command runs on a root shell but redirection runs on a shell of a normal user. So, let's re-visit another sample case when we want to write a line into a file that requires root permission:

$ sudo echo "line" > /mnt/data-store/test.txt
-bash: /mnt/data-store/test.txt: Permission denied

We need to invoke a root shell to run the command and the redirection on the shell:

$ sudo sh -c "echo line > /mnt/data-store/test.txt"

$ cat /mnt/data-store/test.txt
line

Another example: attaching a line to a file:

$ echo "192.168.64.12 wordpress.local" | sudo tee -a /etc/hosts    


awk

The awk is the most useful when handling text files that are formatted in a predictable way. For instance, it is excellent at parsing and manipulating tabular data. It operates on a line-by-line basis and iterates through the entire file.

The syntax looks like this:

awk '/search_pattern/ { action_to_take_on_matches; another_action; }' file_to_parse

In its simplest form, we can use awk like cat to simply print all lines of a text file out to the screen. Let's print out our server's fstab file, which lists the filesystems that it knows about:

$ awk '{print}' /etc/fstab
# /etc/fstab: static file system information.
#
# Use 'blkid' to print the universally unique identifier for a
# device; this may be used with UUID= as a more robust way to name devices
# that works even if disks are added and removed. See fstab(5).
#
# <file system> <mount point>   <type>  <options>       <dump>  <pass>
# / was on /dev/sda2 during installation
UUID=dca7dd33-7ac2-4e12-a85f-555008cdb302 /               ext4    errors=remount-ro 0       1
# /boot/efi was on /dev/sda1 during installation
UUID=D790-E415  /boot/efi       vfat    defaults        0       1
# swap was on /dev/sda3 during installation
UUID=9555d31f-54fa-4f68-b597-3c0c77335182 none            swap    sw              0       0

This isn't that useful. Let's try out awk's search filtering capabilities:

$ awk '/UUID/' /etc/fstab
# device; this may be used with UUID= as a more robust way to name devices
UUID=dca7dd33-7ac2-4e12-a85f-555008cdb302 /               ext4    errors=remount-ro 0       1
UUID=D790-E415  /boot/efi       vfat    defaults        0       1
UUID=9555d31f-54fa-4f68-b597-3c0c77335182 none            swap    sw              0       0

Now, awk only prints the lines that have "UUID" in them. We can get rid of the extraneous comment line by specifying that UUID must be located at the very beginning of the line:

$ awk '/^UUID/' /etc/fstab
UUID=dca7dd33-7ac2-4e12-a85f-555008cdb302 /               ext4    errors=remount-ro 0       1
UUID=D790-E415  /boot/efi       vfat    defaults        0       1
UUID=9555d31f-54fa-4f68-b597-3c0c77335182 none            swap    sw              0       0

We can use the action section to specify which pieces of information we want to print. For instance, to print only the first column, we can type:

$ awk '/^UUID/ {print $1;}' /etc/fstab
UUID=dca7dd33-7ac2-4e12-a85f-555008cdb302
UUID=D790-E415
UUID=9555d31f-54fa-4f68-b597-3c0c77335182

We can reference every column (as delimited by white space) by variables associated with their column number. The first column can be referenced by $1 for instance. The entire line can by referenced by $0.


Here is another example counting the number of unique users from "ps" with "awk" commands:

$ ps -ef | awk '{print $1}' | sort | uniq | wc -l
16

We can make the 'top' like tool, displaying top 20 items via sorting by the 2nd item (MEM) and reversing the output (descending order).

Initial "ps aux" looks like this:

USER  PID  %CPU  %MEM  VSZ   RSS TTY  STAT START   TIME COMMAND

We want to take the 2nd (PID), 4 (MEM) and 11th (COMMAND) columns of the output.

$ echo [PID]  [MEM]  [PATH] &&  ps aux | awk '{print $2, $4, $11}' | sort -k2rn | head -n 20
[PID] [MEM] [PATH]
4578 19.8 /usr/lib/jvm/java-8-openjdk-amd64/bin/java
23490 17.9 /usr/bin/java
27389 10.0 /usr/bin/mongod
23952 7.1 uwsgi
15757 1.9 php-fpm:
15758 1.9 php-fpm:
21296 1.9 php-fpm:
8440 1.5 PM2
3137 1.3 sshd:
20318 1.1 grunt
3007 1.1 sshd:
3170 1.0 -bash
3103 0.9 -bash
1 0.8 /sbin/init
1099 0.7 /sbin/iscsid
387 0.7 /lib/systemd/systemd-journald
2900 0.6 pickup
3102 0.6 sshd:
3169 0.6 sshd:
3200 0.6 ps


Another example : How to get "192.168.*.*" from the output of "ifconfig" command?

docker0   Link encap:Ethernet  HWaddr 02:42:38:53:56:44  
          inet addr:172.17.0.1  Bcast:172.17.255.255  Mask:255.255.0.0
          UP BROADCAST MULTICAST  MTU:1500  Metric:1
          RX packets:0 errors:0 dropped:0 overruns:0 frame:0
          TX packets:0 errors:0 dropped:0 overruns:0 carrier:0
          collisions:0 txqueuelen:0 
          RX bytes:0 (0.0 B)  TX bytes:0 (0.0 B)

enp3s0    Link encap:Ethernet  HWaddr 74:46:a0:c6:78:a6  
          inet addr:192.168.1.80  Bcast:192.168.1.255  Mask:255.255.255.0
          inet6 addr: fe80::8b16:1048:c773:91b6/64 Scope:Link
          inet6 addr: 2600:1700:38d0:3e60::41/128 Scope:Global
          inet6 addr: 2600:1700:38d0:3e60:d7a6:da4c:afb0:7434/64 Scope:Global
          inet6 addr: 2600:1700:38d0:3e60:11c9:a495:7588:bba4/64 Scope:Global
          UP BROADCAST RUNNING MULTICAST  MTU:1500  Metric:1
          RX packets:92006 errors:0 dropped:0 overruns:0 frame:0
          TX packets:48699 errors:0 dropped:0 overruns:0 carrier:0
          collisions:0 txqueuelen:1000 
          RX bytes:47534075 (47.5 MB)  TX bytes:8363574 (8.3 MB)

lo        Link encap:Local Loopback  
          inet addr:127.0.0.1  Mask:255.0.0.0
          inet6 addr: ::1/128 Scope:Host
          UP LOOPBACK RUNNING  MTU:65536  Metric:1
          RX packets:12293 errors:0 dropped:0 overruns:0 frame:0
          TX packets:12293 errors:0 dropped:0 overruns:0 carrier:0
          collisions:0 txqueuelen:1 
          RX bytes:1133688 (1.1 MB)  TX bytes:1133688 (1.1 MB)

virbr0    Link encap:Ethernet  HWaddr 00:00:00:00:00:00  
          inet addr:192.168.122.1  Bcast:192.168.122.255  Mask:255.255.255.0
          UP BROADCAST MULTICAST  MTU:1500  Metric:1
          RX packets:0 errors:0 dropped:0 overruns:0 frame:0
          TX packets:0 errors:0 dropped:0 overruns:0 carrier:0
          collisions:0 txqueuelen:1000 
          RX bytes:0 (0.0 B)  TX bytes:0 (0.0 B)

virbr1    Link encap:Ethernet  HWaddr 00:00:00:00:00:00  
          inet addr:192.168.42.1  Bcast:192.168.42.255  Mask:255.255.255.0
          UP BROADCAST MULTICAST  MTU:1500  Metric:1
          RX packets:0 errors:0 dropped:0 overruns:0 frame:0
          TX packets:0 errors:0 dropped:0 overruns:0 carrier:0
          collisions:0 txqueuelen:1000 
          RX bytes:0 (0.0 B)  TX bytes:0 (0.0 B)

Initial grep looks like this:

$ ifconfig |grep inet
          inet addr:172.17.0.1  Bcast:172.17.255.255  Mask:255.255.0.0
          inet addr:192.168.1.80  Bcast:192.168.1.255  Mask:255.255.255.0
          inet6 addr: fe80::8b16:1048:c773:91b6/64 Scope:Link
          inet6 addr: 2600:1700:38d0:3e60::41/128 Scope:Global
          inet6 addr: 2600:1700:38d0:3e60:d7a6:da4c:afb0:7434/64 Scope:Global
          inet6 addr: 2600:1700:38d0:3e60:11c9:a495:7588:bba4/64 Scope:Global
          inet addr:127.0.0.1  Mask:255.0.0.0
          inet6 addr: ::1/128 Scope:Host
          inet addr:192.168.122.1  Bcast:192.168.122.255  Mask:255.255.255.0
          inet addr:192.168.42.1  Bcast:192.168.42.255  Mask:255.255.255.0

$ ifconfig | grep inet | egrep -v '172|127' | awk '{print $2}'
addr:192.168.1.80
addr:
addr:
addr:
addr:
addr:
addr:192.168.122.1
addr:192.168.42.1

Here is the shell command:

$ ifconfig | grep 'inet ' | egrep -v '172|127' | awk '{print $2}' | awk -F':' '{print $2}'
192.168.1.80
192.168.122.1
192.168.42.1

Note that we used "egrep" for invert match.


Or we can find the ip this way:

$ ifconfig | grep mask | egrep -v '172|127' | awk '{print $2}' |cut -d: -f2
192.168.1.80
192.168.122.1
192.168.42.1

We can use delimiter with "-F". For example, let's work with the following "/etc/passwd" file:

nobody:*:-2:-2:Unprivileged User:/var/empty:/usr/bin/false
root:*:0:0:System Administrator:/var/root:/bin/sh
daemon:*:1:1:System Services:/var/root:/usr/bin/false
_uucp:*:4:4:Unix to Unix Copy Protocol:/var/spool/uucp:/usr/sbin/uucico
_taskgated:*:13:13:Task Gate Daemon:/var/empty:/usr/bin/false
...

If we want to get only the user name, we want to use a delimiter, ":":

$ awk -F':' '{print $1}' /etc/passwd
nobody
root
daemon
_uucp
_taskgated
...


tr

We can use tr for translating, or deleting, or squeezing repeated characters. It will read from STDIN and write to STDOUT.

lower case to upper case:

$ tr a-z A-Z
abcdef
ABCDEF
(abcdef)
(ABCDEF)
^C
$

()->{}:

$ tr '()' '{}'
(abcdef)
{abcdef}

It can work with files as well:

$ cat ok1
(abcdef)

$ tr '()' '{}' < ok1 > ok2

$ cat ok2
{abcdef}

We can use the 'tr' to count the words. For example, how many 'zero's in a file ('myfile.txt'):

one two three
four five zero zeros
six
zero zero
zero

$ cat myfile.txt | wc   # output : lines, words, chars
       5      11      54
       
$ cat myfile.txt | grep zero
four five zero zeros
zero zero
zero
       
$ cat myfile.txt | grep zero | wc
       3       7      36       
       
$ tr " " "\n" < myfile.txt | grep zero 
zero
zeros
zero
zero
zero

$ tr " " "\n" < myfile.txt | grep zero | wc    
       5       5      26
       
$ tr " " "\n" < myfile.txt | grep zero | wc | awk '{print $1}'
5


stream editor - Replacing a String

sed is a stream editor, we can use it to replacing a string with another either in-place or to a new file.

Suppose we have the following file (t.txt):

12345-abcde

We can in-place (via the option '-i') replace '-' with ':'

$ sed -i 's/-/:/g' t.txt 
$ cat t.txt 
12345:abcde

For in-place, depending on the system such as Mac, after the '-i', we may need a backup file extension such as ".bak":

$ sed -i .bak 's/-/:/g' t.txt    

This will backup the old file as t.txt.bak.


Or we can create another file:

$ sed 's/:/-/g' t.txt > tnew.txt 
$ cat tnew.txt 
12345-abcde

In place deleting the last of a file:

$ sed -i '$ d' a.txt 

We have a new file, 't.txt':

1
2
.
.
10

How can we add 'line ' at the beginning of each line?

$ sed -i 's/^/line /g' t.txt

'sed' can work only on certain range of lines. For example, we can add '#' from line 1 to 7 at the beginning of each line:

$ sed -i '1,10{s/^/#/}' variables.tf

Now, we want to print from line 3 to 7:

$ sed -n 3,5p t.txt
line 3
line 4
line 5


cut

The command cut is used for text processing. We can use this command to extract portion of text from a file by selecting columns.

cut OPTION... [FILE]...

In the example below, the option -f specifies which field we want to extract, and the option -d specifies what is the field delimiter that is used in the input file.

The example displays only the first field of each lines from /etc/passwd file using the field delimiter : (colon). In this case, the 1st field is the username.

$ cut -f1 -d':' /etc/passwd
root
daemon
bin
sys
sync
games
man
...

Similar example, with delimiter '/':

$ kubectl get pods -l app.kubernetes.io/name=argocd-server -o name
pod/argo-cd-argocd-server-5fd4f6c7cd-l8xqp

To get the 2nd one:

$ kubectl get pods -l app.kubernetes.io/name=argocd-server -o name | cut -d'/' -f 2
argo-cd-argocd-server-5fd4f6c7cd-l8xqp

Actually, we can drop the quote in -d:

$ cut -f1 -d: /etc/passwd

To check list of groups, we can use the "cut" with "sort":

$ cut -d: -f1 /etc/group | sort
adm
ans
audio
...
voice
whoopsie
www-data

Another cut example with bash script. Suppose we have the following file ("number.txt"):

1,2,3
4,5,6
7,8,9

We want to print out the 2nd number only for each line. Here the script:

for line in `cat number.txt`
do
 echo ${line} | cut -d "," -f 2
done

The output should look like this:

2
5
8

Of course, we could have used the "cut" directly on the shell:

$ cut -f2 -d, number.txt


tac

tac (which is "cat" backwards) outputs in reverse:

$ cat ok
1
2
3

$ tac ok
3
2
1


tail

$ cat ok
1
2
3
4
5
6
7
8
9

$ tail ok -n 3
7
8
9


watch

We can execute a command periodically using watch command.

We can use watch to display available disk space (repeat every 10 seconds). By default watch command uses 2 second interval, we can change it using -n option. The following example executes df -h command every 10 seconds.

$ watch -n 10 df -h

Every 10.0s: df -h                  Sat Aug 22 21:59:35 2015

Filesystem      Size  Used Avail Use% Mounted on
/dev/sda2       455G  194G  239G  45% /
none            4.0K     0  4.0K   0% /sys/fs/cgroup
udev            1.8G  4.0K  1.8G   1% /dev
tmpfs           355M  1.3M  354M   1% /run
none            5.0M     0  5.0M   0% /run/lock
none            1.8G   41M  1.7G   3% /run/shm
none            100M   60K  100M   1% /run/user
/dev/sda1       511M  3.4M  508M   1% /boot/efi


Symbolic link (soft link) : ln -s

Symbolic link is a file-system object that points to another file system object (file/directory).

ln -s source_file symbolic_link    

We can think of it as a short-cut.

For difference between hard and soft link, please check What is the difference between a symbolic link and a hard link?.

Since a symbolic link refers to a filename, rather than an i-node number, it can be used to link to a file in a different file system. Symbolic links also do not suffer the other limitation of hard links: we can create symbolic links to directories.

$ cat target
This is the target

$ ln -s target target-alias

$ cat target-alias
This is the target

If we try to set a symbolic link with an existing alias, we get the following error:

$ ln -s target target-alias
ln: failed to create symbolic link 'target-alias': File exists

In this case, we can use this:

$ ls -la target*
-rw-rw-r-- 1 k k 19 Aug 22 22:59 target
lrwxrwxrwx 1 k k  6 Aug 22 23:00 target-alias -> target

$ ln -sf target target-alias

$ ls -la target*
-rw-rw-r-- 1 k k 19 Aug 22 22:59 target
lrwxrwxrwx 1 k k  6 Aug 22 23:07 target-alias -> target


uptime - load average

We can get the load average from commands like top or uptime:

$ uptime
 16:48:25 up 32 min,  2 users,  load average: 0.58, 1.13, 2.46

From left to right, these numbers show us the average load over the last 1 minute, the last 5 minutes, and the last 15 minutes. In other words, the above output indicates:

load average over the last 1 minute: 0.58
load average over the last 5 minutes: 1.13
load average over the last 15 minutes: 2.46

Assuming 1 CPU machine, it means:

load average over the last 1 minute: 0.58 => The CPU idled for 42% of the time
load average over the last 5 minutes: 1.13 => .13 processes were waiting for the CPU
load average over the last 15 minutes: 2.46 => On average, 1.46 processes were waiting for the CPU

Actually, if the machine has 2 CPUs, then it would mean:

load average over the last 1 minute: 0.58 => The CPU idled for 142% of the time
load average over the last 5 minutes: 1.13 => The CPU idled for 87% of the time
load average over the last 15 minutes: 2.46 => On average, 0.46 processes were waiting for the CPU


/etc/init.d

The /etc/init.d directory contains a number of start/stop scripts for various services on our system.

There are times when we need to start or stop a process cleanly and without using the kill or killall commands. That is where the /etc/init.d directory comes in handy.

In order to control any of the scripts in init.d manually, we have to have root (or sudo) access. Each script will be run as a command and the structure of the command will look like:

/etc/init.d/command OPTION

Where command is the actual command to run and OPTION can be one of the following:

start
stop
reload
restart
force-reload

Most often we will use either start, stop, or restart. So, if we want to stop our network we can issue the command:

/etc/init.d/networking stop


What is inode?

inode is a "database" of all file information that tells about file structure. The inode of each file uses a pointer to point to the specific file, directory or object. The pointer is a unique number which usually is referred to as the inode number. For example, to get a listing of an inode number, use the following command:

iNode.png

Picture credit - What is iNode in Linux / Unit


$ ls -i myfile
19147527 myfile

To get more information that just the inode number, we can use the "stat" command:

$ stat myfile
  File: 'myfile'
  Size: 11        	Blocks: 8          IO Block: 4096   regular file
Device: 802h/2050d	Inode: 19147527    Links: 1
Access: (0664/-rw-rw-r--)  Uid: ( 1000/       k)   Gid: ( 1000/       k)
Access: 2015-10-14 18:42:09.111527150 -0700
Modify: 2015-10-14 18:42:12.703534639 -0700
Change: 2015-10-14 18:42:12.743534723 -0700
 Birth: -

We can see that the inode number for the myfile file is 19147527 for both commands.

When an application needs a file, the application exchanges the file name for the inode number from the directory listing. After that, the application uses the inode number for a reference to the file.

To find the inode numbers, we can use the "tree" command with "inode":

$ tree /etc -L 1 --inodes
/etc
|- [3932166]  acpi
|- [3932292]  adduser.conf
|- [3932167]  alternatives
|- [3932293]  anacrontab
|- [3938960]  ansible
|- [3934719]  apache2

To check inode count:

$ df -i
Filesystem       Inodes   IUsed    IFree IUse% Mounted on
udev             448782     549   448233    1% /dev
tmpfs            453654     810   452844    1% /run
/dev/sda2      30261248 1230679 29030569    5% /
tmpfs            453654      99   453555    1% /dev/shm
tmpfs            453654       6   453648    1% /run/lock
tmpfs            453654      16   453638    1% /sys/fs/cgroup
/dev/sda1             0       0        0     - /boot/efi
tmpfs            453654      34   453620    1% /run/user/1000


What is the difference between a symbolic link and a hard link?

Simple version of the difference:

  1. Soft link (symbolic link) - short cut
  2. Hard link - copied file

The soft link is a short cut and it does not have all the information that original file (i-node) has, and it has much smaller size compared with the original. Because the hard link is a copy, it has the original contents and if we delete the hard link, it does not affect the original file.


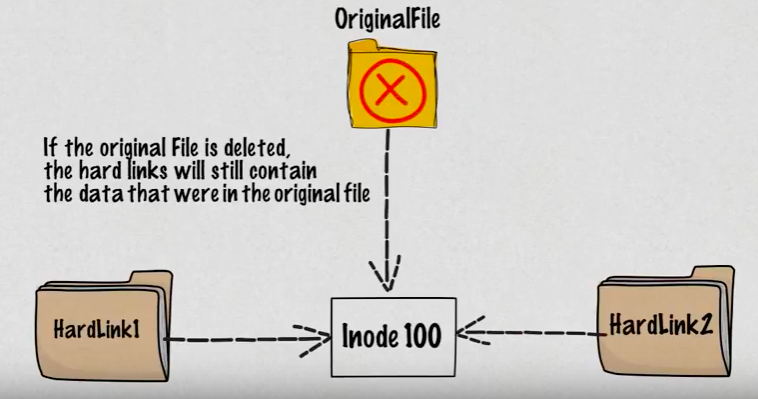
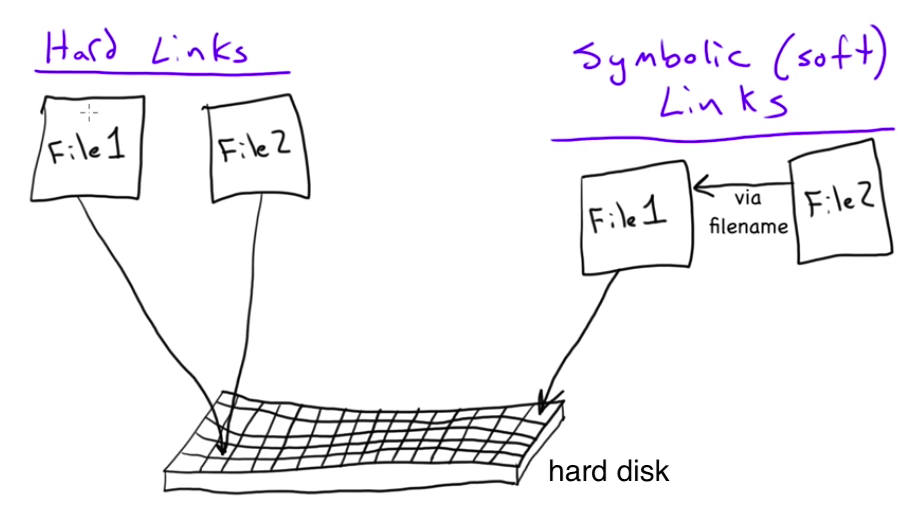
The linux files are represented by inodes, and a file in the file system is basically a link to an inode. A hard link creates another file with a link to the same underlying inode.


softlink.png
hardlink.png

Picture source: Hard vs Soft Links in Linux (Linux Links)


hard-soft-difference.png

Picture source: MicroNuggets: Hard Links versus Soft Links Explained


Let's see the hard link in action. Note the number of links when we do ls -l before and after the hard line:

$ ls -la
total 8
drwxr-xr-x    3 kihyuckhong  staff    96 Aug  5 14:50 .
drwxr-xr-x+ 117 kihyuckhong  staff  3744 Aug  5 11:46 ..
-rw-r--r--    1 kihyuckhong  staff     6 Aug  5 14:50 file1    

$ ln file1 file2

$ ls -la
total 16
drwxr-xr-x    4 kihyuckhong  staff   128 Aug  5 14:50 .
drwxr-xr-x+ 117 kihyuckhong  staff  3744 Aug  5 11:46 ..
-rw-r--r--    2 kihyuckhong  staff     6 Aug  5 14:50 file1
-rw-r--r--    2 kihyuckhong  staff     6 Aug  5 14:50 file2    

$ rm file1

$ ls -la
total 8
drwxr-xr-x    3 kihyuckhong  staff    96 Aug  5 14:54 .
drwxr-xr-x+ 117 kihyuckhong  staff  3744 Aug  5 11:46 ..
-rw-r--r--    1 kihyuckhong  staff     6 Aug  5 14:50 file2

Compare it with symbolic link:

$ ls -la
total 8
drwxr-xr-x    3 kihyuckhong  staff    96 Aug  5 14:57 .
drwxr-xr-x+ 117 kihyuckhong  staff  3744 Aug  5 11:46 ..
-rw-r--r--    1 kihyuckhong  staff     6 Aug  5 14:50 file1

$ ln -s file1 file2

$ ls -la
total 8
drwxr-xr-x    4 kihyuckhong  staff   128 Aug  5 14:57 .
drwxr-xr-x+ 117 kihyuckhong  staff  3744 Aug  5 11:46 ..
-rw-r--r--    1 kihyuckhong  staff     6 Aug  5 14:50 file1
lrwxr-xr-x    1 kihyuckhong  staff     5 Aug  5 14:57 file2 -> file1


hard-soft-difference-2.png

Picture source: Explaining the difference between hard links & symbolic links using Bruce Lee


So, when we delete a file, it removes one link to the underlying inode. The inode is deleted only when all links to the inode have been deleted.

While the hard link creates another file with a link to the same underlying inode, a soft link is a link to another inode in the file system.


Let's create two files: one for symbolic link and the other one for hard link:

$ touch soft; touch hard

Make links:

$ ln hard hard-link
$ ln -s soft soft-link

As we discussed in the previous section, a file is represented by inodes (a pointer to an inode). So, let's check inode:

$ ls -i
19924730 hard  19924730 hard-link  19924727 soft  19924856 soft-link

As we can see from the output, the hard link then creates another file with a link to the same underlying inode (inode number 19924730) while a soft link is a link to another name in the file system.

Want to create the second links?

$ ls -i
19924730 hard       19924730 hard-link   19924730 hard-link2
19924727 soft       19924856 soft-link   19924945 soft-linke2

$ ls -la | awk -F" " '{print $9 $10 $11;}'
hard
hard-link
hard-link2
soft
soft-link->soft
soft-linke2->soft

The hard link then just creates another file with a link to the same inode!

Let's rename the original links:

$ ls -i
19924730 hard-new   19924730 hard-link   19924730 hard-link2
19924727 soft-new   19924856 soft-link   19924945 soft-linke2

So, rename did not have any effects?

Well, we can see the soft links are pointing to a file that's no longer exists!

$ ls -la | awk -F" " '{print $9 $10 $11;}'
hard-link
hard-link2
hard-new
soft-link->soft
soft-linke2->soft
soft-new

Let's see what's happening we try to work on each file.

$ cat hard-link
hard file

$ cat soft-link2
cat: soft-link2: No such file or directory

Once a hard link has been made, the link is pointing to the inode. Renaming the original file will not affect the hard link. Any changes to the data on the inode is reflected in all files that refer to that inode. But soft link become a link to a non-existing file.

Want to see the effects of deletion on hard-link & hard-link2?

$ ls
hard-link  hard-link2  hard-new  soft-link  soft-linke2  soft-new

$ rm soft-new hard-new

$ ls
hard-link  hard-link2  soft-link  soft-linke2

$ ls -i
19924730 hard-link   19924856 soft-link
19924730 hard-link2  19924945 soft-linke2

The symbolic links are pointing to non-existent file. However, hard-links are still valid:

$ cat hard-link
hard file

A major advantage of a symbolic link is that it can point to a file that's not existing. This is useful if we need a link to a file that is periodically removed and recreated.

Let's create a new soft file with the same name that the link is pointing:

$ echo "soft file" > soft
$ ls
hard-link  hard-link2  soft  soft-link  soft-linke2
$ cat soft-link
soft file

As a practical example, a symbolic link could point to a file that gets checked in and out under a version control system, "a.o" file that is re-created by the compiler each time we run make.

Hard-links can be very useful when you want to have the same contents (and same permissions!) in several files on the same filesystem.

Take for example a package manager, that creates a /usr/share/doc/$packagename directory for each package that is installed and inside that directory a file called LICENSE with the license information of the package. Many packages on a typical Linux system are GPL licensed, so instead of having 200 copies of the GPL on the filesystem there could be only one copy and 199 links. - from Linux: Best-practices for Hard Linking?.


Summary:

  1. Hard link can only be created for a file but cannot be created for directories.
  2. On the other hand, symbolic links or symlinks can link to a directory.
  3. Removing the original file that hard link points to does not remove the hardlink itself; the hardlink still provides the content of the underlying file.
  4. If we remove the hard link or the symlink itself, the original file will stay intact.
  5. Removing the original file does not remove the attached symbolic link or symlink, but without the original file, the symlink is useless and becomes similar to a dangling pointer.


How to redirect output to a file and stdout

tee reads standard streams and writes it to both standard output and one or more files, effectively duplicating its input. It is primarily used in conjunction with pipes and filters. The command is named after the T-splitter used in plumbing.

tee.png

Picture source: https://en.wikipedia.org/wiki/Tee_(command)


How to use 'dd' command?

The command dd is used to convert and copy files.

By default, dd reads from stdin and writes to stdout, but these can be changed by using the if (input file) and of (output file) options.

Backing up a disk to an image will be faster than copying the exact data. Also, disk image make the restoration much more easier. We can create a compressed disk image using dd:

$ sudo dd if=/dev/sda1 | gzip >/tmp/sda1disk.img.gz

We often use dd to simulate CPU load by filling a file with random content:

$ dd if=/dev/urandom of=500MBfile bs=1M count=500
500+0 records in
500+0 records out
524288000 bytes (524 MB) copied, 103.075 s, 5.1 MB/s

For this, /dev/urandom will supply random numbers, which will be generated by the kernel. This will lead to an increased load on the CPU (sy - system time). At the same time, a vmstat command executing in parallel will indicate that between 51% and 55% of the CPU time is being used for the execution of kernel code (for the generation of random numbers, in this case):

$ vmstat 1 5
procs -----------memory---------- ---swap-- -----io---- -system-- ------cpu-----
 r  b   swpd   free   buff  cache   si   so    bi    bo   in   cs us sy id wa st
 4  0 870968 164752   2556 440300   10   17   111   117  289  269 28 10 61  2  0
 3  0 870964 158576   2556 445440    0    0     0     0 2341 8240 19 53 28  0  0
 6  0 870960 154900   2556 450528    0    0    28     0 2022 6690 19 51 30  0  0
 3  1 870960 147560   2676 455800    0    0   232     8 2071 9254 20 55 25  0  0
 3  1 870956 142108   2824 462736    0    0   920  8580 1747 5959 15 55 28  2  0

As a high IO read load example, a large file (such as an ISO file) will be read and written to /dev/null using dd:

$ dd if=bigfile.iso of=/dev/null bs=1M

While reading, open another terminal and can execute vmstat in parallel. It will show the increased IO read load (the bi value - blocks received from a block device (blocks/s)):

$ vmstat 1 5
procs -----------memory---------- ---swap-- -----io---- -system-- ------cpu-----
 r  b   swpd   free   buff  cache   si   so    bi    bo   in   cs us sy id wa st
 2  2 882580 146512  44096 540636   14   17   123   115   48  461 28 10 60  1  0
 8  1 886024 142780  43864 547788    0 3448 48508  3448 3509 6549 18 18 25 38  0
 4  1 886028 101204  43864 590696   32   20 77344    20 2110 4447 10 19 40 32  0
 2  1 888788 110368  43784 585296    0 2760 52612  2968 3386 7110 17 18 24 41  0
 2  2 891308 110732  43784 591972   64 2528 85440  2528 2986 7273 18 24 32 25  0


Checking linux distribution / OS

To check linux distribution:

$ cat /etc/issue
Ubuntu 14.04.3 LTS \n \l

Or:

$ lsb_release -a
No LSB modules are available.
Distributor ID:	Ubuntu
Description:	Ubuntu 14.04.3 LTS
Release:	14.04
Codename:	trusty

$ cat /etc/lsb-release
DISTRIB_ID=Ubuntu
DISTRIB_RELEASE=14.04
DISTRIB_CODENAME=trusty
DISTRIB_DESCRIPTION="Ubuntu 14.04.3 LTS"

$ cat /etc/*-release
CentOS Linux release 7.2.1511 (Core) 
NAME="CentOS Linux"
VERSION="7 (Core)"
ID="centos"
ID_LIKE="rhel fedora"
VERSION_ID="7"
PRETTY_NAME="CentOS Linux 7 (Core)"
ANSI_COLOR="0;31"
CPE_NAME="cpe:/o:centos:centos:7"
HOME_URL="https://www.centos.org/"
BUG_REPORT_URL="https://bugs.centos.org/"

CENTOS_MANTISBT_PROJECT="CentOS-7"
CENTOS_MANTISBT_PROJECT_VERSION="7"
REDHAT_SUPPORT_PRODUCT="centos"
REDHAT_SUPPORT_PRODUCT_VERSION="7"

CentOS Linux release 7.2.1511 (Core) 

Or:

$ cat /etc/os-release
NAME="Ubuntu"
VERSION="14.04.3 LTS, Trusty Tahr"
ID=ubuntu
ID_LIKE=debian
PRETTY_NAME="Ubuntu 14.04.3 LTS"
VERSION_ID="14.04"
HOME_URL="http://www.ubuntu.com/"
SUPPORT_URL="http://help.ubuntu.com/"
BUG_REPORT_URL="http://bugs.launchpad.net/ubuntu/"


How to setup passwordless `sudo` on Linux?

We can add a user to a wheel group:

$ sudo usermod -g wheel my-user-name

"The term wheel refers to a user account with a wheel bit, a system setting that provides additional special system privileges that empower a user to execute restricted commands that ordinary user accounts cannot access. The term is derived from the slang phrase big wheel, referring to a person with great power or influence." - Wheel (Unix term)

We may need to uncomment a line using sudo visudo and it should look like this:

## Allows people in group wheel to run all commands
%wheel  ALL=(ALL)       ALL

## Same thing without a password
%wheel  ALL=(ALL)       NOPASSWD: ALL


users & grous - useradd, usermod, groupadd, gpasswd, and deluser

To create a user with home directory, we can use useradd:

$ sudo useradd -m testuser

To create a group:

$ sudo groupadd testgroup

We can add a user (for example, testuser) to a group (testgroup):

$ sudo usermod -aG testgroup testuser
$ groups testuser
testuser : testuser testgroup

$ sudo usermod -aG sudo testuser
$ groups testuser
testuser : testuser sudo testgroup

To remove a user from a group:

$ sudo gpasswd -d testuser sudo
Removing user testuser from group sudo
$ groups testuser
testuser : testuser testgroup

To delete a group:

$ sudo groupdel testgroup

To delete a user:

$ sudo userdel testuser

Also check Managing User Account


Check if a file has been modified

We may want to check whether its inode change time (ctime) has changed from the last check:

$ stat testfile
  File: 'testfile'
  Size: 0         	Blocks: 0          IO Block: 4096   regular empty file
Device: 802h/2050d	Inode: 27402256    Links: 1
Access: (0664/-rw-rw-r--)  Uid: ( 1000/       k)   Gid: ( 1000/       k)
Access: 2017-01-25 23:06:10.881876244 -0700
Modify: 2017-01-25 23:06:10.881876244 -0700
Change: 2017-01-25 23:06:10.881876244 -0700
 Birth: -

$ stat -c %Y a.txt
1487890881

$ touch a.txt

$ stat -c %Y a.txt
1487890975

$ stat -c %Y a.txt
1487890975

Note that the "-c" is the same as "--format=format", and the "%Y" should display "Time of last data modification as seconds since Epoch"


We changed the modification time via touch command.


killing processes

Quite often, we need to kill a process when it behaves unfriendly. To list signals:

$ kill -l
 1) SIGHUP	 2) SIGINT	 3) SIGQUIT	 4) SIGILL	 5) SIGTRAP
 6) SIGABRT	 7) SIGBUS	 8) SIGFPE	 9) SIGKILL	10) SIGUSR1
11) SIGSEGV	12) SIGUSR2	13) SIGPIPE	14) SIGALRM	15) SIGTERM
16) SIGSTKFLT	17) SIGCHLD	18) SIGCONT	19) SIGSTOP	20) SIGTSTP
21) SIGTTIN	22) SIGTTOU	23) SIGURG	24) SIGXCPU	25) SIGXFSZ
26) SIGVTALRM	27) SIGPROF	28) SIGWINCH	29) SIGIO	30) SIGPWR
31) SIGSYS	34) SIGRTMIN	35) SIGRTMIN+1	36) SIGRTMIN+2	37) SIGRTMIN+3
38) SIGRTMIN+4	39) SIGRTMIN+5	40) SIGRTMIN+6	41) SIGRTMIN+7	42) SIGRTMIN+8
43) SIGRTMIN+9	44) SIGRTMIN+10	45) SIGRTMIN+11	46) SIGRTMIN+12	47) SIGRTMIN+13
48) SIGRTMIN+14	49) SIGRTMIN+15	50) SIGRTMAX-14	51) SIGRTMAX-13	52) SIGRTMAX-12
53) SIGRTMAX-11	54) SIGRTMAX-10	55) SIGRTMAX-9	56) SIGRTMAX-8	57) SIGRTMAX-7
58) SIGRTMAX-6	59) SIGRTMAX-5	60) SIGRTMAX-4	61) SIGRTMAX-3	62) SIGRTMAX-2
63) SIGRTMAX-1	64) SIGRTMAX	

Note that 15: SIGTERM is the default and it terminates a process.

To kill processes related, for example, nginx:

$ ps aux|grep nginx
k          674  0.0  0.0  22576   960 pts/23   S+   15:59   0:00 grep --color=auto nginx
root     10457  0.0  0.0 125096    72 ?        Ss   10:00   0:00 nginx: master process /usr/sbin/nginx -g daemon on; master_process on;
www-data 10458  0.0  0.0 125472  1620 ?        S    10:00   0:02 nginx: worker process
www-data 10459  0.0  0.0 125472  1608 ?        S    10:00   0:00 nginx: worker process

We can use killall:

$ sudo killall nginx

To kill processes belong a specific user, we use pkill:

$ sudo pkill -u username

To get the man page for signals:

$ man signal


DevOps

  • Phases of Continuous Integration
  • Software development methodology
  • Introduction to DevOps
  • Samples of Continuous Integration (CI) / Continuous Delivery (CD) - Use cases
  • Artifact repository and repository management
  • Linux - General, shell programming, processes & signals ...
  • RabbitMQ...
  • MariaDB
  • New Relic APM with NodeJS : simple agent setup on AWS instance
  • Nagios on CentOS 7 with Nagios Remote Plugin Executor (NRPE)
  • Nagios - The industry standard in IT infrastructure monitoring on Ubuntu
  • Zabbix 3 install on Ubuntu 14.04 & adding hosts / items / graphs
  • Datadog - Monitoring with PagerDuty/HipChat and APM
  • Install and Configure Mesos Cluster
  • Cassandra on a Single-Node Cluster
  • OpenStack install on Ubuntu 16.04 server - DevStack
  • AWS EC2 Container Service (ECS) & EC2 Container Registry (ECR) | Docker Registry
  • CI/CD with CircleCI - Heroku deploy
  • Introduction to Terraform with AWS elb & nginx
  • Kubernetes I - Running Kubernetes Locally via Minikube
  • Kubernetes II - kops on AWS
  • Kubernetes III - kubeadm on AWS
  • CI/CD Github actions
  • CI/CD Gitlab


  • DevOps / Sys Admin Q & A

  • (1A) - Linux Commands
  • (1B) - Linux Commands
  • (2) - Networks
  • (2B) - Networks
  • (3) - Linux Systems
  • (4) - Scripting (Ruby/Shell)
  • (5) - Configuration Management
  • (6) - AWS VPC setup (public/private subnets with NAT)
  • (6B) - AWS VPC Peering
  • (7) - Web server
  • (8) - Database
  • (9) - Linux System / Application Monitoring, Performance Tuning, Profiling Methods & Tools
  • (10) - Trouble Shooting: Load, Throughput, Response time and Leaks
  • (11) - SSH key pairs & SSL Certificate
  • (12) - Why is the database slow?
  • (13) - Is my web site down?
  • (14) - Is my server down?
  • (15) - Why is the server sluggish?
  • (16A) - Serving multiple domains using Virtual Hosts - Apache
  • (16B) - Serving multiple domains using server block - Nginx
  • (16C) - Reverse proxy servers and load balancers - Nginx
  • (17) - Linux startup process
  • (19) - phpMyAdmin with Nginx virtual host as a subdomain
  • (19) - How to SSH login without password?
  • (20) - Log Rotation
  • (21) - Monitoring Metrics
  • (22) - lsof
  • (23) - Wireshark introduction
  • (24) - User account management
  • (25) - Domain Name System (DNS)
  • (26) - NGINX SSL/TLS, Caching, and Session
  • (27) - Troubleshooting 5xx server errors
  • (28) - Linux Systemd: journalctl
  • (29) - Linux Systemd: FirewallD
  • (30) - Linux: SELinux
  • (31) - Linux: Samba
  • (0) - Linux Sys Admin's Day to Day tasks


  • Linux - system, cmds & shell

    1. Linux Tips - links, vmstats, rsync
    2. Linux Tips 2 - ctrl a, curl r, tail -f, umask
    3. Linux - bash I
    4. Linux - bash II
    5. Linux - Uncompressing 7z file
    6. Linux - sed I (substitution: sed 's///', sed -i)
    7. Linux - sed II (file spacing, numbering, text conversion and substitution)
    8. Linux - sed III (selective printing of certain lines, selective definition of certain lines)
    9. Linux - 7 File types : Regular, Directory, Block file, Character device file, Pipe file, Symbolic link file, and Socket file
    10. Linux shell programming - introduction
    11. Linux shell programming - variables and functions (readonly, unset, and functions)
    12. Linux shell programming - special shell variables
    13. Linux shell programming : arrays - three different ways of declaring arrays & looping with $*/$@
    14. Linux shell programming : operations on array
    15. Linux shell programming : variables & commands substitution
    16. Linux shell programming : metacharacters & quotes
    17. Linux shell programming : input/output redirection & here document
    18. Linux shell programming : loop control - for, while, break, and break n
    19. Linux shell programming : string
    20. Linux shell programming : for-loop
    21. Linux shell programming : if/elif/else/fi
    22. Linux shell programming : Test
    23. Managing User Account - useradd, usermod, and userdel
    24. Linux Secure Shell (SSH) I : key generation, private key and public key
    25. Linux Secure Shell (SSH) II : ssh-agent & scp
    26. Linux Secure Shell (SSH) III : SSH Tunnel as Proxy - Dynamic Port Forwarding (SOCKS Proxy)
    27. Linux Secure Shell (SSH) IV : Local port forwarding (outgoing ssh tunnel)
    28. Linux Secure Shell (SSH) V : Reverse SSH Tunnel (remote port forwarding / incoming ssh tunnel) /)
    29. Linux Processes and Signals
    30. Linux Drivers 1
    31. tcpdump
    32. Linux Debugging using gdb
    33. Embedded Systems Programming I - Introduction
    34. Embedded Systems Programming II - gcc ARM Toolchain and Simple Code on Ubuntu/Fedora
    35. LXC (Linux Container) Install and Run
    36. Linux IPTables
    37. Hadoop - 1. Setting up on Ubuntu for Single-Node Cluster
    38. Hadoop - 2. Runing on Ubuntu for Single-Node Cluster
    39. ownCloud 7 install
    40. Ubuntu 14.04 guest on Mac OSX host using VirtualBox I
    41. Ubuntu 14.04 guest on Mac OSX host using VirtualBox II
    42. Windows 8 guest on Mac OSX host using VirtualBox I
    43. Ubuntu Package Management System (apt-get vs dpkg)
    44. RPM Packaging
    45. How to Make a Self-Signed SSL Certificate
    46. Linux Q & A
    47. DevOps / Sys Admin questions


    Ph.D. / Golden Gate Ave, San Francisco / Seoul National Univ / Carnegie Mellon / UC Berkeley / DevOps / Deep Learning / Visualization

    YouTubeMy YouTube channel

    Sponsor Open Source development activities and free contents for everyone.

    Thank you.

    - K Hong


    DevOps


    Phases of Continuous Integration

    Software development methodology

    Introduction to DevOps

    Samples of Continuous Integration (CI) / Continuous Delivery (CD) - Use cases

    Artifact repository and repository management

    Linux - General, shell programming, processes & signals ...

    RabbitMQ...

    MariaDB

    New Relic APM with NodeJS : simple agent setup on AWS instance

    Nagios on CentOS 7 with Nagios Remote Plugin Executor (NRPE)

    Nagios - The industry standard in IT infrastructure monitoring on Ubuntu

    Zabbix 3 install on Ubuntu 14.04 & adding hosts / items / graphs

    Datadog - Monitoring with PagerDuty/HipChat and APM

    Install and Configure Mesos Cluster

    Cassandra on a Single-Node Cluster

    Container Orchestration : Docker Swarm vs Kubernetes vs Apache Mesos

    OpenStack install on Ubuntu 16.04 server - DevStack

    AWS EC2 Container Service (ECS) & EC2 Container Registry (ECR) | Docker Registry

    CI/CD with CircleCI - Heroku deploy

    Introduction to Terraform with AWS elb & nginx

    Docker & Kubernetes

    Kubernetes I - Running Kubernetes Locally via Minikube

    Kubernetes II - kops on AWS

    Kubernetes III - kubeadm on AWS

    AWS : EKS (Elastic Container Service for Kubernetes)

    CI/CD Github actions

    CI/CD Gitlab


    DevOps / Sys Admin Q & A


    (1A) - Linux Commands

    (1B) - Linux Commands

    (2) - Networks

    (2B) - Networks

    (3) - Linux Systems

    (4) - Scripting (Ruby/Shell)

    (5) - Configuration Management

    (6) - AWS VPC setup (public/private subnets with NAT)

    (6B) - AWS VPC Peering

    (7) - Web server

    (8) - Database

    (9) - Linux System / Application Monitoring, Performance Tuning, Profiling Methods & Tools

    (10) - Trouble Shooting: Load, Throughput, Response time and Leaks

    (11) - SSH key pairs, SSL Certificate, and SSL Handshake

    (12) - Why is the database slow?

    (13) - Is my web site down?

    (14) - Is my server down?

    (15) - Why is the server sluggish?

    (16A) - Serving multiple domains using Virtual Hosts - Apache

    (16B) - Serving multiple domains using server block - Nginx

    (16C) - Reverse proxy servers and load balancers - Nginx

    (17) - Linux startup process

    (18) - phpMyAdmin with Nginx virtual host as a subdomain

    (19) - How to SSH login without password?

    (20) - Log Rotation

    (21) - Monitoring Metrics

    (22) - lsof

    (23) - Wireshark introduction

    (24) - User account management

    (25) - Domain Name System (DNS)

    (26) - NGINX SSL/TLS, Caching, and Session

    (27) - Troubleshooting 5xx server errors

    (28) - Linux Systemd: journalctl

    (29) - Linux Systemd: FirewallD

    (30) - Linux: SELinux

    (31) - Linux: Samba

    (0) - Linux Sys Admin's Day to Day tasks


    Sponsor Open Source development activities and free contents for everyone.

    Thank you.

    - K Hong


    Docker & K8s


    Docker install on Amazon Linux AMI

    Docker install on EC2 Ubuntu 14.04

    Docker container vs Virtual Machine

    Docker install on Ubuntu 14.04

    Docker Hello World Application

    Nginx image - share/copy files, Dockerfile

    Working with Docker images : brief introduction

    Docker image and container via docker commands (search, pull, run, ps, restart, attach, and rm)

    More on docker run command (docker run -it, docker run --rm, etc.)

    Docker Networks - Bridge Driver Network

    Docker Persistent Storage

    File sharing between host and container (docker run -d -p -v)

    Linking containers and volume for datastore

    Dockerfile - Build Docker images automatically I - FROM, MAINTAINER, and build context

    Dockerfile - Build Docker images automatically II - revisiting FROM, MAINTAINER, build context, and caching

    Dockerfile - Build Docker images automatically III - RUN

    Dockerfile - Build Docker images automatically IV - CMD

    Dockerfile - Build Docker images automatically V - WORKDIR, ENV, ADD, and ENTRYPOINT

    Docker - Apache Tomcat

    Docker - NodeJS

    Docker - NodeJS with hostname

    Docker Compose - NodeJS with MongoDB

    Docker - Prometheus and Grafana with Docker-compose

    Docker - StatsD/Graphite/Grafana

    Docker - Deploying a Java EE JBoss/WildFly Application on AWS Elastic Beanstalk Using Docker Containers

    Docker : NodeJS with GCP Kubernetes Engine

    Docker : Jenkins Multibranch Pipeline with Jenkinsfile and Github

    Docker : Jenkins Master and Slave

    Docker - ELK : ElasticSearch, Logstash, and Kibana

    Docker - ELK 7.6 : Elasticsearch on Centos 7 Docker - ELK 7.6 : Filebeat on Centos 7

    Docker - ELK 7.6 : Logstash on Centos 7

    Docker - ELK 7.6 : Kibana on Centos 7 Part 1

    Docker - ELK 7.6 : Kibana on Centos 7 Part 2

    Docker - ELK 7.6 : Elastic Stack with Docker Compose

    Docker - Deploy Elastic Cloud on Kubernetes (ECK) via Elasticsearch operator on minikube

    Docker - Deploy Elastic Stack via Helm on minikube

    Docker Compose - A gentle introduction with WordPress

    Docker Compose - MySQL

    MEAN Stack app on Docker containers : micro services

    Docker Compose - Hashicorp's Vault and Consul Part A (install vault, unsealing, static secrets, and policies)

    Docker Compose - Hashicorp's Vault and Consul Part B (EaaS, dynamic secrets, leases, and revocation)

    Docker Compose - Hashicorp's Vault and Consul Part C (Consul)

    Docker Compose with two containers - Flask REST API service container and an Apache server container

    Docker compose : Nginx reverse proxy with multiple containers

    Docker compose : Nginx reverse proxy with multiple containers

    Docker & Kubernetes : Envoy - Getting started

    Docker & Kubernetes : Envoy - Front Proxy

    Docker & Kubernetes : Ambassador - Envoy API Gateway on Kubernetes

    Docker Packer

    Docker Cheat Sheet

    Docker Q & A

    Kubernetes Q & A - Part I

    Kubernetes Q & A - Part II

    Docker - Run a React app in a docker

    Docker - Run a React app in a docker II (snapshot app with nginx)

    Docker - NodeJS and MySQL app with React in a docker

    Docker - Step by Step NodeJS and MySQL app with React - I

    Installing LAMP via puppet on Docker

    Docker install via Puppet

    Nginx Docker install via Ansible

    Apache Hadoop CDH 5.8 Install with QuickStarts Docker

    Docker - Deploying Flask app to ECS

    Docker Compose - Deploying WordPress to AWS

    Docker - WordPress Deploy to ECS with Docker-Compose (ECS-CLI EC2 type)

    Docker - ECS Fargate

    Docker - AWS ECS service discovery with Flask and Redis

    Docker & Kubernetes: minikube version: v1.31.2, 2023

    Docker & Kubernetes 1 : minikube

    Docker & Kubernetes 2 : minikube Django with Postgres - persistent volume

    Docker & Kubernetes 3 : minikube Django with Redis and Celery

    Docker & Kubernetes 4 : Django with RDS via AWS Kops

    Docker & Kubernetes : Kops on AWS

    Docker & Kubernetes : Ingress controller on AWS with Kops

    Docker & Kubernetes : HashiCorp's Vault and Consul on minikube

    Docker & Kubernetes : HashiCorp's Vault and Consul - Auto-unseal using Transit Secrets Engine

    Docker & Kubernetes : Persistent Volumes & Persistent Volumes Claims - hostPath and annotations

    Docker & Kubernetes : Persistent Volumes - Dynamic volume provisioning

    Docker & Kubernetes : DaemonSet

    Docker & Kubernetes : Secrets

    Docker & Kubernetes : kubectl command

    Docker & Kubernetes : Assign a Kubernetes Pod to a particular node in a Kubernetes cluster

    Docker & Kubernetes : Configure a Pod to Use a ConfigMap

    AWS : EKS (Elastic Container Service for Kubernetes)

    Docker & Kubernetes : Run a React app in a minikube

    Docker & Kubernetes : Minikube install on AWS EC2

    Docker & Kubernetes : Cassandra with a StatefulSet

    Docker & Kubernetes : Terraform and AWS EKS

    Docker & Kubernetes : Pods and Service definitions

    Docker & Kubernetes : Headless service and discovering pods

    Docker & Kubernetes : Service IP and the Service Type

    Docker & Kubernetes : Kubernetes DNS with Pods and Services

    Docker & Kubernetes - Scaling and Updating application

    Docker & Kubernetes : Horizontal pod autoscaler on minikubes

    Docker & Kubernetes : NodePort vs LoadBalancer vs Ingress

    Docker & Kubernetes : Load Testing with Locust on GCP Kubernetes

    Docker & Kubernetes : From a monolithic app to micro services on GCP Kubernetes

    Docker & Kubernetes : Rolling updates

    Docker & Kubernetes : Deployments to GKE (Rolling update, Canary and Blue-green deployments)

    Docker & Kubernetes : Slack Chat Bot with NodeJS on GCP Kubernetes

    Docker & Kubernetes : Continuous Delivery with Jenkins Multibranch Pipeline for Dev, Canary, and Production Environments on GCP Kubernetes

    Docker & Kubernetes - MongoDB with StatefulSets on GCP Kubernetes Engine

    Docker & Kubernetes : Nginx Ingress Controller on minikube

    Docker & Kubernetes : Setting up Ingress with NGINX Controller on Minikube (Mac)

    Docker & Kubernetes : Nginx Ingress Controller for Dashboard service on Minikube

    Docker & Kubernetes : Nginx Ingress Controller on GCP Kubernetes

    Docker & Kubernetes : Kubernetes Ingress with AWS ALB Ingress Controller in EKS

    Docker & Kubernetes : MongoDB / MongoExpress on Minikube

    Docker & Kubernetes : Setting up a private cluster on GCP Kubernetes

    Docker & Kubernetes : Kubernetes Namespaces (default, kube-public, kube-system) and switching namespaces (kubens)

    Docker & Kubernetes : StatefulSets on minikube

    Docker & Kubernetes : StatefulSets on minikube

    Docker & Kubernetes : RBAC

    Docker & Kubernetes Service Account, RBAC, and IAM

    Docker & Kubernetes - Kubernetes Service Account, RBAC, IAM with EKS ALB, Part 1

    Docker & Kubernetes : Helm Chart

    Docker & Kubernetes : My first Helm deploy

    Docker & Kubernetes : Readiness and Liveness Probes

    Docker & Kubernetes : Helm chart repository with Github pages

    Docker & Kubernetes : Deploying WordPress and MariaDB with Ingress to Minikube using Helm Chart

    Docker & Kubernetes : Deploying WordPress and MariaDB to AWS using Helm 2 Chart

    Docker & Kubernetes : Deploying WordPress and MariaDB to AWS using Helm 3 Chart

    Docker & Kubernetes : Helm Chart for Node/Express and MySQL with Ingress

    Docker & Kubernetes : Docker_Helm_Chart_Node_Expess_MySQL_Ingress.php

    Docker & Kubernetes: Deploy Prometheus and Grafana using Helm and Prometheus Operator - Monitoring Kubernetes node resources out of the box

    Docker & Kubernetes : Deploy Prometheus and Grafana using kube-prometheus-stack Helm Chart

    Docker & Kubernetes : Istio (service mesh) sidecar proxy on GCP Kubernetes

    Docker & Kubernetes : Istio on EKS

    Docker & Kubernetes : Istio on Minikube with AWS EC2 for Bookinfo Application

    Docker & Kubernetes : Deploying .NET Core app to Kubernetes Engine and configuring its traffic managed by Istio (Part I)

    Docker & Kubernetes : Deploying .NET Core app to Kubernetes Engine and configuring its traffic managed by Istio (Part II - Prometheus, Grafana, pin a service, split traffic, and inject faults)

    Docker & Kubernetes : Helm Package Manager with MySQL on GCP Kubernetes Engine

    Docker & Kubernetes : Deploying Memcached on Kubernetes Engine

    Docker & Kubernetes : EKS Control Plane (API server) Metrics with Prometheus

    Docker & Kubernetes : Spinnaker on EKS with Halyard

    Docker & Kubernetes : Continuous Delivery Pipelines with Spinnaker and Kubernetes Engine

    Docker & Kubernetes: Multi-node Local Kubernetes cluster - Kubeadm-dind(docker-in-docker)

    Docker & Kubernetes: Multi-node Local Kubernetes cluster - Kubeadm-kind(k8s-in-docker)

    Docker & Kubernetes : nodeSelector, nodeAffinity, taints/tolerations, pod affinity and anti-affinity - Assigning Pods to Nodes

    Docker & Kubernetes : Jenkins-X on EKS

    Docker & Kubernetes : ArgoCD App of Apps with Heml on Kubernetes

    Docker & Kubernetes : ArgoCD on Kubernetes cluster

    Docker & Kubernetes : GitOps with ArgoCD for Continuous Delivery to Kubernetes clusters (minikube) - guestbook


    Ansible 2.0


    What is Ansible?

    Quick Preview - Setting up web servers with Nginx, configure environments, and deploy an App

    SSH connection & running commands

    Ansible: Playbook for Tomcat 9 on Ubuntu 18.04 systemd with AWS

    Modules

    Playbooks

    Handlers

    Roles

    Playbook for LAMP HAProxy

    Installing Nginx on a Docker container

    AWS : Creating an ec2 instance & adding keys to authorized_keys

    AWS : Auto Scaling via AMI

    AWS : creating an ELB & registers an EC2 instance from the ELB

    Deploying Wordpress micro-services with Docker containers on Vagrant box via Ansible

    Setting up Apache web server

    Deploying a Go app to Minikube

    Ansible with Terraform


    Terraform


    Introduction to Terraform with AWS elb & nginx

    Terraform Tutorial - terraform format(tf) and interpolation(variables)

    Terraform Tutorial - user_data

    Terraform Tutorial - variables

    Terraform 12 Tutorial - Loops with count, for_each, and for

    Terraform Tutorial - creating multiple instances (count, list type and element() function)

    Terraform Tutorial - State (terraform.tfstate) & terraform import

    Terraform Tutorial - Output variables

    Terraform Tutorial - Destroy

    Terraform Tutorial - Modules

    Terraform Tutorial - Creating AWS S3 bucket / SQS queue resources and notifying bucket event to queue

    Terraform Tutorial - AWS ASG and Modules

    Terraform Tutorial - VPC, Subnets, RouteTable, ELB, Security Group, and Apache server I

    Terraform Tutorial - VPC, Subnets, RouteTable, ELB, Security Group, and Apache server II

    Terraform Tutorial - Docker nginx container with ALB and dynamic autoscaling

    Terraform Tutorial - AWS ECS using Fargate : Part I

    Hashicorp Vault

    HashiCorp Vault Agent

    HashiCorp Vault and Consul on AWS with Terraform

    Ansible with Terraform

    AWS IAM user, group, role, and policies - part 1

    AWS IAM user, group, role, and policies - part 2

    Delegate Access Across AWS Accounts Using IAM Roles

    AWS KMS

    terraform import & terraformer import

    Terraform commands cheat sheet

    Terraform Cloud

    Terraform 14

    Creating Private TLS Certs


    AWS (Amazon Web Services)


    AWS : EKS (Elastic Container Service for Kubernetes)

    AWS : Creating a snapshot (cloning an image)

    AWS : Attaching Amazon EBS volume to an instance

    AWS : Adding swap space to an attached volume via mkswap and swapon

    AWS : Creating an EC2 instance and attaching Amazon EBS volume to the instance using Python boto module with User data

    AWS : Creating an instance to a new region by copying an AMI

    AWS : S3 (Simple Storage Service) 1

    AWS : S3 (Simple Storage Service) 2 - Creating and Deleting a Bucket

    AWS : S3 (Simple Storage Service) 3 - Bucket Versioning

    AWS : S3 (Simple Storage Service) 4 - Uploading a large file

    AWS : S3 (Simple Storage Service) 5 - Uploading folders/files recursively

    AWS : S3 (Simple Storage Service) 6 - Bucket Policy for File/Folder View/Download

    AWS : S3 (Simple Storage Service) 7 - How to Copy or Move Objects from one region to another

    AWS : S3 (Simple Storage Service) 8 - Archiving S3 Data to Glacier

    AWS : Creating a CloudFront distribution with an Amazon S3 origin

    AWS : Creating VPC with CloudFormation

    WAF (Web Application Firewall) with preconfigured CloudFormation template and Web ACL for CloudFront distribution

    AWS : CloudWatch & Logs with Lambda Function / S3

    AWS : Lambda Serverless Computing with EC2, CloudWatch Alarm, SNS

    AWS : Lambda and SNS - cross account

    AWS : CLI (Command Line Interface)

    AWS : CLI (ECS with ALB & autoscaling)

    AWS : ECS with cloudformation and json task definition

    AWS : AWS Application Load Balancer (ALB) and ECS with Flask app

    AWS : Load Balancing with HAProxy (High Availability Proxy)

    AWS : VirtualBox on EC2

    AWS : NTP setup on EC2

    AWS: jq with AWS

    AWS : AWS & OpenSSL : Creating / Installing a Server SSL Certificate

    AWS : OpenVPN Access Server 2 Install

    AWS : VPC (Virtual Private Cloud) 1 - netmask, subnets, default gateway, and CIDR

    AWS : VPC (Virtual Private Cloud) 2 - VPC Wizard

    AWS : VPC (Virtual Private Cloud) 3 - VPC Wizard with NAT

    AWS : DevOps / Sys Admin Q & A (VI) - AWS VPC setup (public/private subnets with NAT)

    AWS : OpenVPN Protocols : PPTP, L2TP/IPsec, and OpenVPN

    AWS : Autoscaling group (ASG)

    AWS : Setting up Autoscaling Alarms and Notifications via CLI and Cloudformation

    AWS : Adding a SSH User Account on Linux Instance

    AWS : Windows Servers - Remote Desktop Connections using RDP

    AWS : Scheduled stopping and starting an instance - python & cron

    AWS : Detecting stopped instance and sending an alert email using Mandrill smtp

    AWS : Elastic Beanstalk with NodeJS

    AWS : Elastic Beanstalk Inplace/Rolling Blue/Green Deploy

    AWS : Identity and Access Management (IAM) Roles for Amazon EC2

    AWS : Identity and Access Management (IAM) Policies, sts AssumeRole, and delegate access across AWS accounts

    AWS : Identity and Access Management (IAM) sts assume role via aws cli2

    AWS : Creating IAM Roles and associating them with EC2 Instances in CloudFormation

    AWS Identity and Access Management (IAM) Roles, SSO(Single Sign On), SAML(Security Assertion Markup Language), IdP(identity provider), STS(Security Token Service), and ADFS(Active Directory Federation Services)

    AWS : Amazon Route 53

    AWS : Amazon Route 53 - DNS (Domain Name Server) setup

    AWS : Amazon Route 53 - subdomain setup and virtual host on Nginx

    AWS Amazon Route 53 : Private Hosted Zone

    AWS : SNS (Simple Notification Service) example with ELB and CloudWatch

    AWS : Lambda with AWS CloudTrail

    AWS : SQS (Simple Queue Service) with NodeJS and AWS SDK

    AWS : Redshift data warehouse

    AWS : CloudFormation - templates, change sets, and CLI

    AWS : CloudFormation Bootstrap UserData/Metadata

    AWS : CloudFormation - Creating an ASG with rolling update

    AWS : Cloudformation Cross-stack reference

    AWS : OpsWorks

    AWS : Network Load Balancer (NLB) with Autoscaling group (ASG)

    AWS CodeDeploy : Deploy an Application from GitHub

    AWS EC2 Container Service (ECS)

    AWS EC2 Container Service (ECS) II

    AWS Hello World Lambda Function

    AWS Lambda Function Q & A

    AWS Node.js Lambda Function & API Gateway

    AWS API Gateway endpoint invoking Lambda function

    AWS API Gateway invoking Lambda function with Terraform

    AWS API Gateway invoking Lambda function with Terraform - Lambda Container

    Amazon Kinesis Streams

    Kinesis Data Firehose with Lambda and ElasticSearch

    Amazon DynamoDB

    Amazon DynamoDB with Lambda and CloudWatch

    Loading DynamoDB stream to AWS Elasticsearch service with Lambda

    Amazon ML (Machine Learning)

    Simple Systems Manager (SSM)

    AWS : RDS Connecting to a DB Instance Running the SQL Server Database Engine

    AWS : RDS Importing and Exporting SQL Server Data

    AWS : RDS PostgreSQL & pgAdmin III

    AWS : RDS PostgreSQL 2 - Creating/Deleting a Table

    AWS : MySQL Replication : Master-slave

    AWS : MySQL backup & restore

    AWS RDS : Cross-Region Read Replicas for MySQL and Snapshots for PostgreSQL

    AWS : Restoring Postgres on EC2 instance from S3 backup

    AWS : Q & A

    AWS : Security

    AWS : Security groups vs. network ACLs

    AWS : Scaling-Up

    AWS : Networking

    AWS : Single Sign-on (SSO) with Okta

    AWS : JIT (Just-in-Time) with Okta


    Jenkins


    Install

    Configuration - Manage Jenkins - security setup

    Adding job and build

    Scheduling jobs

    Managing_plugins

    Git/GitHub plugins, SSH keys configuration, and Fork/Clone

    JDK & Maven setup

    Build configuration for GitHub Java application with Maven

    Build Action for GitHub Java application with Maven - Console Output, Updating Maven

    Commit to changes to GitHub & new test results - Build Failure

    Commit to changes to GitHub & new test results - Successful Build

    Adding code coverage and metrics

    Jenkins on EC2 - creating an EC2 account, ssh to EC2, and install Apache server

    Jenkins on EC2 - setting up Jenkins account, plugins, and Configure System (JAVA_HOME, MAVEN_HOME, notification email)

    Jenkins on EC2 - Creating a Maven project

    Jenkins on EC2 - Configuring GitHub Hook and Notification service to Jenkins server for any changes to the repository

    Jenkins on EC2 - Line Coverage with JaCoCo plugin

    Setting up Master and Slave nodes

    Jenkins Build Pipeline & Dependency Graph Plugins

    Jenkins Build Flow Plugin

    Pipeline Jenkinsfile with Classic / Blue Ocean

    Jenkins Setting up Slave nodes on AWS

    Jenkins Q & A


    Puppet


    Puppet with Amazon AWS I - Puppet accounts

    Puppet with Amazon AWS II (ssh & puppetmaster/puppet install)

    Puppet with Amazon AWS III - Puppet running Hello World

    Puppet Code Basics - Terminology

    Puppet with Amazon AWS on CentOS 7 (I) - Master setup on EC2

    Puppet with Amazon AWS on CentOS 7 (II) - Configuring a Puppet Master Server with Passenger and Apache

    Puppet master /agent ubuntu 14.04 install on EC2 nodes

    Puppet master post install tasks - master's names and certificates setup,

    Puppet agent post install tasks - configure agent, hostnames, and sign request

    EC2 Puppet master/agent basic tasks - main manifest with a file resource/module and immediate execution on an agent node

    Setting up puppet master and agent with simple scripts on EC2 / remote install from desktop

    EC2 Puppet - Install lamp with a manifest ('puppet apply')

    EC2 Puppet - Install lamp with a module

    Puppet variable scope

    Puppet packages, services, and files

    Puppet packages, services, and files II with nginx Puppet templates

    Puppet creating and managing user accounts with SSH access

    Puppet Locking user accounts & deploying sudoers file

    Puppet exec resource

    Puppet classes and modules

    Puppet Forge modules

    Puppet Express

    Puppet Express 2

    Puppet 4 : Changes

    Puppet --configprint

    Puppet with Docker

    Puppet 6.0.2 install on Ubuntu 18.04


    Chef


    What is Chef?

    Chef install on Ubuntu 14.04 - Local Workstation via omnibus installer

    Setting up Hosted Chef server

    VirtualBox via Vagrant with Chef client provision

    Creating and using cookbooks on a VirtualBox node

    Chef server install on Ubuntu 14.04

    Chef workstation setup on EC2 Ubuntu 14.04

    Chef Client Node - Knife Bootstrapping a node on EC2 ubuntu 14.04


    Elasticsearch search engine, Logstash, and Kibana


    Elasticsearch, search engine

    Logstash with Elasticsearch

    Logstash, Elasticsearch, and Kibana 4

    Elasticsearch with Redis broker and Logstash Shipper and Indexer

    Samples of ELK architecture

    Elasticsearch indexing performance


    Vagrant


    VirtualBox & Vagrant install on Ubuntu 14.04

    Creating a VirtualBox using Vagrant

    Provisioning

    Networking - Port Forwarding

    Vagrant Share

    Vagrant Rebuild & Teardown

    Vagrant & Ansible


    GCP (Google Cloud Platform)


    GCP: Creating an Instance

    GCP: gcloud compute command-line tool

    GCP: Deploying Containers

    GCP: Kubernetes Quickstart

    GCP: Deploying a containerized web application via Kubernetes

    GCP: Django Deploy via Kubernetes I (local)

    GCP: Django Deploy via Kubernetes II (GKE)


    Big Data & Hadoop Tutorials


    Hadoop 2.6 - Installing on Ubuntu 14.04 (Single-Node Cluster)

    Hadoop 2.6.5 - Installing on Ubuntu 16.04 (Single-Node Cluster)

    Hadoop - Running MapReduce Job

    Hadoop - Ecosystem

    CDH5.3 Install on four EC2 instances (1 Name node and 3 Datanodes) using Cloudera Manager 5

    CDH5 APIs

    QuickStart VMs for CDH 5.3

    QuickStart VMs for CDH 5.3 II - Testing with wordcount

    QuickStart VMs for CDH 5.3 II - Hive DB query

    Scheduled start and stop CDH services

    CDH 5.8 Install with QuickStarts Docker

    Zookeeper & Kafka Install

    Zookeeper & Kafka - single node single broker

    Zookeeper & Kafka - Single node and multiple brokers

    OLTP vs OLAP

    Apache Hadoop Tutorial I with CDH - Overview

    Apache Hadoop Tutorial II with CDH - MapReduce Word Count

    Apache Hadoop Tutorial III with CDH - MapReduce Word Count 2

    Apache Hadoop (CDH 5) Hive Introduction

    CDH5 - Hive Upgrade to 1.3 to from 1.2

    Apache Hive 2.1.0 install on Ubuntu 16.04

    Apache HBase in Pseudo-Distributed mode

    Creating HBase table with HBase shell and HUE

    Apache Hadoop : Hue 3.11 install on Ubuntu 16.04

    Creating HBase table with Java API

    HBase - Map, Persistent, Sparse, Sorted, Distributed and Multidimensional

    Flume with CDH5: a single-node Flume deployment (telnet example)

    Apache Hadoop (CDH 5) Flume with VirtualBox : syslog example via NettyAvroRpcClient

    List of Apache Hadoop hdfs commands

    Apache Hadoop : Creating Wordcount Java Project with Eclipse Part 1

    Apache Hadoop : Creating Wordcount Java Project with Eclipse Part 2

    Apache Hadoop : Creating Card Java Project with Eclipse using Cloudera VM UnoExample for CDH5 - local run

    Apache Hadoop : Creating Wordcount Maven Project with Eclipse

    Wordcount MapReduce with Oozie workflow with Hue browser - CDH 5.3 Hadoop cluster using VirtualBox and QuickStart VM

    Spark 1.2 using VirtualBox and QuickStart VM - wordcount

    Spark Programming Model : Resilient Distributed Dataset (RDD) with CDH

    Apache Spark 2.0.2 with PySpark (Spark Python API) Shell

    Apache Spark 2.0.2 tutorial with PySpark : RDD

    Apache Spark 2.0.0 tutorial with PySpark : Analyzing Neuroimaging Data with Thunder

    Apache Spark Streaming with Kafka and Cassandra

    Apache Spark 1.2 with PySpark (Spark Python API) Wordcount using CDH5

    Apache Spark 1.2 Streaming

    Apache Drill with ZooKeeper install on Ubuntu 16.04 - Embedded & Distributed

    Apache Drill - Query File System, JSON, and Parquet

    Apache Drill - HBase query

    Apache Drill - Hive query

    Apache Drill - MongoDB query


    Redis In-Memory Database


    Redis vs Memcached

    Redis 3.0.1 Install

    Setting up multiple server instances on a Linux host

    Redis with Python

    ELK : Elasticsearch with Redis broker and Logstash Shipper and Indexer


    Powershell 4 Tutorial


    Powersehll : Introduction

    Powersehll : Help System

    Powersehll : Running commands

    Powersehll : Providers

    Powersehll : Pipeline

    Powersehll : Objects

    Powershell : Remote Control

    Windows Management Instrumentation (WMI)

    How to Enable Multiple RDP Sessions in Windows 2012 Server

    How to install and configure FTP server on IIS 8 in Windows 2012 Server

    How to Run Exe as a Service on Windows 2012 Server

    SQL Inner, Left, Right, and Outer Joins


    Git/GitHub Tutorial


    One page express tutorial for GIT and GitHub

    Installation

    add/status/log

    commit and diff

    git commit --amend

    Deleting and Renaming files

    Undoing Things : File Checkout & Unstaging

    Reverting commit

    Soft Reset - (git reset --soft <SHA key>)

    Mixed Reset - Default

    Hard Reset - (git reset --hard <SHA key>)

    Creating & switching Branches

    Fast-forward merge

    Rebase & Three-way merge

    Merge conflicts with a simple example

    GitHub Account and SSH

    Uploading to GitHub

    GUI

    Branching & Merging

    Merging conflicts

    GIT on Ubuntu and OS X - Focused on Branching

    Setting up a remote repository / pushing local project and cloning the remote repo

    Fork vs Clone, Origin vs Upstream

    Git/GitHub Terminologies

    Git/GitHub via SourceTree I : Commit & Push

    Git/GitHub via SourceTree II : Branching & Merging

    Git/GitHub via SourceTree III : Git Work Flow

    Git/GitHub via SourceTree IV : Git Reset

    Git Cheat sheet - quick command reference


    Subversion

    Subversion Install On Ubuntu 14.04

    Subversion creating and accessing I

    Subversion creating and accessing II


    Contact

    BogoToBogo
    contactus@bogotobogo.com

    Follow Bogotobogo

    About Us

    contactus@bogotobogo.com

    YouTubeMy YouTube channel
    Pacific Ave, San Francisco, CA 94115

    Pacific Ave, San Francisco, CA 94115

    Copyright © 2024, bogotobogo
    Design: Web Master