DDocker & Kubernetes : Pods and Service definitions
Docker or rkt (pronounced “rock-it”)?
Kubernetes is Greek for pilot or helmsman (the person holding the ship’s steering wheel).
Kubernetes abstracts away the hardware infrastructure and exposes a whole datacenter as a single enormous computational resource.
From Kubernetes Architecture made easy | Kubernetes Tutorial
At v1.18, Kubernetes supports clusters with up to 5000 nodes. More specifically, we support configurations that meet all of the following criteria (Building large clusters):
- No more than 5000 nodes
- No more than 150000 total pods
- No more than 300000 total containers
- No more than 100 pods per node
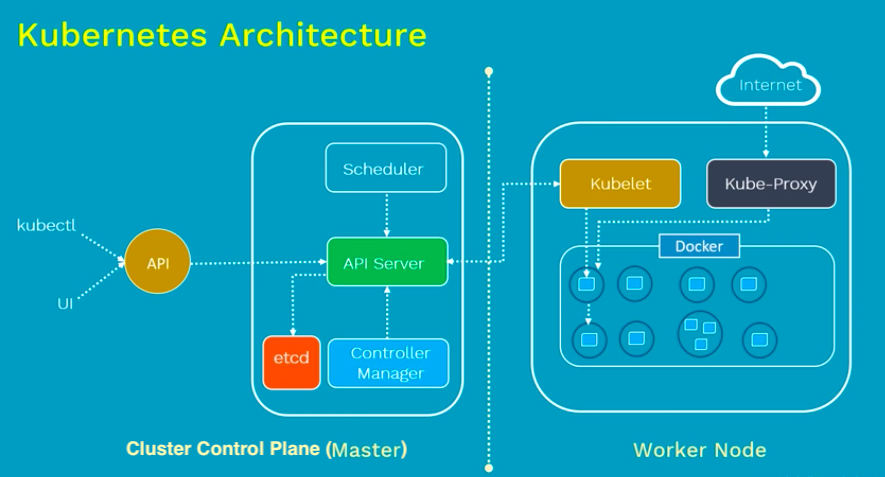
Master(Cluster control plane)
The Kubernetes control plane is split into a set of components, which can all run on a single master node, or can be replicated in order to support high-availability clusters.The following 4 processes should be running on every master node.
- API Server: This is a cluster gateway. It is intended to be a relatively simple server mainly processes REST operations.
It is responsible for establishing communication between Kubernetes Node and the Kubernetes master components.
kubectlis the command line utility that interacts with Kubernetes API. It is also working as a gatekeeper for authentication. - Scheduler: It watches for unscheduled pods and binds them to nodes via the /binding pod subresource API. The scheduler obtains resource usage data for each worker node from "etcd" via the API server.
- Cluster state store (etcd): All persistent cluster state is stored in etcd. It is the single source of truth for all components of a cluster. Etcd stores the configuration data of the Kubernetes cluster, representing the state of the cluster at any given point in time.
- Controller-Manager: Most other cluster-level functions are currently performed by a separate process, called the "Controller Manager".
It performs both lifecycle functions (garbage collections) and API business logic (such as scaling of pods controlled by a ReplicaSet).
It provides self-healing, scaling, application lifecycle management, service discovery, routing, and service binding and provisioning.
- kube controller manager: controller that watches the node, replication set, endpoints (services), and service accounts.
- cloud controller manager: Interacts with the underlying cloud provider to manage resources.
- Node controller
- Replication controller
- Endpoint controller
- Service accounts and token controller
Worker Node
Every worker node should be running 3 processes: kubelet, kube-proxy, and container runtime as listed below:
- kubelet: An agent running on each node. It is the most important and most prominent controller in Kubernetes. kubelet interacts with a node and pods within the node. It is the primary implementer of the Pod and Node APIs that drive the container execution layer. It makes sure the containers are running and if any pod has issue, it tries to restart the pod.
- kube-proxy: A network agent running on each node. It exposes services to the outside world. It is responsible for maintaining network configuration and iptable rules. It creates a virtual IP which clients can access and which is transparently proxied to the pods in a Service.
- container runtime: Docker is the most prominent runtime. Others are rkt, cri-o, and containerd.
Also, check Kubernetes Design and Architecture for the details of each components of the picture.
This post is mostly based on Kubernetes - Services Explained which is one of the best tutorial on Kubernetes intro.
Also, I strongly recommend TGI Kubernetes 002: Networking and Services by heptio for who is really interested in pods, services, IPs, and a little bit of Kubernetes history.
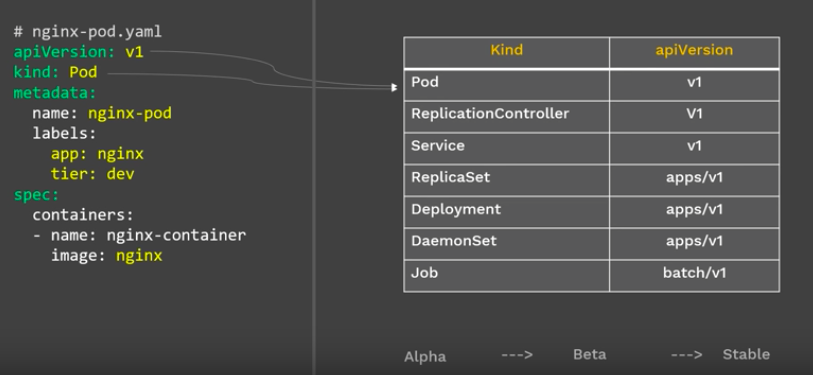
nginx-pod.yaml:
apiVersion: v1

kind: Pod

metadata:
  name: nginx-pod
  labels:
    app: myapp
    type: front-end

spec:
  containers:
      - name: nginx-container
        image: nginx
$ kubectl create -f nginx-pod
pod/nginx-pod created

$ kubectl get pods
NAME        READY   STATUS    RESTARTS   AGE
nginx-pod   1/1     Running   1          18m

$ kubectl get pods -o wide
NAME        READY   STATUS    RESTARTS   AGE     IP           NODE       NOMINATED NODE   READINESS GATES
nginx-pod   1/1     Running   0          2m14s   172.17.0.5   minikube   <none>           v

$ kubectl exec -it nginx-pod -- /bin/bash
root@nginx-pod:/#
Now, our nginx pod is running. How can we access the pod?
Note: we usually create pods using Deployment (Statefulset for DBs). The Deployment manages ReplicaSet which manages Pods. A Pod is an abstraction of a Container!
Each Pod has its own IP address but Pods are ephemeral (destroyed frequently). When a Pod get restarted, it will have a new IP address (a new IP address on re-creation). So, it does not make any sense to use Pods IP addresses. However, the service has its own IP address and even when a Pod dies the service retains its IP address. Unlike the IP of a Pod, the IP address of a service is stable. In other words, the lifecycles of a service and Pod are not connected!
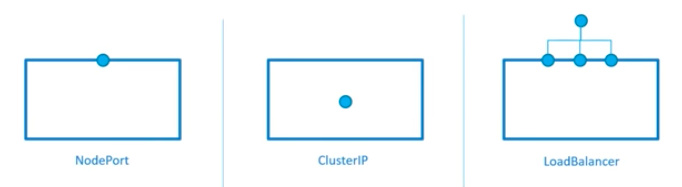
- NodePort:
Exposes the service on each Node's public IP at a static port.
From outside. - ClusterIP:
This is the default service type and we don't have to specify a service type. It exposes the service on an internal-cluster IP.
From inside (reachable only from within the cluster) - LoadBalancer:
This service type exposes the service via cloud provider's LB. The services to which LB will route are created automatically.
From outside.
Note: However, when we want to expose multiple applications there are some issues and challenges. For each application:- One LB resource (i.e. AWS)
- At lest one public IP
- DNS name (CNAME)
Ingress comes to the rescue. - Headless Service:
We can create headless service when we specify a Service with .spec.clusterIP set to None.
This service type can be used when
- A client wants to communicate with a specific Pod.
- Pods want to talk directly with a specific Pod.
- Ingress:
Ingress, unlike the services listed above, is actually NOT a type of service but acts as a router or an entry point to our cluster.
Ingress allows simple host or URL based HTTP routing.
An ingress is a core concept of Kubernetes, but is always implemented by a third party proxy.
These implementation is known as ingress controller which is responsible for processing the Ingress Resource information.
Note that the Ingress is just a description of how routing should be performed. The actual logic has to be performed by an "Ingress Controller". So, creating Ingress resources in a Kubernetes cluster won't have any effect until an Ingress Controller is available.
Refs: Kubernetes Service And Service Types | Nodeport, ClusterIP, LoadBalancer + Manifest YAML
If we use a Deployment to run our app, it can create and destroy Pods dynamically.
Each Pod gets its own IP address, however in a Deployment, the set of Pods running in one moment in time could be different from the set of Pods running that application a moment later.
This leads to a problem: if some set of Pods (call them “backends”) provides functionality to other Pods (call them “frontends”) inside our cluster, how do the frontends find out and keep track of which IP address to connect to, so that the frontend can use the backend part of the workload?
While the actual Pods that compose the backend set may change, the frontend clients should not need to be aware of that, nor should they need to keep track of the set of backends themselves. The Service enables this decoupling.
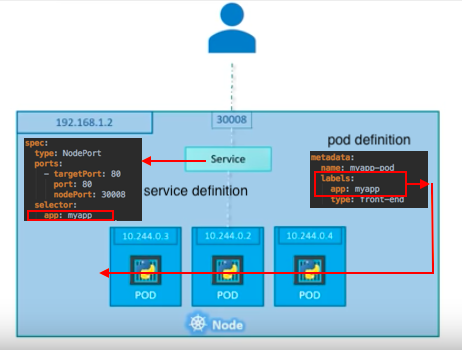
Suppose, we have a set of Pods that each listen on TCP port 80 and carry a label app=myapp. So, our service definition (service-definition.yaml) looks like this:
apiVersion: v1

kind: Service

metadata:
  name: myapp-service

spec:
  type: NodePort
  ports:
    - targetPort: 80
      port: 80
      nodePort: 30008
  selector:
    app: myapp
    type: front-end
This specification creates a new Service object named myapp-service, which targets TCP port 80 on any Pod with the app: myapp label.
For nginx application, we want to expose the Service onto an external IP address, that's outside of our cluster. Kubernetes ServiceTypes allow us to specify what kind of Service we want.
Though the default is ClusterIP, by setting the type field to NodePort, we can exposes the Service on each Node's IP at a static port (the NodePort). A ClusterIP Service, to which the NodePort Service routes, is automatically created. We'll be able to contact the NodePort Service,
from outside the cluster, by requesting <NodeIP>:<NodePort>.
$ kubectl create -f service-definition.yaml
service/myapp-service created

$ kubectl get svc
NAME            TYPE        CLUSTER-IP      EXTERNAL-IP   PORT(S)        AGE
kubernetes      ClusterIP   10.96.0.1       <none>        443/TCP        6d1h
myapp-service   NodePort    10.103.149.63   <none>        80:30008/TCP   27s
Note that what the selector is doing. It lets the service know which pod it is connecting with. The set of Pods targeted by a Service is usually determined by a selector. Indeed, we simply copied the labels from the Pod definition into the labels!
This Service will also be assigned an IP address (sometimes called the "Cluster-IP"), which is used by the service proxies. The Cluster-IP has no association with network interfaces, it is totally virtual and implemented using ip-tables.
The Service's selector will be evaluated continuously and the results will be POSTed to an Endpoints object also named myapp-service.
Note that a Service can map an incoming port to any nodePort. By default the targetPort will be set to the same value as the port field. Perhaps more interesting is that targetPort can be a string, referring to the name of a port in the backend Pods. The actual port number assigned to that name can be different in each backend Pod. This offers a lot of flexibility for deploying and evolving our Services. For example, we can change the port number that pods expose in the next version of our backend software, without breaking clients.
Now, we can access the app (<NodeIP>:<NodePort>):
$ minikube ip
192.168.99.100

$ curl -v http://192.168.99.108:30008
* Rebuilt URL to: http://192.168.99.108:30008/
*   Trying 192.168.99.108...
* TCP_NODELAY set
* Connected to 192.168.99.108 (192.168.99.108) port 30008 (#0)
> GET / HTTP/1.1
> Host: 192.168.99.108:30008
> User-Agent: curl/7.54.0
> Accept: */*
>
< HTTP/1.1 200 OK
< Server: nginx/1.17.10
...

<!DOCTYPE html>
<html>
<head>
<title>Welcome to nginx!</title>
...

<p><em>Thank you for using nginx.</em></p>
</body>
</html>
* Connection #0 to host 192.168.99.108 left intact
Though we usually do not directly manipulate the EndPoint, it may bother us if we do not know what it is.
EndPoint is a defined object in API server itself. An Endpoint object is automatically created for us when we create a service. Actually, it's an optimization.
Here is a summary about what is an EndPoint:
- K8s creates an EndPoint object when we create a service.
- Its name is the same as the name of the service.
- Whenever a pod is recreated or updated, the EndPoint is changed and K8s uses this EndPoint to keep track of Pods: which Pods are the members of a service.
In Kubernetes many controllers want to know IP addresses of all pods associated with a service. Because we have many many pods in Kubernetes and it's expensive asking the API server to go and find the selector. Kubernetes group them together in an object called Endpoints so that instead of constantly deriving this information over and over again, it's cached for us inside this object.
So, when a service is created, an Endpoint is created with one-to-one mapping, generally with a service that has the same selector. The pod (that has selector) list of the Endpoint is dynamically kept up to date.
Here is the deployment (nginx-deployment.yaml):
apiVersion: apps/v1
kind: Deployment
metadata:
  name: nginx-deployment
  labels:
    app: my-nginx
spec:
  replicas: 3
  selector:
    matchLabels:
      app: myapp
  template:
    metadata:
      labels:
        app: myapp
    spec:
      containers:
      - name: myapp-pod
        image: nginx:1.7.9
        ports:
        - containerPort: 80
Create the Deployment by running the following command:
$ kubectl create -f nginx-deployment.yaml
deployment.apps/nginx-deployment created
Run kubectl get deployments to check if the Deployment was created:
$ kubectl get deployments
NAME               READY   UP-TO-DATE   AVAILABLE   AGE
nginx-deployment   3/3     3            3           3m57s
Notice that the Deployment has created all three replicas, and all replicas are up-to-date (they contain the latest Pod template) and available.
To see the Deployment rollout status, run:
$ kubectl rollout status deployment.v1.apps/nginx-deployment
deployment "nginx-deployment" successfully rolled out
$ kubectl get pods
NAME                                READY   STATUS    RESTARTS   AGE
nginx-deployment-86bfb6b67d-4w6b6   1/1     Running   0          7m59s
nginx-deployment-86bfb6b67d-dqsxh   1/1     Running   0          7m59s
nginx-deployment-86bfb6b67d-z7v9b   1/1     Running   0          7m59s
To see the labels automatically generated for each Pod, run kubectl get pods --show-labels:
$ kubectl get pods --show-labels
NAME                                READY   STATUS    RESTARTS  AGE     LABELS
nginx-deployment-86bfb6b67d-4w6b6   1/1     Running   0         9m40s   app=my-nginx-app,pod-template-hash=86bfb6b67d
nginx-deployment-86bfb6b67d-dqsxh   1/1     Running   0         9m40s   app=my-nginx-app,pod-template-hash=86bfb6b67d
nginx-deployment-86bfb6b67d-z7v9b   1/1     Running   0         9m40s   app=my-nginx-app,pod-template-hash=86bfb6b67d
We can get the info using kubectl get ep command:
$ kubectl get ep
NAME            ENDPOINTS                                   AGE
kubernetes      192.168.99.108:8443                         6d7h
myapp-service   172.17.0.5:80,172.17.0.6:80,172.17.0.7:80   15m
As we can see from the output, the Endpoints are the IP addresses of the Pods with ports, ip:TargetPort.
As briefly discussed in the previous section, the Service's selector will be evaluated continuously and the results will be POSTed to an Endpoints.
So, if a service has no selector, the corresponding Endpoints object will not be created. In this case, we can manually map the service to our own specific endpoints. Here is a sample, endpoints.yaml:
kind: Endpoints
apiVersion: v1
metadata:
  name: myapp-service
subsets:
  - addresses:
      - ip: 172.17.0.10
      - ip: 172.17.0.7
      - ip: 172.17.0.9
    ports:
      - port: 8787
Run it:
$ kubectl create -f endpoints.yaml
endpoints/myapp-service created

$ kubectl get ep
NAME            ENDPOINTS                                          AGE
kubernetes      192.168.99.100:8443                                87d
myapp-service   172.17.0.10:8787,172.17.0.7:8787,172.17.0.9:8787   7s
Note that in that case our service definition does not have the "selector":
apiVersion: v1
kind: Service
metadata:
  name: myapp-service
spec:
  ports:
    - targetPort: 80
      port: 80
Accessing a Service without a selector works the same as if it had a selector. The traffic will be routed to endpoints defined by the user (172.17.0.10:8787, ...).
For more information about the services without selectors, please check https://kubernetes.io/docs/concepts/services-networking/service/#services-without-selectors.
When a pod is created, without a service, we cannot access to the app running within container in the pod. The most obvious way is to create a service for the pod either via Load Balancer or NodePort.
Legt's create a service using a definition file we've created in the earlier section of this post:
$ kubectl create -f service-definition.yaml
service/myapp-service created
Or:
$ kubectl create -f nginx-deployment.yaml
service/myapp-service created
Now, one more option will be introduced: cubectl expose command!
Here is our deployment definition (deploy_only.yaml):
---
apiVersion: apps/v1
kind: Deployment
metadata:
  name: nginx-deployment
  labels:
    app: my-nginx
spec:
  replicas: 3
  selector:
    matchLabels:
      app: myapp
  template:
    metadata:
      labels:
        app: myapp
    spec:
      containers:
      - name: myapp-pod
        image: nginx:1.7.9
        ports:
        - containerPort: 80
Note that it doesn't have a Kind of "service". First, let's just deploy pods:
$ kubectl get pods
No resources found.

$ kubectl apply -f deploy_only.yaml
deployment.apps/nginx-deployment created

$ kubectl get pods
NAME                              READY     STATUS    RESTARTS   AGE
nginx-deployment-9dd698bd-cn747   1/1       Running   0          16s
nginx-deployment-9dd698bd-lh4xb   1/1       Running   0          16s
nginx-deployment-9dd698bd-trjzq   1/1       Running   0          16s

$ kubectl get deployments
NAME               READY     UP-TO-DATE   AVAILABLE   AGE
nginx-deployment   3/3       3            3           4m46s

$ kubectl get svc
NAME         TYPE        CLUSTER-IP   EXTERNAL-IP   PORT(S)   AGE
kubernetes   ClusterIP   10.96.0.1    <none>        443/TCP   7h4m
Let's "expose" the pods:
$ kubectl expose deployment nginx-deployment --type=NodePort --target-port=80 -o yaml
apiVersion: v1
kind: Service
metadata:
  ...
  labels:
    app: my-nginx
  name: nginx-deployment
  namespace: default
  ...
spec:
  clusterIP: 10.101.150.222
  externalTrafficPolicy: Cluster
  ports:
  - nodePort: 30598
    port: 80
    protocol: TCP
    targetPort: 80
  selector:
    app: myapp
  sessionAffinity: None
  type: NodePort
status:
  loadBalancer: {}
As we can see from the output, the kubectl expose takes a deployment and expose it as a new Kubernetes Service!
Note that the arg "-o yaml" is to see what service has been created. Also, we could have used the following command which is almost identical:
$ kubectl expose deployment/nginx-deployment --type=NodePort --target-port=80
Let's see what we have now:
$ kubectl get svc
NAME               TYPE        CLUSTER-IP       EXTERNAL-IP   PORT(S)        AGE
kubernetes         ClusterIP   10.96.0.1        <none>        443/TCP        7h11m
nginx-deployment   NodePort    10.101.150.222   <none>        80:30598/TCP   3m44s
Now that we created a service, we can access the app via $(minikube ip):$NODE_PORT:
$ minikube ip
192.168.64.2

$ curl http://192.168.64.2:30598
...
<title>Welcome to nginx!</title>
...

Please check Interactive Tutorial - Exposing Your App
Basically, what the kubectl expose is doing is to grab the selector of the deployment:
  selector:
    matchLabels:
      app: myapp
and then, inserting it into the service.
So, what is a service?
We've seen it has bunch of types!
Suppose, we misspelled the "NodePort" as "nodePort", we get the following error:
$ kubectl expose deployment nginx-deployment --type=nodePort --target-port=80 -o yaml
The Service "nginx-deployment" is invalid: spec.type: Unsupported value: "nodePort":
supported values: "ClusterIP", "ExternalName", "LoadBalancer", "NodePort"
What are those supported types?
"ClusterIP", "ExternalName", "LoadBalancer", "NodePort"
We'll see in the subsequent sections.
Note: the "ExternalName" seems to be related to the discovery system of Kubernetes, from inside to outside the cluster, however, we're not interested in that.
An ExternalName Service is a special case of Service that does not have selectors and uses DNS names instead - ExternalName.
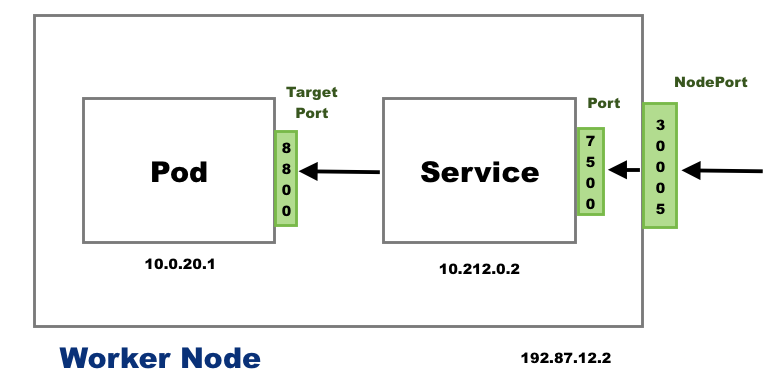
There are 3 ports involved with the service. They are named in service perspective and the ways of exposing our application.
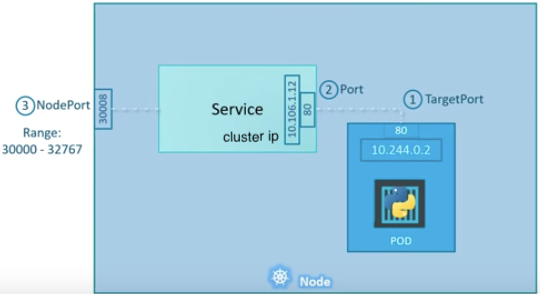
- TargetPort: a port on the Pod where an actual web server is running, port 80. This is called target port because that's the port to which the service forward the request to.
- Port: a port on the service itself. Service creates a virtual ip inside a cluster to enable communications between different services. We can only access this service while inside the cluster. If a targetPort is set in spec, it will route from the (service) port to the targetPort.
- NodePort: a port on the node itself. This is the port we used to access the web server externally. Our NodeIP is the external IP address of the node.
When a user sets the Service type field to NodePort, the Kubernetes master allocates a static port from a range, and each Node will proxy that port into our Service.
Note that, however, NodePorts are not designed to be directly used for production.
Please check Docker & Kubernetes : NodePort vs LoadBalancer vs Ingress
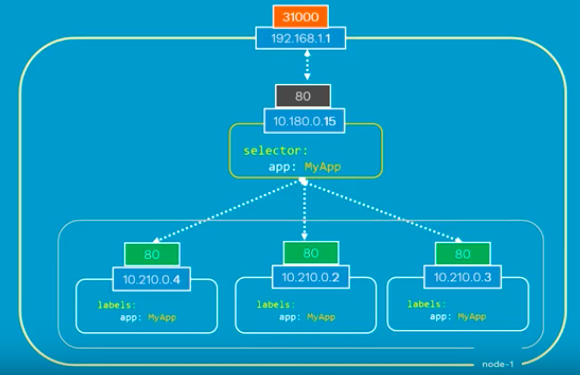
What if there are multiple pods in a host (node)?
In that case, as shown in the picture above, all the pods will have the same labels with a key which is set to myapp as a selector during the creation of the service. So, when the service is created, it will look for pods with the matching label, myapp, and find three of them. The service then automatically selects all the three pods as endpoints and forwards requests coming from the user. The service, by default, acts as a built-in load balancer for us using a random algorithm to distribute the loads across our pods.
In this case, traffic distribution among the pods is up to the service:
Here is another scenario that we have distributed pods across multiple nodes. This is probably one of the most common cases in a real production situation:

Thanks to Kubernetes, in this case again, we do not have to do anything regarding the configuration to make it work because Kubernetes creates service spans across all the nodes in the cluster and maps the target port to the same NodePort for all the nodes in the cluster. Because of that, we can access to our application via IP of any nodes on the same port which is 31000.
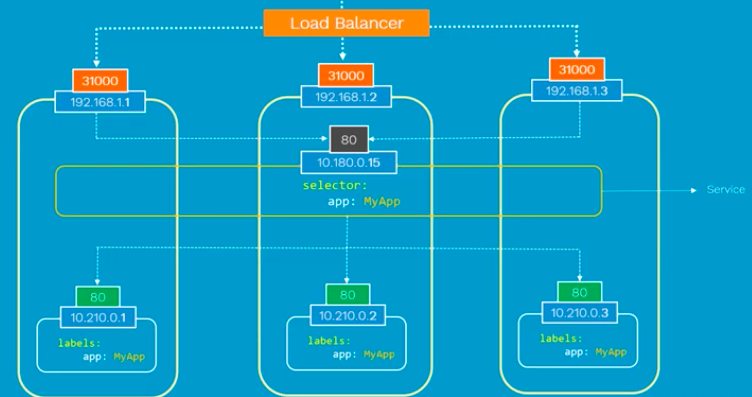
Note that this is on Layer 4 (Ingress is on Layer 7). Also note that the exact implementation of a LoadBalancer is dependent on the cloud provider. So, unlike the NodePort service type, not all cloud providers support the LoadBalancer service type.
Please check another post : Docker & Kubernetes : NodePort vs LoadBalancer vs Ingress
Instead of creating pods and services, we can create deployment and expose a service.
A Kubernetes Deployment checks on the health of our Pod and restarts the Pod's Container if it terminates. Deployments are the recommended way to manage the creation and scaling of Pods - https://kubernetes.io/docs/tutorials/hello-minikube/.
Here is the nginx-deployment.yaml file (3 pods and each pod has only one container):
apiVersion: apps/v1
kind: Deployment
metadata:
  name: nginx-deployment
  labels:
    app: nginx
spec:
  replicas: 3
  selector:
    matchLabels:
      app: nginx
  template:
    metadata:
      labels:
        app: nginx
    spec:
      containers:
      - name: nginx
        image: nginx:1.7.9
        ports:
        - containerPort: 80
With that yaml, using the kubectl create command to create a Deployment that manages the Pods.
$ kubectl create -f nginx-deployment.yaml
deployment.apps/nginx-deployment created

$ kubectl get deployment
NAME               DESIRED   CURRENT   UP-TO-DATE   AVAILABLE   AGE
nginx-deployment   3         3         3            2           18s

$ kubectl describe deployments nginx-deployment
Name:                   nginx-deployment
Namespace:              default
CreationTimestamp:      Wed, 20 Mar 2019 22:05:49 -0700
Labels:                 app=nginx
Annotations:            deployment.kubernetes.io/revision: 1
Selector:               app=nginx
Replicas:               3 desired | 3 updated | 3 total | 3 available | 0 unavailable
StrategyType:           RollingUpdate
MinReadySeconds:        0
RollingUpdateStrategy:  25% max unavailable, 25% max surge
Pod Template:
  Labels:  app=nginx
  Containers:
   nginx:
    Image:        nginx:1.7.9
    Port:         80/TCP
    Host Port:    0/TCP
    Environment:
    Mounts:
  Volumes:
Conditions:
  Type           Status  Reason
  ----           ------  ------
  Available      True    MinimumReplicasAvailable
  Progressing    True    NewReplicaSetAvailable
OldReplicaSets:
NewReplicaSet:   nginx-deployment-75675f5897 (3/3 replicas created)
Events:
  Type    Reason             Age   From                   Message
  ----    ------             ----  ----                   -------
  Normal  ScalingReplicaSet  18m   deployment-controller  Scaled up replica set nginx-deployment-75675f5897 to 3

$ kubectl get pods
NAME                                READY   STATUS    RESTARTS   AGE
nginx-deployment-75675f5897-46dkf   1/1     Running   0          25s
nginx-deployment-75675f5897-gfq9x   1/1     Running   0          25s
nginx-deployment-75675f5897-hc9cx   1/1     Running   0          25s
The pods we deployed are not yet accessible from outside because by default, the Pods are only accessible by its internal IP address within the Kubernetes cluster.
In other words, although each Pod has a unique IP address, those IPs are not exposed outside the cluster without a Service. Services allow our applications to receive traffic. Services can be exposed in different ways by specifying a type.
To make the container accessible from outside the Kubernetes virtual network, we have to expose the pod as a Kubernetes Service.
So, let's make it available using kubectl expose:
$ kubectl expose deployment nginx-deployment --type=NodePort --name=my-service
service/my-service exposed

$ kubectl get svc
NAME         TYPE        CLUSTER-IP       EXTERNAL-IP   PORT(S)        AGE
kubernetes   ClusterIP   10.96.0.1        <none>        443/TCP        84d
my-service   NodePort    10.108.176.127   <none>        80:32373/TCP   53s
We can get the url in several ways:
$ minikube service my-service --url
http://192.168.99.100:32373

$ minikube ip
192.168.99.100
Or we may want to fire up the site directly using the following command:
$ minikube service my-service
In the example, we used NodePort service type. But we can use LoadBalancer service as well:
$ kubectl expose deployment nginx-deployment --type=LoadBalancer --name=my-service-2
service/my-service-2 exposed

$ kubectl get svc
NAME           TYPE           CLUSTER-IP       EXTERNAL-IP   PORT(S)        AGE
kubernetes     ClusterIP      10.96.0.1        <none>        443/TCP        84d
my-service     NodePort       10.108.176.127   <none>        80:32373/TCP   10h
my-service-2   LoadBalancer   10.108.139.202   <pending>     80:30531/TCP   3m
But unfortunately, we see the EXTERNAL-IP stays in "pending" status because we're in local desktop (local Kubernetes environment) where the LoadBalancer type service is not supported. It depends on the cloud providers. If load balancers are supported, an external IP address would be provisioned to access the Service.
Let's dig more about the service, especially, the Endpoints:
$ kubectl describe services my-service
Name:                     my-service
Namespace:                default
Labels:                   app=nginx
Annotations:              <none>
Selector:                 app=nginx
Type:                     NodePort
IP:                       10.108.176.127
Port:                     <unset>  80/TCP
TargetPort:               80/TCP
NodePort:                 <unset>  32373/TCP
Endpoints:                172.17.0.10:80,172.17.0.8:80,172.17.0.9:80
Session Affinity:         None
External Traffic Policy:  Cluster
Events:                   <none>
We can see that the service has several endpoints: 172.17.0.10:80,172.17.0.8:80,172.17.0.9:80. These are internal addresses of the pods that are running the application. To verify these are pod addresses, enter this command:
$ kubectl get pods -o wide
NAME                                READY   STATUS    RESTARTS   AGE   IP            NODE
nginx-deployment-75675f5897-46dkf   1/1     Running   0          11h   172.17.0.10   minikube
nginx-deployment-75675f5897-gfq9x   1/1     Running   0          11h   172.17.0.9    minikube
nginx-deployment-75675f5897-hc9cx   1/1     Running   0          11h   172.17.0.8    minikube
Also note that we have the Endpoints because we used selector. There are some use cases with Services that involve not defining selector in the spec. A Service created without selector will not create the corresponding Endpoints object.
We can hit the nginx pod from within using services with Type=ClusterIP. Let's fire up the 3rd service:
$ kubectl expose deployment nginx-deployment --name=my-service-3
service/my-service-3 exposed

$ kubectl get svc
NAME           TYPE           CLUSTER-IP       EXTERNAL-IP   PORT(S)        AGE
kubernetes     ClusterIP      10.96.0.1        <none>        443/TCP        84d
my-service     NodePort       10.108.176.127   <none>        80:32373/TCP   12h
my-service-2   LoadBalancer   10.108.139.202   <pending>     80:30531/TCP   1h
my-service-3   ClusterIP      10.109.254.145   <none>        80/TCP         17m
Note that we could have explicitly set the ClusterIP type in the command:
$ kubectl expose deployment nginx-deployment \
--type=ClusterIP --name=my-service-4 -o yaml
apiVersion: v1
kind: Service
metadata:
  ...
  labels:
    app: my-nginx
  name: my-service-4
  ...
spec:
  clusterIP: 10.96.124.20
  ports:
  - port: 80
    protocol: TCP
    targetPort: 80
  selector:
    app: myapp
  sessionAffinity: None
  type: ClusterIP
status:
  loadBalancer: {}
To hit the ClusterIP from a pod in the same cluster, let's create a busybox pod:
$ kubectl run busybox -it --image=busybox --restart=Never --rm
If you don't see a command prompt, try pressing enter.
/ # wget -q0 - 10.109.254.145
<!DOCTYPE html>
<html>
<head>
<title>Welcome to nginx!</title>
...
We can also ping to each pod from within via the busybox:
$ kubectl get pods -o wide
NAME                                READY   STATUS    RESTARTS   AGE   IP            NODE
busybox                             1/1     Running   0          5m    172.17.0.11   minikube
nginx-deployment-75675f5897-46dkf   1/1     Running   0          12h   172.17.0.10   minikube
nginx-deployment-75675f5897-gfq9x   1/1     Running   0          12h   172.17.0.9    minikube
nginx-deployment-75675f5897-hc9cx   1/1     Running   0          12h   172.17.0.8    minikube

$ kubectl run busybox -it --image=busybox --restart=Never --rm
If you don't see a command prompt, try pressing enter.

/ # ping 172-17-0-10.default.pod.cluster.local
PING 172-17-0-10.default.pod.cluster.local (172.17.0.10): 56 data bytes
64 bytes from 172.17.0.10: seq=0 ttl=64 time=0.170 ms
...
Note that pods are assigned a DNS A record in the form of pod-ip-address.my-namespace.pod.cluster.local. For example, a pod with IP 1.2.3.4 in the namespace default with a DNS name of cluster.local would have an entry: 1-2-3-4.default.pod.cluster.local.
The ClusterIPs which are virtual-IPs will not change for the life of the services. They are actually used by kube-proxy pods:
$ kubectl get pods -n kube-system
NAME                               READY     STATUS    RESTARTS   AGE
coredns-fb8b8dccf-6bfmc            1/1       Running   0          8h
coredns-fb8b8dccf-b8dj9            1/1       Running   0          8h
etcd-minikube                      1/1       Running   0          8h
kube-addon-manager-minikube        1/1       Running   0          8h
kube-apiserver-minikube            1/1       Running   0          8h
kube-controller-manager-minikube   1/1       Running   0          8h
kube-proxy-fwfd9                   1/1       Running   0          8h
kube-scheduler-minikube            1/1       Running   0          8h
storage-provisioner                1/1       Running   0          8h
Since I am using minikube, I have only one node and so there is only one kube-proxy process which is created via DaemonSet.
What the kube-proxy is doing?
It monitors all the services defined the ClusterIPs, go and look at the buddy Endpoint, look for any change of those, configures IP tables such that any traffic going to one of those ClusterIPs. The Endpoint is randomly load-balanced, and eventually giving access to a single IP that represents the service. All of these is magically done by the kube-proxy which has all the information based on the services and Endpoints.
NodePort service type is basically anybody who talks to any node in the cluster on port 30475 (see the example setup below) actually ends up talking to that service.
For a sample, we'll reuse the deployment definition (deploy_only.yaml) again:
---
apiVersion: apps/v1
kind: Deployment
metadata:
  name: nginx-deployment
  labels:
    app: my-nginx
spec:
  replicas: 3
  selector:
    matchLabels:
      app: myapp
  template:
    metadata:
      labels:
        app: myapp
    spec:
      containers:
      - name: myapp-pod
        image: nginx
        ports:
        - containerPort: 80
$ kubectl apply -f deploy_only.yaml

$ kubectl expose deployment nginx-deployment --type=NodePort --name=NodePort-service --name=nodeport-service
service/nodeport-service exposed

$ kubectl get svc
NAME               TYPE        CLUSTER-IP       EXTERNAL-IP   PORT(S)        AGE
kubernetes         ClusterIP   10.96.0.1        <none>        443/TCP        12h
nodeport-service   NodePort    10.110.218.230   <none>        80:30475/TCP   14s

$ minikube ip
192.168.99.100

$ kubectl get pods -o wide
NAME                               READY     STATUS             RESTARTS   AGE       IP           NODE       NOMINATED NODE   READINESS GATES
nginx-deployment-58fd6f587-kcb9k   1/1       Running            0          3h44m     172.17.0.4   minikube   <none>           <none>
nginx-deployment-58fd6f587-km9q8   1/1       Running            0          3h44m     172.17.0.5   minikube   <none>           <none>
nginx-deployment-58fd6f587-mk9qs   1/1       Running            0          3h44m     172.17.0.6   minikube   <none>           <none>
First, we access our nginx server usual way: Node-IP:nodePort which is 192.168.99.100:30475.
Then, inside the cluster from alpine pod:
$ kubectl run --generator=run-pod/v1 --image=alpine -it my-alpine-shell -- /bin/sh
If you don't see a command prompt, try pressing enter.
/ # apk update
fetch http://dl-cdn.alpinelinux.org/alpine/v3.11/main/x86_64/APKINDEX.tar.gz
fetch http://dl-cdn.alpinelinux.org/alpine/v3.11/community/x86_64/APKINDEX.tar.gz
v3.11.6-10-g3d1aef7a83 [http://dl-cdn.alpinelinux.org/alpine/v3.11/main]
v3.11.6-13-g5da24b5794 [http://dl-cdn.alpinelinux.org/alpine/v3.11/community]
OK: 11270 distinct packages available

/ # apk add curl
(1/4) Installing ca-certificates (20191127-r1)
(2/4) Installing nghttp2-libs (1.40.0-r0)
(3/4) Installing libcurl (7.67.0-r0)
(4/4) Installing curl (7.67.0-r0)
Executing busybox-1.31.1-r9.trigger
Executing ca-certificates-20191127-r1.trigger
OK: 7 MiB in 18 packages
Here are two ways of connecting to the nginx pod within the cluster (in our case from the "alpine" pod):
- Via ClusterIP:
- Via pod IP:
/ # curl 10.110.218.230:80
/ # curl 172.17.0.4:80
Default Kubernetes service type is clusterIP.
But when we create a headless service by setting clusterIP to None, no load-balancing is done and no cluster IP is allocated for this service because we're bypassing the kube-proxy.
Only DNS is automatically configured. So, when we do a DNS query for headless service, we will get the list of the Pods IPs and usually client dns chooses the first DNS record.
The clusterIP service creates a single cluster IP and distribute the traffic between pods. So, if we're going to run multiple pods for a service, it is better to create clusterIP type kubernetes service.
However, if we want to use a single pod like a database server, we can use the headless service instead.
Summary: a headless service returns the IPs of associated pods instead of performing load-balancing. This allows us to interact directly with pods instead of a kube-proxy.
We can create headless service when we specify a Service with .spec.clusterIP set to None and can be utilized with or without selectors.
Here is a sample config for a headless service:
apiVersion: v1
kind: Service
metadata:
  name: sample-headless-service
spec :
  clusterIP: None
  selector:
    app: test-app
  ports:
    - protocol: TCP
      port: 80
      targetPort: 80
So, the "headless" services are different from "normal" services in that they are not assigned a ClusterIP and don't perform load balancing. "Normal" services are assigned a DNS A record for a name of the form your-svc.your-namespace.svc.cluster.local. This name resolves to the cluster IP of the Service. "Headless" services are also assigned a DNS A record for a name of the form your-svc.your-namespace.svc.cluster.local.
However, in contrast to a "normal" service, this name resolves to a set of IPs of the pods selected by the service. The DNS will not resolve this set to a specific IP automatically so the clients should take care of load balancing or round-robin selection from the set.
To make it more clear, let's compare the headless service with normal service.
nginx-deployment.yaml:
apiVersion: apps/v1
kind: Deployment
metadata:
  name: nginx-deployment
  labels:
    app: nginx
spec:
  replicas: 5
  selector:
    matchLabels:
      app: nginx
  template:
    metadata:
      labels:
        app: nginx
    spec:
      containers:
      - name: nginx
        image: stenote/nginx-hostname
Apply the yaml and check the deployment and pods and:
$ kubectl apply -f nginx-deployment.yaml
deployment.apps/nginx-deployment created

$ kubectl get all
NAME                                    READY   STATUS    RESTARTS   AGE
pod/nginx-deployment-77cc95699b-54z5x   1/1     Running   0          20s
pod/nginx-deployment-77cc95699b-6j4q2   1/1     Running   0          20s
pod/nginx-deployment-77cc95699b-hxvrq   1/1     Running   0          20s
pod/nginx-deployment-77cc95699b-jgcd6   1/1     Running   0          20s
pod/nginx-deployment-77cc95699b-k8mzv   1/1     Running   0          20s

NAME                 TYPE        CLUSTER-IP   EXTERNAL-IP   PORT(S)   AGE
service/kubernetes   ClusterIP   10.96.0.1    <none>        443/TCP   8h

NAME                               READY   UP-TO-DATE   AVAILABLE   AGE
deployment.apps/nginx-deployment   5/5     5            5           20s

NAME                                          DESIRED   CURRENT   READY   AGE
replicaset.apps/nginx-deployment-77cc95699b   5         5         5       20s
Create both of the service (normal vs headless).
normal-service.yaml
apiVersion: v1
kind: Service
metadata:
  name: normal-service
spec:
  selector:
    app: nginx
  ports:
    - protocol: TCP
      port: 80
      targetPort: 80
headless-service.yaml
apiVersion: v1
kind: Service
metadata:
  name: headless-service
spec:
  clusterIP: None
  selector:
    app: nginx
  ports:  # Actually, no port is needed.
    - protocol: TCP
      port: 80
      targetPort: 80
Using the two config files for the services, let's expose them:
$ kubectl apply -f normal-service.yaml
service/normal-service created

$ kubectl apply -f headless-service.yaml
service/headless-service created

$ kubectl get all
NAME                                    READY   STATUS    RESTARTS   AGE
pod/nginx-deployment-77cc95699b-9t5q8   1/1     Running   0          58s
pod/nginx-deployment-77cc95699b-cwnzm   1/1     Running   0          58s
pod/nginx-deployment-77cc95699b-ks8nd   1/1     Running   0          58s
pod/nginx-deployment-77cc95699b-qdlsk   1/1     Running   0          58s
pod/nginx-deployment-77cc95699b-x5zkg   1/1     Running   0          58s

NAME                       TYPE        CLUSTER-IP       EXTERNAL-IP   PORT(S)   AGE
service/headless-service   ClusterIP   None             <none>        80/TCP    13s
service/kubernetes         ClusterIP   10.96.0.1        <none>        443/TCP   8h
service/normal-service     ClusterIP   10.110.178.226   <none>        80/TCP    7s

NAME                               READY   UP-TO-DATE   AVAILABLE   AGE
deployment.apps/nginx-deployment   5/5     5            5           58s

NAME                                          DESIRED   CURRENT   READY   AGE
replicaset.apps/nginx-deployment-77cc95699b   5         5         5       58s
Note that we used "stenote/nginx-hostname" image to get hostname of the each pod in http response.
To test our case we need to do DNS queries and issue curl command. "dockerbogo/utils" contains all the tools we need.
At nslookup on the "headless-service", the list of associated Pod IPs with the service DNS returned. At host, the query returns Pods IP list:
$ kubectl run --generator=run-pod/v1 --rm utils -it --image dockerbogo/utils bash
root@utils:/#
root@utils:/# nslookup normal-service
Server:		10.96.0.10
Address:	10.96.0.10#53

Name:	normal-service.default.svc.cluster.local
Address: 10.110.178.226

root@utils:/# nslookup headless-service
Server:		10.96.0.10
Address:	10.96.0.10#53

Name:	headless-service.default.svc.cluster.local
Address: 172.18.0.8
Name:	headless-service.default.svc.cluster.local
Address: 172.18.0.9
Name:	headless-service.default.svc.cluster.local
Address: 172.18.0.5
Name:	headless-service.default.svc.cluster.local
Address: 172.18.0.7
Name:	headless-service.default.svc.cluster.local
Address: 172.18.0.6

root@utils:/# host normal-service
normal-service.default.svc.cluster.local has address 10.110.178.226

root@utils:/# host headless-service
headless-service.default.svc.cluster.local has address 172.18.0.5
headless-service.default.svc.cluster.local has address 172.18.0.7
headless-service.default.svc.cluster.local has address 172.18.0.8
headless-service.default.svc.cluster.local has address 172.18.0.9
headless-service.default.svc.cluster.local has address 172.18.0.6
The nslookup on the normal-service shows one DNS entry (normal-service.default.svc.cluster.local) and one IP is returned.
But for headless-service (without a cluster IP),
it returns the list of associated Pod IPs with a service DNS (headless-service.default.svc.cluster.local).
So, unlike normal services, with the headless services, the clients are expected to consume the set
or else use standard round-robin selection from the set.
Though we do not see the differences from the following output, let's check the response to curl:
root@utils:/# for i in {1..10};do curl normal-service;done
nginx-deployment-77cc95699b-x5zkg
nginx-deployment-77cc95699b-cwnzm
nginx-deployment-77cc95699b-cwnzm
nginx-deployment-77cc95699b-qdlsk
nginx-deployment-77cc95699b-9t5q8
nginx-deployment-77cc95699b-9t5q8
nginx-deployment-77cc95699b-qdlsk
nginx-deployment-77cc95699b-9t5q8
nginx-deployment-77cc95699b-cwnzm
nginx-deployment-77cc95699b-9t5q8

root@utils:/# for i in {1..10};do curl headless-service;done
nginx-deployment-77cc95699b-9t5q8
nginx-deployment-77cc95699b-cwnzm
nginx-deployment-77cc95699b-ks8nd
nginx-deployment-77cc95699b-ks8nd
nginx-deployment-77cc95699b-ks8nd
nginx-deployment-77cc95699b-9t5q8
nginx-deployment-77cc95699b-x5zkg
nginx-deployment-77cc95699b-x5zkg
nginx-deployment-77cc95699b-x5zkg
nginx-deployment-77cc95699b-9t5q8
Clean up:
$ kubectl delete -f nginx-deployment.yaml && \
kubectl delete -f headless-service.yaml && \
kubectl delete -f normal-service.yaml
deployment.apps "nginx-deployment" deleted
service "headless-service" deleted
service "normal-service" deleted

$ kubectl get all
NAME                 TYPE        CLUSTER-IP   EXTERNAL-IP   PORT(S)   AGE
service/kubernetes   ClusterIP   10.96.0.1    <none>        443/TCP   7h2m
The headless service is often used when a deployer wants to decouple their service from Kubernetes and use an alternative method of service discovery and load balancing.
We may choose to use the headless service combined with running the application as a StatefulSet as shown in this post: Deploy Elastic Stack via Helm on minikube where the Elasticsearch will handle the service discovery.
As another real world example, when we deploy HashCorp's Consul, we're using a StatefulSet and a Headless Service: Docker & Kubernetes : HashiCorp's Vault and Consul on minikube
SRV records facilitate service discovery by describing the protocols and address of certain services.
An SRV record usually defines a symbolic name and the transport protocol (e.g., TCP) used as part of the domain name and defines the priority, weight, port, and target for a given service as shown in the example below:
_sip._tcp.mysite.com.   3600 IN    SRV 10       60     3379 srvrecord.mysite.com.
_sip._tcp.mysite.com.   3600 IN    SRV 10       30     3379 srvrecord2.mysite.com.
In the example above, _sip is the service's symbolic name and _tcp is the transport protocol used by the service. The record's content defines a priority of 10 for both records. Additionally, the first record has a weight of 60 and the second one has a weight of 30. The priority and weight are often used to encourage the use of certain servers over others. The final two values in the record define the port and hostname to connect to in order to communicate with the service.
In Kubernetes, SRV Records are created for named ports that are part of a "normal" or "headless" service.
The SRV record takes the form of _my-port-name._my-port-protocol.my-svc.my-namespace.svc.cluster.local. For a regular service, this resolves to the port number and the domain name: my-svc.my-namespace.svc.cluster.local. In case of a "headless" service, this name resolves to multiple answers, one for each pod backing the service. Each answer contains the port number and the domain name of the pod of the form auto-generated-name.my-svc.my-namespace.svc.cluster.local.
Refs: Exposing Kubernetes Applications, Part 1: Service and Ingress Resources
Docker & K8s
- Docker install on Amazon Linux AMI
- Docker install on EC2 Ubuntu 14.04
- Docker container vs Virtual Machine
- Docker install on Ubuntu 14.04
- Docker Hello World Application
- Nginx image - share/copy files, Dockerfile
- Working with Docker images : brief introduction
- Docker image and container via docker commands (search, pull, run, ps, restart, attach, and rm)
- More on docker run command (docker run -it, docker run --rm, etc.)
- Docker Networks - Bridge Driver Network
- Docker Persistent Storage
- File sharing between host and container (docker run -d -p -v)
- Linking containers and volume for datastore
- Dockerfile - Build Docker images automatically I - FROM, MAINTAINER, and build context
- Dockerfile - Build Docker images automatically II - revisiting FROM, MAINTAINER, build context, and caching
- Dockerfile - Build Docker images automatically III - RUN
- Dockerfile - Build Docker images automatically IV - CMD
- Dockerfile - Build Docker images automatically V - WORKDIR, ENV, ADD, and ENTRYPOINT
- Docker - Apache Tomcat
- Docker - NodeJS
- Docker - NodeJS with hostname
- Docker Compose - NodeJS with MongoDB
- Docker - Prometheus and Grafana with Docker-compose
- Docker - StatsD/Graphite/Grafana
- Docker - Deploying a Java EE JBoss/WildFly Application on AWS Elastic Beanstalk Using Docker Containers
- Docker : NodeJS with GCP Kubernetes Engine
- Docker : Jenkins Multibranch Pipeline with Jenkinsfile and Github
- Docker : Jenkins Master and Slave
- Docker - ELK : ElasticSearch, Logstash, and Kibana
- Docker - ELK 7.6 : Elasticsearch on Centos 7
- Docker - ELK 7.6 : Filebeat on Centos 7
- Docker - ELK 7.6 : Logstash on Centos 7
- Docker - ELK 7.6 : Kibana on Centos 7
- Docker - ELK 7.6 : Elastic Stack with Docker Compose
- Docker - Deploy Elastic Cloud on Kubernetes (ECK) via Elasticsearch operator on minikube
- Docker - Deploy Elastic Stack via Helm on minikube
- Docker Compose - A gentle introduction with WordPress
- Docker Compose - MySQL
- MEAN Stack app on Docker containers : micro services
- MEAN Stack app on Docker containers : micro services via docker-compose
- Docker Compose - Hashicorp's Vault and Consul Part A (install vault, unsealing, static secrets, and policies)
- Docker Compose - Hashicorp's Vault and Consul Part B (EaaS, dynamic secrets, leases, and revocation)
- Docker Compose - Hashicorp's Vault and Consul Part C (Consul)
- Docker Compose with two containers - Flask REST API service container and an Apache server container
- Docker compose : Nginx reverse proxy with multiple containers
- Docker & Kubernetes : Envoy - Getting started
- Docker & Kubernetes : Envoy - Front Proxy
- Docker & Kubernetes : Ambassador - Envoy API Gateway on Kubernetes
- Docker Packer
- Docker Cheat Sheet
- Docker Q & A #1
- Kubernetes Q & A - Part I
- Kubernetes Q & A - Part II
- Docker - Run a React app in a docker
- Docker - Run a React app in a docker II (snapshot app with nginx)
- Docker - NodeJS and MySQL app with React in a docker
- Docker - Step by Step NodeJS and MySQL app with React - I
- Installing LAMP via puppet on Docker
- Docker install via Puppet
- Nginx Docker install via Ansible
- Apache Hadoop CDH 5.8 Install with QuickStarts Docker
- Docker - Deploying Flask app to ECS
- Docker Compose - Deploying WordPress to AWS
- Docker - WordPress Deploy to ECS with Docker-Compose (ECS-CLI EC2 type)
- Docker - WordPress Deploy to ECS with Docker-Compose (ECS-CLI Fargate type)
- Docker - ECS Fargate
- Docker - AWS ECS service discovery with Flask and Redis
- Docker & Kubernetes : minikube
- Docker & Kubernetes 2 : minikube Django with Postgres - persistent volume
- Docker & Kubernetes 3 : minikube Django with Redis and Celery
- Docker & Kubernetes 4 : Django with RDS via AWS Kops
- Docker & Kubernetes : Kops on AWS
- Docker & Kubernetes : Ingress controller on AWS with Kops
- Docker & Kubernetes : HashiCorp's Vault and Consul on minikube
- Docker & Kubernetes : HashiCorp's Vault and Consul - Auto-unseal using Transit Secrets Engine
- Docker & Kubernetes : Persistent Volumes & Persistent Volumes Claims - hostPath and annotations
- Docker & Kubernetes : Persistent Volumes - Dynamic volume provisioning
- Docker & Kubernetes : DaemonSet
- Docker & Kubernetes : Secrets
- Docker & Kubernetes : kubectl command
- Docker & Kubernetes : Assign a Kubernetes Pod to a particular node in a Kubernetes cluster
- Docker & Kubernetes : Configure a Pod to Use a ConfigMap
- AWS : EKS (Elastic Container Service for Kubernetes)
- Docker & Kubernetes : Run a React app in a minikube
- Docker & Kubernetes : Minikube install on AWS EC2
- Docker & Kubernetes : Cassandra with a StatefulSet
- Docker & Kubernetes : Terraform and AWS EKS
- Docker & Kubernetes : Pods and Service definitions
- Docker & Kubernetes : Service IP and the Service Type
- Docker & Kubernetes : Kubernetes DNS with Pods and Services
- Docker & Kubernetes : Headless service and discovering pods
- Docker & Kubernetes : Scaling and Updating application
- Docker & Kubernetes : Horizontal pod autoscaler on minikubes
- Docker & Kubernetes : From a monolithic app to micro services on GCP Kubernetes
- Docker & Kubernetes : Rolling updates
- Docker & Kubernetes : Deployments to GKE (Rolling update, Canary and Blue-green deployments)
- Docker & Kubernetes : Slack Chat Bot with NodeJS on GCP Kubernetes
- Docker & Kubernetes : Continuous Delivery with Jenkins Multibranch Pipeline for Dev, Canary, and Production Environments on GCP Kubernetes
- Docker & Kubernetes : NodePort vs LoadBalancer vs Ingress
- Docker & Kubernetes : MongoDB / MongoExpress on Minikube
- Docker & Kubernetes : Load Testing with Locust on GCP Kubernetes
- Docker & Kubernetes : MongoDB with StatefulSets on GCP Kubernetes Engine
- Docker & Kubernetes : Nginx Ingress Controller on Minikube
- Docker & Kubernetes : Setting up Ingress with NGINX Controller on Minikube (Mac)
- Docker & Kubernetes : Nginx Ingress Controller for Dashboard service on Minikube
- Docker & Kubernetes : Nginx Ingress Controller on GCP Kubernetes
- Docker & Kubernetes : Kubernetes Ingress with AWS ALB Ingress Controller in EKS
- Docker & Kubernetes : Setting up a private cluster on GCP Kubernetes
- Docker & Kubernetes : Kubernetes Namespaces (default, kube-public, kube-system) and switching namespaces (kubens)
- Docker & Kubernetes : StatefulSets on minikube
- Docker & Kubernetes : RBAC
- Docker & Kubernetes Service Account, RBAC, and IAM
- Docker & Kubernetes - Kubernetes Service Account, RBAC, IAM with EKS ALB, Part 1
- Docker & Kubernetes : Helm Chart
- Docker & Kubernetes : My first Helm deploy
- Docker & Kubernetes : Readiness and Liveness Probes
- Docker & Kubernetes : Helm chart repository with Github pages
- Docker & Kubernetes : Deploying WordPress and MariaDB with Ingress to Minikube using Helm Chart
- Docker & Kubernetes : Deploying WordPress and MariaDB to AWS using Helm 2 Chart
- Docker & Kubernetes : Deploying WordPress and MariaDB to AWS using Helm 3 Chart
- Docker & Kubernetes : Helm Chart for Node/Express and MySQL with Ingress
- Docker & Kubernetes : Deploy Prometheus and Grafana using Helm and Prometheus Operator - Monitoring Kubernetes node resources out of the box
- Docker & Kubernetes : Deploy Prometheus and Grafana using kube-prometheus-stack Helm Chart
- Docker & Kubernetes : Istio (service mesh) sidecar proxy on GCP Kubernetes
- Docker & Kubernetes : Istio on EKS
- Docker & Kubernetes : Istio on Minikube with AWS EC2 for Bookinfo Application
- Docker & Kubernetes : Deploying .NET Core app to Kubernetes Engine and configuring its traffic managed by Istio (Part I)
- Docker & Kubernetes : Deploying .NET Core app to Kubernetes Engine and configuring its traffic managed by Istio (Part II - Prometheus, Grafana, pin a service, split traffic, and inject faults)
- Docker & Kubernetes : Helm Package Manager with MySQL on GCP Kubernetes Engine
- Docker & Kubernetes : Deploying Memcached on Kubernetes Engine
- Docker & Kubernetes : EKS Control Plane (API server) Metrics with Prometheus
- Docker & Kubernetes : Spinnaker on EKS with Halyard
- Docker & Kubernetes : Continuous Delivery Pipelines with Spinnaker and Kubernetes Engine
- Docker & Kubernetes : Multi-node Local Kubernetes cluster : Kubeadm-dind (docker-in-docker)
- Docker & Kubernetes : Multi-node Local Kubernetes cluster : Kubeadm-kind (k8s-in-docker)
- Docker & Kubernetes : nodeSelector, nodeAffinity, taints/tolerations, pod affinity and anti-affinity - Assigning Pods to Nodes
- Docker & Kubernetes : Jenkins-X on EKS
- Docker & Kubernetes : ArgoCD App of Apps with Heml on Kubernetes
- Docker & Kubernetes : ArgoCD on Kubernetes cluster
- Docker & Kubernetes : GitOps with ArgoCD for Continuous Delivery to Kubernetes clusters (minikube) - guestbook
Ph.D. / Golden Gate Ave, San Francisco / Seoul National Univ / Carnegie Mellon / UC Berkeley / DevOps / Deep Learning / Visualization